《如何获得完全松耦合的程序设计》
IoC原则、DIP原则、DI设计模式可以帮助我们获得完全松耦合的程序设计。而Dagger2则是实现了依赖注入(DI)设计模式的框架,也就是它实现了IoC原则。
简而言之,Dagger2在遵循IoC原则下帮助我们创建依赖对象。我大概讲一下DI设计模式:比说A类依赖B类,那么我们通过在A类外面创建B类的对象,再将其注入A类。需要有个第三方帮我们把这件事做了(IoC的体现),那么Dagger2就是这个第三方。
Dagger2是基于java规范要求,使用注解的方式生成代码。我们通过定义一些必要的部分,然后在编译时,Dagger2框架会使用我们定义的部分,去将这个“第三方”生成出来。
为了更好地讨论Dagger2我们先来了解一下Dagger2的相关术语:
- Provider(提供者):
@Module注解的类。负责提供注入的对象。 - Consumer(消费者):
@Inject用于定义依赖。 - Connector(连接器):
@Component注解的接口,这个接口定义了provider和consumer的连接。
我们通过一个例子来说明它的定义过程,及相关注解的使用。
如我们想使用Dagger2的技术,完成MainActivity类中context对象的创建。那么我们该如何做呢?
step1:定义Module
每一个module都以Module结尾,它是注入对象的提供者,必须用@Module注解,等会就是由AppModule提供context对象的。
@Module
public class AppModule { private Application application; public AppModule(Application application) { this.application = application; } @Provides @Singleton public Context provideContext() { return application; }
}
- 1
- 2
- 3
- 4
- 5
- 6
- 7
- 8
- 9
- 10
- 11
- 12
- 13
- 14
- 15
在提供注入对象的方法上必须使用@Provides,而@Singleton则表明注入的对象只初始化一次,是一个单例。
step2:定义Component
每一个Component都以Component结尾,它是一个接口,必须用@Component注解。它定义了注入对象提供者与消费者之间的关系。在这里就是注入对象提供者是AppModule,而注入的对象的消费者是MainActivity
@Singleton
@Component(modules = {AppModule.class})
public interface AppComponent { void inject(MainActivity target);
}
- 1
- 2
- 3
- 4
- 5
step3:在Application里初始化AppComponent实例
DaggerAppComponent实现了AppComponent接口,一开始它是不存在的,所以做一步之前,先build编译一下,这个类就会被生成出来。
private AppComponent component; @Override public void onCreate() { super.onCreate(); //needs to run once to generate it component = DaggerAppComponent.builder() .appModule(new AppModule(this)) .build(); } public AppComponent getComponent() { return component; }
- 1
- 2
- 3
- 4
- 5
- 6
- 7
- 8
- 9
- 10
- 11
- 12
- 13
- 14
- 15
- 16
- 17
step4:在消费者里使用@Inject注入对象
public class MainActivity extends AppCompatActivity {
	// 注入点 @Inject Context context; @Override protected void onCreate(Bundle savedInstanceState) { super.onCreate(savedInstanceState); setContentView(R.layout.activity_main); // 向AppComponent接口实例的inject方法传入当前对象,那么Dagger2就会把帮我们把对象注入到当前对象来 ((App) getApplication()).getComponent().inject(this); }
}
- 1
- 2
- 3
- 4
- 5
- 6
- 7
- 8
- 9
- 10
- 11
- 12
- 13
- 14
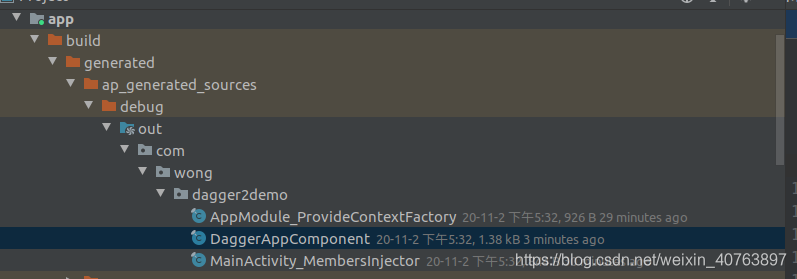
当我们配置了上面这些必要部分后,biuld编译时,Dagger2会把这个“第三方”的所有代码给生成出来。如:

DaggerAppComponent.java:
// Generated by Dagger (https://google.github.io/dagger).
package com.wong.dagger2demo;

import android.content.Context;
import dagger.internal.DoubleCheck;
import dagger.internal.Preconditions;
import javax.inject.Provider;

public final class DaggerAppComponent implements AppComponent {
  private Provider<Context> provideContextProvider; private DaggerAppComponent(Builder builder) { initialize(builder);
  } public static Builder builder() { return new Builder();
  } @SuppressWarnings("unchecked")
  private void initialize(final Builder builder) { this.provideContextProvider = DoubleCheck.provider(AppModule_ProvideContextFactory.create(builder.appModule));
  } @Override
  public void inject(MainActivity target) { injectMainActivity(target);
  } private MainActivity injectMainActivity(MainActivity instance) { MainActivity_MembersInjector.injectContext(instance, provideContextProvider.get()); return instance;
  } public static final class Builder { private AppModule appModule; private Builder() {} public AppComponent build() { Preconditions.checkBuilderRequirement(appModule, AppModule.class); return new DaggerAppComponent(this); } public Builder appModule(AppModule appModule) { this.appModule = Preconditions.checkNotNull(appModule); return this; }
  }
}
- 1
- 2
- 3
- 4
- 5
- 6
- 7
- 8
- 9
- 10
- 11
- 12
- 13
- 14
- 15
- 16
- 17
- 18
- 19
- 20
- 21
- 22
- 23
- 24
- 25
- 26
- 27
- 28
- 29
- 30
- 31
- 32
- 33
- 34
- 35
- 36
- 37
- 38
- 39
- 40
- 41
- 42
- 43
- 44
- 45
- 46
- 47
- 48
- 49
- 50
- 51
- 52
- 53
AppModule_ProvideContextFactory.java:
// Generated by Dagger (https://google.github.io/dagger).
package com.wong.dagger2demo;

import android.content.Context;
import dagger.internal.Factory;
import dagger.internal.Preconditions;

public final class AppModule_ProvideContextFactory implements Factory<Context> {
  private final AppModule module; public AppModule_ProvideContextFactory(AppModule module) { this.module = module;
  } @Override
  public Context get() { return provideInstance(module);
  } public static Context provideInstance(AppModule module) { return proxyProvideContext(module);
  } public static AppModule_ProvideContextFactory create(AppModule module) { return new AppModule_ProvideContextFactory(module);
  } public static Context proxyProvideContext(AppModule instance) { return Preconditions.checkNotNull( instance.provideContext(), "Cannot return null from a non-@Nullable @Provides method");
  }
}
- 1
- 2
- 3
- 4
- 5
- 6
- 7
- 8
- 9
- 10
- 11
- 12
- 13
- 14
- 15
- 16
- 17
- 18
- 19
- 20
- 21
- 22
- 23
- 24
- 25
- 26
- 27
- 28
- 29
- 30
- 31
- 32
- 33
MainActivity_MembersInjector.java:
// Generated by Dagger (https://google.github.io/dagger).
package com.wong.dagger2demo;

import android.content.Context;
import dagger.MembersInjector;
import javax.inject.Provider;

public final class MainActivity_MembersInjector implements MembersInjector<MainActivity> {
  private final Provider<Context> contextProvider; public MainActivity_MembersInjector(Provider<Context> contextProvider) { this.contextProvider = contextProvider;
  } public static MembersInjector<MainActivity> create(Provider<Context> contextProvider) { return new MainActivity_MembersInjector(contextProvider);
  } @Override
  public void injectMembers(MainActivity instance) { injectContext(instance, contextProvider.get());
  } public static void injectContext(MainActivity instance, Context context) { instance.context = context;
  }
}
- 1
- 2
- 3
- 4
- 5
- 6
- 7
- 8
- 9
- 10
- 11
- 12
- 13
- 14
- 15
- 16
- 17
- 18
- 19
- 20
- 21
- 22
- 23
- 24
- 25
- 26
- 27
- 28
如果我们再添加需要注入的字段:
@Module
public class AppModule { private Application application; public AppModule(Application application) { this.application = application; } @Provides @Singleton public Context provideContext() { return application; } @Provides public String provideName(){ return "Hello world"; }
}
public class MainActivity extends AppCompatActivity { @Inject Context context; @Inject String name; @Override protected void onCreate(Bundle savedInstanceState) { super.onCreate(savedInstanceState); setContentView(R.layout.activity_main); ((App) getApplication()).getComponent().inject(this); }
}
- 1
- 2
- 3
- 4
- 5
- 6
- 7
- 8
- 9
- 10
- 11
- 12
- 13
- 14
- 15
- 16
- 17
- 18
- 19
- 20
- 21
- 22
- 23
- 24
- 25
- 26
- 27
- 28
- 29
- 30
- 31
- 32
- 33
再次编译得到:

由此可以看出Dagger2会为每个注入的对象生成一个工厂类。
文章来源: blog.csdn.net,作者:WongKyunban,版权归原作者所有,如需转载,请联系作者。
原文链接:blog.csdn.net/weixin_40763897/article/details/109448649