写在前面
- 负载这一块的知识有些乱, 听人家常说
软负载、硬负载,四层负载,七层负载、客户端负载,服务端负载之类的,所以梳理一下。 - 负载均衡在系统架构中是一个非常重要,通过负载均衡可以提高系统的高可用,缓解网络、硬件资源的限制。
- 博文主要涉及一些项目中常用的负载方式,很浅,不涉及负载算法啥的,做负载离不来代理,所以文中提到代理服务器即负载服务器。
- 这里梳理的方式从
Dev和Ops的概念出发。这里简单分类一下:软负载客户端负载Spring Cloud Ribbon
服务端负载Ngixn(4-7)层负载Hyproxy(4-7)层负载LVS(4)层负载kube-proxy(4-7)层负载
硬负载F5
关于 LVS和kube-proxy、F5我们这里之后在和小伙伴分享,F5没有接触过,LVS的demo容器的方式一直没有成功,kube-proxy这一块我还没学到,只是简单的了解.
如果能深刻理解苦难,苦难就会给人带来崇高感 。 ——路遥
一、软负载
处理传输层到应用层的数据,为了能通一个URL将前端的访问分发到后台的多个服务器上
1、客户端负载
Dev 即开发角度的负载均衡。开发中的负载均衡一般是在微服务中涉及。服务提供方一般以多实例的形式提供服务,负载均衡功能能够让服务调用方连接到合适的服务节点。 并且,服务节点选择的过程对服务调用方来说是透明的。
所以这里理解为是客户端的负载均衡,是相对服务端负载均衡而言。
客户端负载均衡来讲,就是调用的客户端本身是知道所有服务信息,当需要调用服务上的接口的时候,客户端从自身所维护的服务列表中,根据提前配置好的负载均衡策略,自己挑选一个服务来调用,此时,客户端知道它所调用的是哪一个服务.
在Spring Cloud 中使用在RestTemplate进行服务调用,要想使用负载均衡功能,需要使用Spring Cloud Ribbon。
Spring Cloud Ribbon是一个基于HTTP和TCP的客户端负载均衡工具,它基于Nettlix Ribbon实现。通过Spring Cloud的封装,可以让我们轻松地将面向服务的REST模板请求自动转换成客户端负载均衡的服务调用。
使用时需要给RestTemplate实例上添加一个@LoadBalanced注解即可,此时, RestTemplate就会自动具备负载均衡功能,这个负载均衡就是客户端负载均衡。
package com.liruilong.consulcon;

import org.springframework.boot.SpringApplication;
import org.springframework.boot.autoconfigure.SpringBootApplication;
import org.springframework.cloud.client.discovery.EnableDiscoveryClient;
import org.springframework.context.annotation.Bean;
import org.springframework.web.client.RestTemplate;

@SpringBootApplication
@EnableDiscoveryClient
public class ConsulConApplication {

    public static void main(String[] args) {
        SpringApplication.run(ConsulConApplication.class, args);
    }

    @Bean
    @LoadBalanced
    RestTemplate restTemplate(){
        return  new RestTemplate();
    }

}
二、服务端负载
Ops 即运维角度的负载均衡,这里的负载我们也称为服务端负载
所谓服务端负载均衡,比如传统的Nginx的方式,调用的客户端并不知道具体是哪个服务提供的服务,它也不关心,反正请求发送给Nginx, 或者hyproxy作为代理的服务器,然后 Ngixn 在请求负载任意服务,客户端只需要记着Nginx的地址即可。
1、Nginx负载
七层(应用层)负载
Nginx 7层负载是最常见的一种负载,所谓7层负载,即应用层负载,即基于应用层协议(TELNET,SSH,HTTP,SMTP,POP…)做的代理,7层负载需要解析数据包的具体内容,需要消耗额外的cpu,然后根据具体内容(url, 参数, cookie, 请求头)匹配相应的路径,然后转发到相应的服务器。转发的过程是:建立和目标机器的连接,然后转发请求,收到响应数据在转发给请求客户端。
使用docker构建一个内部网络
┌──[root@liruilongs.github.io]-[~]
└─$ docker network create --subnet 10.1.1.1/24 load_balancing
0e0cdf9c70b038f9bcd44fd282ddc3e5bff77403ca28ce5b9006c20793ae2f8d
内网里运行两个httpd服务
10.1.1.22
┌──[root@liruilongs.github.io]-[~/load_balancing]
└─$ docker run -itd  --name=web1 --net=load_balancing -p 80  -h web1 --ip 10.1.1.22 httpd
ccaa091f295d40c61e50f103e9d84b86caddf9f98d6e5075de3690d93ab48f70
┌──[root@liruilongs.github.io]-[~/load_balancing]
└─$ echo 10.1.1.22 >index.html;cat index.html
10.1.1.22
┌──[root@liruilongs.github.io]-[~/load_balancing]
└─$ docker cp ./index.html web1:/usr/local/apache2/htdocs/
┌──[root@liruilongs.github.io]-[~/load_balancing]
└─$ docker ps
CONTAINER ID   IMAGE     COMMAND              CREATED          STATUS          PORTS                                     NAMES
ccaa091f295d   httpd     "httpd-foreground"   29 seconds ago   Up 28 seconds   0.0.0.0:49153->80/tcp, :::49153->80/tcp   web1
┌──[root@liruilongs.github.io]-[~/load_balancing]
└─$ curl 127.0.0.1:49153
10.1.1.22
┌──[root@liruilongs.github.io]-[~/load_balancing]
└─$
10.1.1.33
┌──[root@liruilongs.github.io]-[~/load_balancing]
└─$ docker run -itd  --name=web2 --net=load_balancing -p 80  -h web2 --ip 10.1.1.33 httpd
5b08d54cf4983f6f6ce69cc0cee4b2eab2684cfde8deee89796196760924e434
┌──[root@liruilongs.github.io]-[~/load_balancing]
└─$  echo 10.1.1.33 >index.html;cat index.html
10.1.1.33
┌──[root@liruilongs.github.io]-[~/load_balancing]
└─$ docker cp ./index.html web2:/usr/local/apache2/htdocs/
┌──[root@liruilongs.github.io]-[~/load_balancing]
└─$ docker ps
CONTAINER ID   IMAGE     COMMAND              CREATED          STATUS          PORTS                                     NAMES
5b08d54cf498   httpd     "httpd-foreground"   40 seconds ago   Up 38 seconds   0.0.0.0:49154->80/tcp, :::49154->80/tcp   web2
ccaa091f295d   httpd     "httpd-foreground"   6 minutes ago    Up 6 minutes    0.0.0.0:49153->80/tcp, :::49153->80/tcp   web1
┌──[root@liruilongs.github.io]-[~/load_balancing]
└─$  curl 127.0.0.1:49154
10.1.1.33
┌──[root@liruilongs.github.io]-[~/load_balancing]
└─$
Ngixn实现到上面两个httpd服务的负载
| ng配置文件 |
|---|
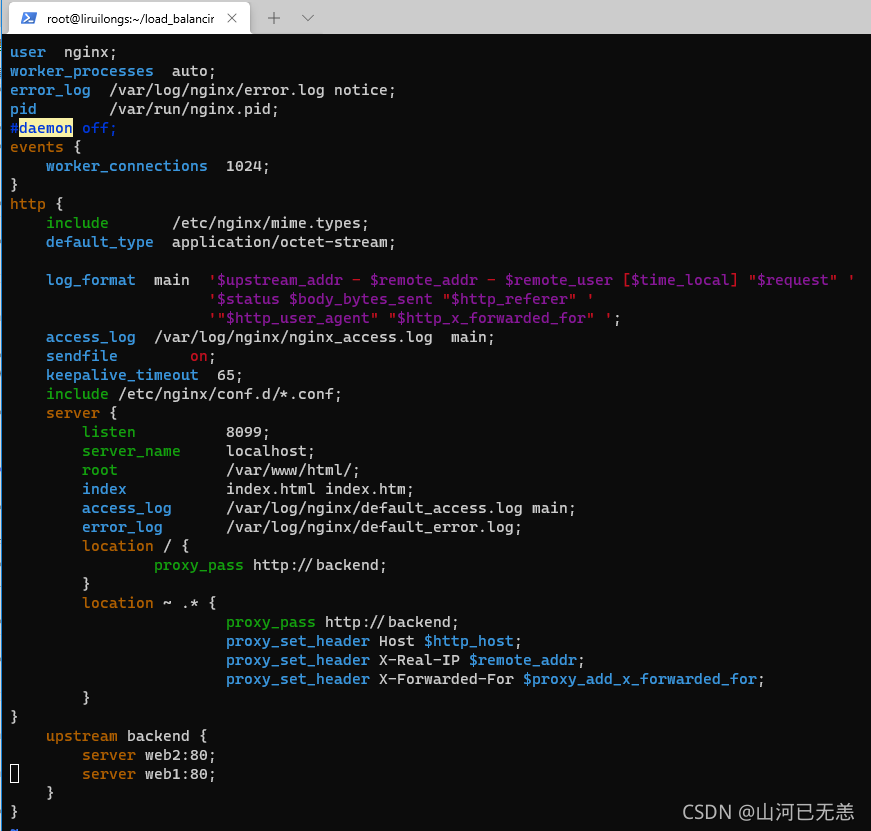 |
┌──[root@liruilongs.github.io]-[~/load_balancing]
└─$ cat nginx.conf
user  nginx;
worker_processes  auto;
error_log  /var/log/nginx/error.log notice;
pid        /var/run/nginx.pid;
#daemon off;
events {
    worker_connections  1024;
}
http {
    include       /etc/nginx/mime.types;
    default_type  application/octet-stream;

    log_format  main  '$upstream_addr - $remote_addr - $remote_user [$time_local] "$request" '
                      '$status $body_bytes_sent "$http_referer" '
                      '"$http_user_agent" "$http_x_forwarded_for" ';
    access_log  /var/log/nginx/nginx_access.log  main;
    sendfile        on;
    keepalive_timeout  65;
    include /etc/nginx/conf.d/*.conf;
    server {
        listen          8099;
        server_name     localhost;
        root            /var/www/html/;
        index           index.html index.htm;
        access_log      /var/log/nginx/default_access.log main;
        error_log       /var/log/nginx/default_error.log;
        location / {
                proxy_pass http://backend;
        }
        location ~ .* {
                        proxy_pass http://backend;
                        proxy_set_header Host $http_host;
                        proxy_set_header X-Real-IP $remote_addr;
                        proxy_set_header X-Forwarded-For $proxy_add_x_forwarded_for;
        }
}
    upstream backend {
        server web2:80;
        server web1:80;
    }
}
运行Nginx容器
┌──[root@liruilongs.github.io]-[~/load_balancing]
└─$ docker run -itd -p 8099:8099 --name=nginx --network=load_balancing  -v $PWD/nginx.conf:/etc/nginx/nginx.conf nginx
0af20ed5c390e81398037a498fc7d385cac96cd2f403a8b08f6f4e09d7a20ee0
测试一下
┌──[root@liruilongs.github.io]-[~/load_balancing]
└─$ docker ps
CONTAINER ID   IMAGE     COMMAND                  CREATED          STATUS          PORTS                                               NAMES
0af20ed5c390   nginx     "/docker-entrypoint.…"   4 seconds ago    Up 3 seconds    80/tcp, 0.0.0.0:8099->8099/tcp, :::8099->8099/tcp   nginx
b16bcb89e0a8   httpd     "httpd-foreground"       32 minutes ago   Up 32 minutes   0.0.0.0:49155->80/tcp, :::49155->80/tcp             web1
5b08d54cf498   httpd     "httpd-foreground"       39 minutes ago   Up 39 minutes   0.0.0.0:49154->80/tcp, :::49154->80/tcp             web2
┌──[root@liruilongs.github.io]-[~/load_balancing]
└─$ curl 127.0.0.1:8099
10.1.1.33
┌──[root@liruilongs.github.io]-[~/load_balancing]
└─$ curl 127.0.0.1:8099
10.1.1.22
┌──[root@liruilongs.github.io]-[~/load_balancing]
└─$
四层(传输层)负载
所谓四层负载,即在传输层协议的基础上来做负载,基于TCP,UDP等协议,传输层的作用是确保数据被可靠的传输送到目标地址,能够让应用程序之间实现通信,所以彼此传递的是数据包,标识的只有IP+端口。不涉及具体的url其他结构解析。路径匹配等,不会涉及具体的应用层协议,所以理论上四层负载要比七成负载快。
nginx 四层代理是nginx1.9.0开始新增的功能,需要开启--with-stream模块,可以实现四层协议的转发、代理、负载等功能。
这里的话,我们还是用容器的方式。配置方式和七层主要是配置文件的区别
| ng配置文件 |
|---|
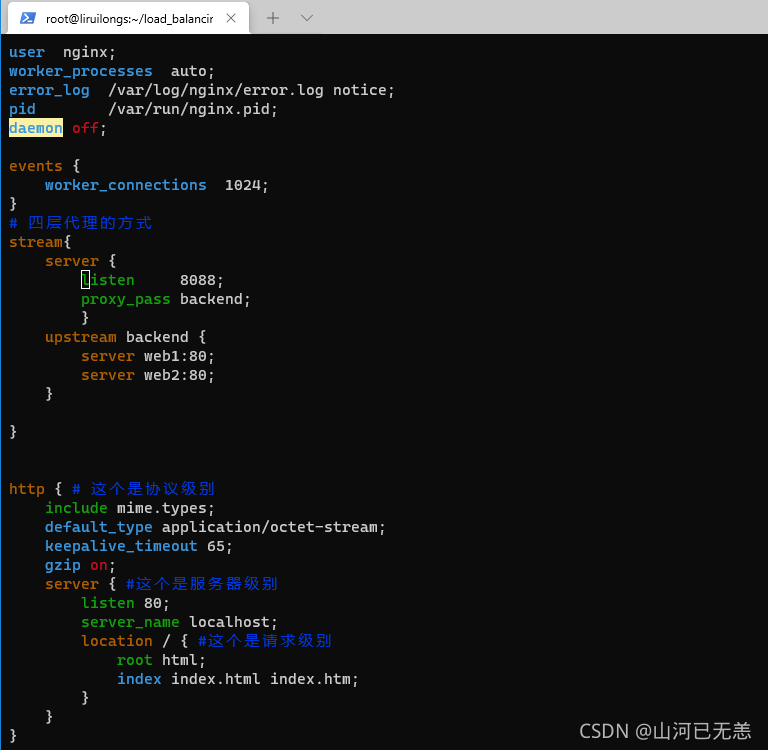 |
└─$ cat nginx.conf
user  nginx;
worker_processes  auto;
error_log  /var/log/nginx/error.log notice;
pid        /var/run/nginx.pid;
daemon off;

events {
    worker_connections  1024;
}
# 四层代理的方式
stream{
    server {
        listen     8088;
        proxy_pass backend;
        }
    upstream backend {
        server web1:80;
        server web2:80;
    }

}


http { # 这个是协议级别
    include mime.types;
    default_type application/octet-stream;
    keepalive_timeout 65;
    gzip on;
    server { #这个是服务器级别
        listen 80;
        server_name localhost;
        location / { #这个是请求级别
            root html;
            index index.html index.htm;
        }
    }
}
启动4层负载的Nginx
┌──[root@liruilongs.github.io]-[~/load_balancing]
└─$ docker run -itd -p 8088:8088 --name=nginx4 --network=load_balancing  -v $PWD/nginx.conf:/etc/nginx/nginx.conf nginx nginx
7c342f86752c5fe494b5a142983503d82dd11ea54e2968da7172f2201d1c45ea
┌──[root@liruilongs.github.io]-[~/load_balancing]
└─$ docker logs nginx4
/docker-entrypoint.sh: /docker-entrypoint.d/ is not empty, will attempt to perform configuration
/docker-entrypoint.sh: Looking for shell scripts in /docker-entrypoint.d/
/docker-entrypoint.sh: Launching /docker-entrypoint.d/10-listen-on-ipv6-by-default.sh
10-listen-on-ipv6-by-default.sh: info: Getting the checksum of /etc/nginx/conf.d/default.conf
10-listen-on-ipv6-by-default.sh: info: Enabled listen on IPv6 in /etc/nginx/conf.d/default.conf
/docker-entrypoint.sh: Launching /docker-entrypoint.d/20-envsubst-on-templates.sh
/docker-entrypoint.sh: Launching /docker-entrypoint.d/30-tune-worker-processes.sh
/docker-entrypoint.sh: Configuration complete; ready for start up
2021/11/16 16:25:50 [notice] 1#1: using the "epoll" event method
2021/11/16 16:25:50 [notice] 1#1: nginx/1.21.3
2021/11/16 16:25:50 [notice] 1#1: built by gcc 8.3.0 (Debian 8.3.0-6)
2021/11/16 16:25:50 [notice] 1#1: OS: Linux 3.10.0-693.el7.x86_64
2021/11/16 16:25:50 [notice] 1#1: getrlimit(RLIMIT_NOFILE): 1048576:1048576
2021/11/16 16:25:50 [notice] 1#1: start worker processes
2021/11/16 16:25:50 [notice] 1#1: start worker process 31
2021/11/16 16:25:50 [notice] 1#1: start worker process 32
┌──[root@liruilongs.github.io]-[~/load_balancing]
└─$ docker ps
CONTAINER ID   IMAGE     COMMAND                  CREATED          STATUS          PORTS                                               NAMES
7c342f86752c   nginx     "/docker-entrypoint.…"   21 seconds ago   Up 19 seconds   80/tcp, 0.0.0.0:8088->8088/tcp, :::8088->8088/tcp   nginx4
0af20ed5c390   nginx     "/docker-entrypoint.…"   2 hours ago      Up 2 hours      80/tcp, 0.0.0.0:8099->8099/tcp, :::8099->8099/tcp   nginx
b16bcb89e0a8   httpd     "httpd-foreground"       2 hours ago      Up 2 hours      0.0.0.0:49155->80/tcp, :::49155->80/tcp             web1
5b08d54cf498   httpd     "httpd-foreground"       2 hours ago      Up 2 hours      0.0.0.0:49154->80/tcp, :::49154->80/tcp             web2
测试一下
┌──[root@liruilongs.github.io]-[~/load_balancing]
└─$ curl 127.0.0.1:8088
10.1.1.22
┌──[root@liruilongs.github.io]-[~/load_balancing]
└─$ curl 127.0.0.1:8088
10.1.1.33
┌──[root@liruilongs.github.io]-[~/load_balancing]
└─$ curl 127.0.0.1:8088
10.1.1.22
2、HAProxy负载
HAProxy 是一款提供高可用性、负载均衡以及基于TCP(第四层)和HTTP(第七层)应用的代理软件,支持虚拟主机,它是免费、快速并且可靠的一种解决方案。
HAProxy特别适用于那些负载特大的web站点,这些站点通常又需要会话保持或七层处理。HAProxy完全可以支持数以万计的并发连接。
7 层(应用层)负载
这里我们还用之前的连个httpd服务演示
┌──[root@liruilongs.github.io]-[~/load_balancing]
└─$ docker pull haproxy
haproxy.cfg配置文件
┌──[root@liruilongs.github.io]-[~/load_balancing]
└─$ cat haproxy.cfg
global
    log 127.0.0.1 local0
    log 127.0.0.1 local1 notice
    maxconn 4096

defaults
    log     global
    mode    http
    option  httplog
    option  dontlognull
    timeout connect 5000ms
    timeout client  50000ms
    timeout server  50000ms

listen  admin_stats
    bind 0.0.0.0:8070
    mode http
    stats enable
    stats hide-version
    stats scope .
    stats realm Haproxy\ Statistics
    stats refresh 30s
    stats uri /
    stats auth user:pass

frontend balancer
    bind 0.0.0.0:8077
    mode http
    default_backend web_backends

backend web_backends
    mode http
    option forwardfor
    balance roundrobin
    server web1 web1:80 check
    server web2 web2:80 check
    option httpchk GET /
    http-check expect status 200


┌──[root@liruilongs.github.io]-[~/load_balancing]
└─$
┌──[root@liruilongs.github.io]-[~/load_balancing]
└─$ docker run -itd -p 8070 -p 8077 --name=haproxy --net=load_balancing -v $PWD/haproxy.cfg:/usr/local/etc/haproxy/haproxy.cfg  haproxy
a467636f6fdc75a7cf7538c32caab78c5a9e465235e2baec212bc9274a2cd534
┌──[root@liruilongs.github.io]-[~/load_balancing]
└─$ docker ps
CONTAINER ID   IMAGE     COMMAND                  CREATED          STATUS          PORTS                                                                                      NAMES
a467636f6fdc   haproxy   "docker-entrypoint.s…"   2 seconds ago    Up 1 second     0.0.0.0:49163->8070/tcp, :::49163->8070/tcp, 0.0.0.0:49162->8077/tcp, :::49162->8077/tcp   haproxy
7c342f86752c   nginx     "/docker-entrypoint.…"   40 minutes ago   Up 40 minutes   80/tcp, 0.0.0.0:8088->8088/tcp, :::8088->8088/tcp                                          nginx4
0af20ed5c390   nginx     "/docker-entrypoint.…"   2 hours ago      Up 2 hours      80/tcp, 0.0.0.0:8099->8099/tcp, :::8099->8099/tcp                                          nginx
b16bcb89e0a8   httpd     "httpd-foreground"       3 hours ago      Up 3 hours      0.0.0.0:49155->80/tcp, :::49155->80/tcp                                                    web1
5b08d54cf498   httpd     "httpd-foreground"       3 hours ago      Up 3 hours      0.0.0.0:49154->80/tcp, :::49154->80/tcp
测试下
┌──[root@liruilongs.github.io]-[~/load_balancing]
└─$ curl 127.0.0.1:49162
10.1.1.22
┌──[root@liruilongs.github.io]-[~/load_balancing]
└─$ curl 127.0.0.1:49162
10.1.1.33
┌──[root@liruilongs.github.io]-[~/load_balancing]
└─$
| 统计页面 |
|---|
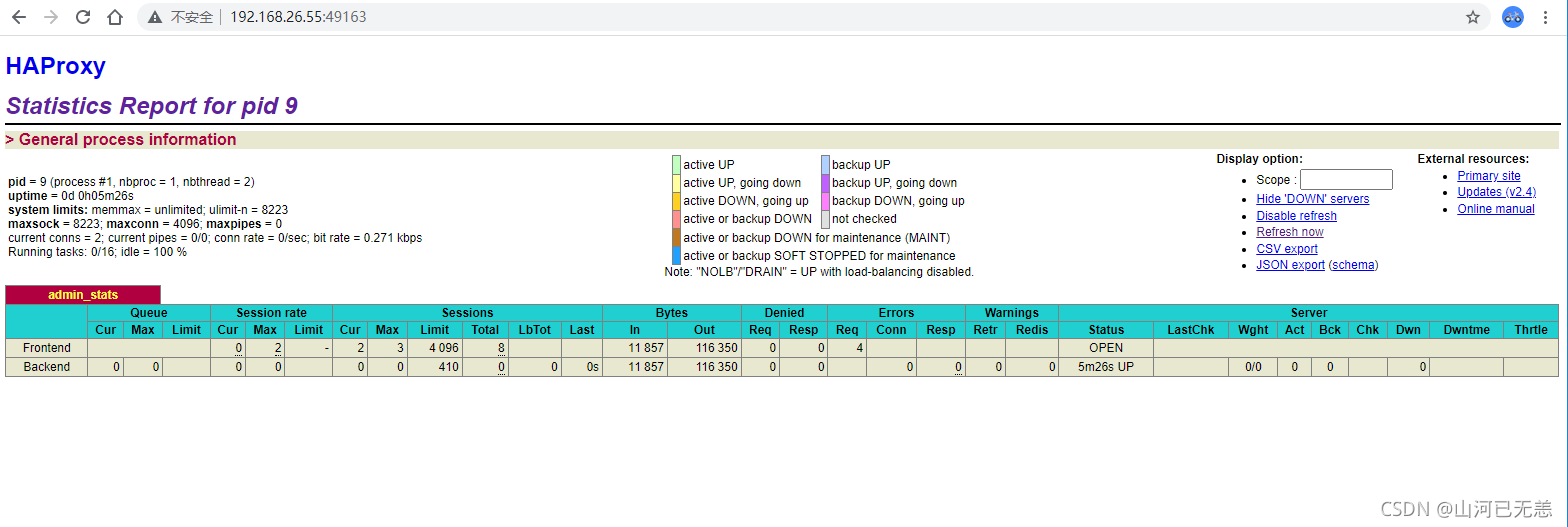 |
4 层(传输层)负载
四层负载和七层负载也是配置文件的区别
┌──[root@liruilongs.github.io]-[~/load_balancing]
└─$ cat haproxy.cfg
global
    log 127.0.0.1 local0
    log 127.0.0.1 local1 notice
    maxconn 4096

defaults
    log     global
    mode    http
    option  httplog
    option  dontlognull
    timeout connect 5000ms
    timeout client  50000ms
    timeout server  50000ms

listen  admin_stats
    bind 0.0.0.0:8070
    mode http
    stats enable
    stats hide-version
    stats scope .
    stats realm Haproxy\ Statistics
    stats refresh 30s
    stats uri /
    stats auth user:pass

listen web
    bind *:3306
    mode tcp
    balance roundrobin
    server web1 10.1.1.22:80  weight 1  check inter 1s rise 2 fall 2
    server web2 10.1.1.33:80  weight 1  check inter 1s rise 2 fall 2

┌──[root@liruilongs.github.io]-[~/load_balancing]
└─$
运行容器并测试
┌──[root@liruilongs.github.io]-[~/load_balancing]
└─$ docker run -itd -p 8070 -p 3306 --name=haproxy4 --net=load_balancing -v $PWD/haproxy.cfg:/usr/local/etc/haproxy/haproxy.cfg  haproxy
602eebc6ad525c420bad6061d9465fa7cdf2036d7db177efaf5450edf8c9db8b
┌──[root@liruilongs.github.io]-[~/load_balancing]
└─$ docker ps
CONTAINER ID   IMAGE     COMMAND                  CREATED         STATUS         PORTS
                  NAMES
602eebc6ad52   haproxy   "docker-entrypoint.s…"   8 seconds ago   Up 6 seconds   0.0.0.0:49165->3306/tcp, :::49165->3306/tcp, 0.0.0.0:49164->8070/tcp, :::49164->8070/tcp   haproxy4
a467636f6fdc   haproxy   "docker-entrypoint.s…"   19 hours ago    Up 19 hours    0.0.0.0:49163->8070/tcp, :::49163->8070/tcp, 0.0.0.0:49162->8077/tcp, :::49162->8077/tcp   haproxy
7c342f86752c   nginx     "/docker-entrypoint.…"   20 hours ago    Up 20 hours    80/tcp, 0.0.0.0:8088->8088/tcp, :::8088->8088/tcp
                  nginx4
0af20ed5c390   nginx     "/docker-entrypoint.…"   21 hours ago    Up 21 hours    80/tcp, 0.0.0.0:8099->8099/tcp, :::8099->8099/tcp
                  nginx
b16bcb89e0a8   httpd     "httpd-foreground"       22 hours ago    Up 22 hours    0.0.0.0:49155->80/tcp, :::49155->80/tcp
                  web1
5b08d54cf498   httpd     "httpd-foreground"       22 hours ago    Up 22 hours    0.0.0.0:49154->80/tcp, :::49154->80/tcp
                  web2
┌──[root@liruilongs.github.io]-[~/load_balancing]
└─$ curl 127.0.0.1:49165
10.1.1.22
┌──[root@liruilongs.github.io]-[~/load_balancing]
└─$ curl 127.0.0.1:49165
10.1.1.33
┌──[root@liruilongs.github.io]-[~/load_balancing]
└─$