Listener
监听器
- 能做什么事?
监听某一个事件的发生, 状态的改变。
- 监听器的内部机制
其实就是接口回调.
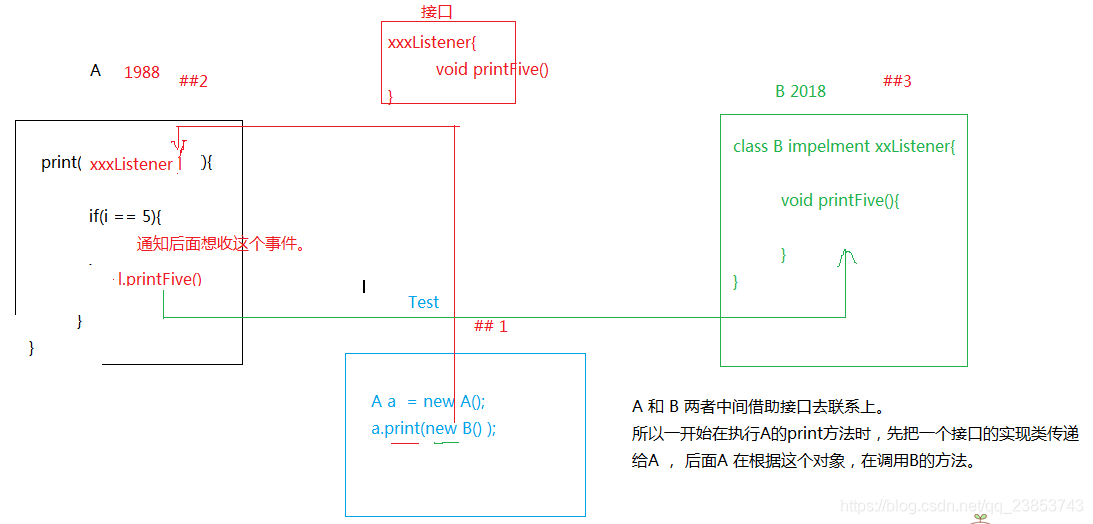
接口回调
- 需求:
A在执行循环,当循环到5的时候, 通知B。
事先先把一个对象传递给 A , 当A 执行到5的时候,通过这个对象,来调用B中的方法。 但是注意,不是直接传递B的实例,而是传递一个接口的实例过去。
Web监听器
总共有8个 划分成三种类型
-
定义一个类,实现接口
-
注册 | 配置监听器
监听三个作用域创建和销毁
request  ---httpServletRequest
session  ---httpSession
aapplication  --- ServletContext

1. ServletContextListener

	servletcontext创建: 1. 启动服务器的时候

	servletContext销毁: 2. 关闭服务器. 从服务器移除项目 2. ServletRequestListener

	request创建: 访问服务器上的任意资源都会有请求出现。 访问 html: 会
		访问 jsp:	会
		访问 servlet : 会 request销毁: 服务器已经对这次请求作出了响应。 public class MyRequestListener implements ServletRequestListener { @Override public void requestDestroyed(ServletRequestEvent sre) { System.out.println("servletrequest 销毁了"); } @Override public void requestInitialized(ServletRequestEvent sre) { System.out.println("servletrequest 初始化了"); } } <listener> <listener-class>com.itheima.listener.MyRequestListener</listener-class> </listener> 3. HttpSessionListener

	session的创建
		只要调用getSession html:		不会
		jsp:		会	  getSession();
		servlet: 	会

	session的销毁
		超时  30分钟 非正常关闭 销毁 正常关闭服务器(序列化) public class MySessionListener implements HttpSessionListener { @Override public void sessionCreated(HttpSessionEvent se) { System.out.println("创建session了"); } @Override public void sessionDestroyed(HttpSessionEvent se) { System.out.println("销毁session了"); }
		}
- 1
- 2
- 3
- 4
- 5
- 6
- 7
- 8
- 9
- 10
- 11
- 12
- 13
- 14
- 15
- 16
- 17
- 18
- 19
- 20
- 21
- 22
- 23
- 24
- 25
- 26
- 27
- 28
- 29
- 30
- 31
- 32
- 33
- 34
- 35
- 36
- 37
- 38
- 39
- 40
- 41
- 42
- 43
- 44
- 45
- 46
- 47
- 48
- 49
- 50
- 51
- 52
- 53
- 54
- 55
- 56
- 57
- 58
- 59
- 60
- 61
- 62
- 63
- 64
- 65
- 66
- 67
- 68
- 69
- 70
- 71
- 72
- 73
- 74
- 75
- 76
- 77
- 78
作用:
ServletContextListener

	利用它来,在servletcontext创建的时候, 1. 完成自己想要的初始化工作 2. 执行自定义任务调度。 执行某一个任务。 Timer HttpSessionListener

	统计在线人数.
- 1
- 2
- 3
- 4
- 5
- 6
- 7
- 8
- 9
- 10
监听三个作用域属性状态变更
可以监听在作用域中值 添加 | 替换 | 移除的动作。
-
servletContext — ServletContextAttributeListener

-
request — ServletRequestAttributeListener

-
session — HttpSessionAttributeListener

监听httpSession里面存值的状态变更
这一类监听器不用注册。
- HttpSessionBindingListener
监听对象与session 绑定和解除绑定 的动作
1. 让javaBean 实现该接口即可 @Override
		public void valueBound(HttpSessionBindingEvent event) { System.out.println("对象被绑定进来了");
		} @Override
		public void valueUnbound(HttpSessionBindingEvent event) { System.out.println("对象被解除绑定");
		}
- 1
- 2
- 3
- 4
- 5
- 6
- 7
- 8
- 9
- 10
- 11
- HttpSessionActivationListener
用于监听现在session的值 是 钝化 (序列化)还是活化 (反序列化)的动作
- 钝化 (序列化)
把内存中的数据 存储到硬盘上
- 活化 (反序列化)
把硬盘中的数据读取到内存中。
- session的钝化活化的用意何在
session中的值可能会很多, 并且我们有很长一段时间不使用这个内存中的值, 那么可以考虑把session的值可以存储到硬盘上【钝化】,等下一次在使用的时候,在从硬盘上提取出来。 【活化】
- 如何让session的在一定时间内钝化.
做配置即可
1. 在tomcat里面 conf/context.xml 里面配置 对所有的运行在这个服务器的项目生效 2. 在conf/Catalina/localhost/context.xml 配置 对 localhost生效。  localhost:8080

3. 在自己的web工程项目中的 META-INF/context.xml 只对当前的工程生效。

	maxIdleSwap : 1分钟不用就钝化
	directory :  钝化后的那个文件存放的目录位置。 D:\tomcat\apache-tomcat-7.0.52\work\Catalina\localhost\ListenerDemo\itheima

	<Context>
		<Manager className="org.apache.catalina.session.PersistentManager" maxIdleSwap="1"> <Store className="org.apache.catalina.session.FileStore" directory="itheima"/>
		</Manager>
	</Context>
- 1
- 2
- 3
- 4
- 5
- 6
- 7
- 8
- 9
- 10
- 11
- 12
- 13
- 14
- 15
- 16
- 17
- 18
- 19
- 20
- 21
- 22
Filter
过滤器 , 其实就是对客户端发出来的请求进行过滤。 浏览器发出, 然后服务器派servlet处理。 在中间就可以过滤, 其实过滤器起到的是拦截的作用。
-
作用
- 对一些敏感词汇进行过滤
- 统一设置编码
- 自动登录
…
如何使用Filter
-
定义一个类, 实现Filter
public class FilterDemo implements Filter { public void destroy() { } public void doFilter(ServletRequest request, ServletResponse response, FilterChain chain) throws IOException, ServletException { System.out.println("来到过虑器了。。。"); chain.doFilter(request, response); } public void init(FilterConfig fConfig) throws ServletException { } }- 1
- 2
- 3
- 4
- 5
- 6
- 7
- 8
- 9
- 10
- 11
- 12
- 13
- 14
-
注册过滤器
在web.xml里面注册,注册的手法与servlet基本一样。
<filter> <display-name>FilterDemo</display-name> <filter-name>FilterDemo</filter-name> <filter-class>com.itheima.filter.FilterDemo</filter-class> </filter> <filter-mapping> <filter-name>FilterDemo</filter-name> <url-pattern>/*</url-pattern> </filter-mapping>
- 1
- 2
- 3
- 4
- 5
- 6
- 7
- 8
- 9
Filter的生命周期
- 创建
在服务器启动的时候就创建。
- 销毁
服务器停止的时候。
Filter执行顺序
-
客户端发出请求,先经过过滤器, 如果过滤器放行,那么才能到servlet
-
如果有多个过滤器, 那么他们会按照注册的映射顺序 来 排队。 只要有一个过滤器, 不放行,那么后面排队的过滤器以及咱们的servlet都不会收到请求。
Filter细节:
-
init方法的参数 FilterConfig , 可以用于获取filter在注册的名字 以及初始化参数。 其实这里的设计的初衷与ServletConfig是一样的。
-
如果想放行,那么在doFilter 方法里面操作,使用参数 chain
chain.doFilter(request, response); 放行, 让请求到达下一个目标。- 1
-
/* 写法格式与servlet一样。
-
全路径匹配 以 / 开始
/LoginServlet- 1
-
以目录匹配 以 / 开始 以 * 结束
/demo01/*
-
以后缀名匹配 以 * 开始 以后缀名结束
*.jsp *.html *.do
-
-
针对 dispatcher 设置
REQUEST : 只要是请求过来,都拦截,默认就是REQUEST FORWARD : 只要是转发都拦截。 ERROR : 页面出错发生跳转 INCLUDE : 包含页面的时候就拦截。- 1
- 2
- 3
- 4
自动登录
- 需求分析
1. 搭建环境
-
搭建数据库
-
搭建页面
登录servlet代码
	protected void doGet(HttpServletRequest request, HttpServletResponse response) throws ServletException, IOException {

	try {
		String userName = request.getParameter("username");
		String password = request.getParameter("password");
		String autoLogin = request.getParameter("auto_login");
		UserBean user = new UserBean();
		user.setUsername(userName);
		user.setPassword(password); UserDao dao = new UserDaoImpl();
		UserBean userBean = dao.login(user); if(userBean != null){ //成功了,进入首页 request.getSession().setAttribute("userBean", userBean); response.sendRedirect("index.jsp");
		}else{ //不成功... request.getRequestDispatcher("login.jsp").forward(request, response);
		} } catch (SQLException e) {
		e.printStackTrace();
	}
}
- 1
- 2
- 3
- 4
- 5
- 6
- 7
- 8
- 9
- 10
- 11
- 12
- 13
- 14
- 15
- 16
- 17
- 18
- 19
- 20
- 21
- 22
- 23
- 24
- 25
- 26
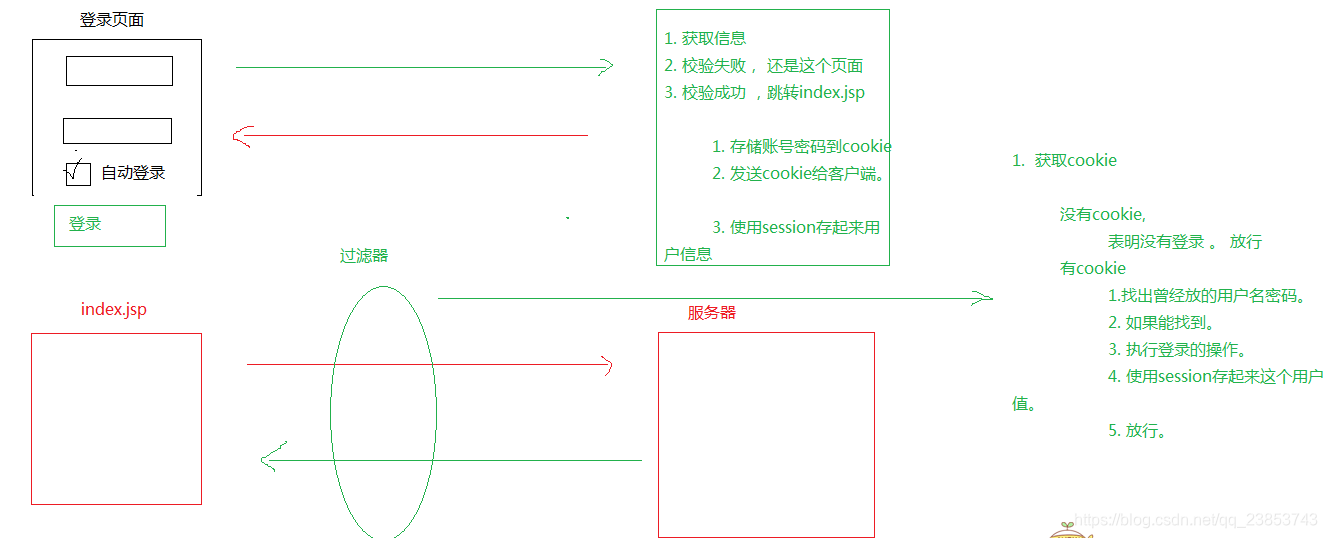
过滤器代码
过滤器的核心不是完成拦截 , 不是放行显示。 它的核心是在放行之前,帮用户完成登录的功能。
- 实现思路
-
先判断session是否有效, 如果有效,就不用取cookie了,直接放行。
-
如果session失效了,那么就取 cookie。
-
没有cookie 放行
-
有cookie
1. 取出来cookie的值,然后完成登录 2. 把这个用户的值存储到session中 3. 放行。 /** * @see Filter#doFilter(ServletRequest, ServletResponse, FilterChain) */ public void doFilter(ServletRequest req, ServletResponse response, FilterChain chain) throws IOException, ServletException { try { HttpServletRequest request = (HttpServletRequest) req; //先判断,现在session中还有没有那个userBean. UserBean userBean = (UserBean) request.getSession().getAttribute("userBean"); //还有,有效。 if(userBean != null){ chain.doFilter(request, response); }else{ //代表session失效了。 //2. 看cookie。 //1. 来请求的时候,先从请求里面取出cookie , 但是cookie有很多的key-value Cookie[] cookies = request.getCookies(); //2. 从一堆的cookie里面找出我们以前给浏览器发的那个cookie Cookie cookie = CookieUtil.findCookie(cookies, "auto_login"); //第一次来 if(cookie == null){ chain.doFilter(request, response); }else{ //不是第一次。 String value = cookie.getValue(); String username = value.split("#itheima#")[0]; String password = value.split("#itheima#")[1]; //完成登录 UserBean user = new UserBean(); user.setUsername(username); user.setPassword(password); UserDao dao = new UserDaoImpl(); userBean = dao.login(user); //使用session存这个值到域中,方便下一次未过期前还可以用。 request.getSession().setAttribute("userBean", userBean); chain.doFilter(request, response); } } } catch (Exception e) { e.printStackTrace(); chain.doFilter(req, response); } }- 1
- 2
- 3
- 4
- 5
- 6
- 7
- 8
- 9
- 10
- 11
- 12
- 13
- 14
- 15
- 16
- 17
- 18
- 19
- 20
- 21
- 22
- 23
- 24
- 25
- 26
- 27
- 28
- 29
- 30
- 31
- 32
- 33
- 34
- 35
- 36
- 37
- 38
- 39
- 40
- 41
- 42
- 43
- 44
- 45
- 46
- 47
- 48
- 49
- 50
- 51
- 52
- 53
- 54
- 55
- 56
- 57
- 58
- 59
- 60
-
BeanUtils的使用
BeanUtils.populate(bean, map);
		//注册自己的日期转换器
		ConvertUtils.register(new MyDateConverter(), Date.class); //转化数据
		Map map = request.getParameterMap();
		UserBean bean = new UserBean(); 转化map中的数据,放置到bean对象身上
		BeanUtils.populate(bean, map);
- 1
- 2
- 3
- 4
- 5
- 6
- 7
- 8
- 9
- 10
总结
Listener
8个

三种类型 针对三个作用域的创建和销毁
	针对三个作用域的值改变 【添加 | 替换 | 移除】
	针对session中的值 【钝化 活化】 , 【绑定  解绑】

钝化 ( 序列化 )
	内存中的对象存储到硬盘 超时失效。 session销毁了。

非正常关闭服务器, 钝化  。 正常关闭服务器 销毁

设置了session,多久时间。 context.xml


活化 (反序列化)
	从硬盘里面读取到内存
- 1
- 2
- 3
- 4
- 5
- 6
- 7
- 8
- 9
- 10
- 11
- 12
- 13
- 14
- 15
- 16
- 17
- 18
- 19
ServletContextListner : 应用被部署的时候, 服务器加载这个项目的时候,做一些初始化工作, 任务调度。
HttpSessionListener : 统计在线人数
HttpSessionActivationListener : 钝化活化处理
Filter
使用频率更高
- 如果要写一个过滤器。
- 定义一个类,实现接口 Filter
- 注册 . web.xml . 与servlet相似。
- 过滤器放行。
chain.doFilter(request, response);
-
过滤器生命周期
创建: 服务器加载这个项目的时候创建实例
销毁: 关闭服务器或者从服务器中移除项目的时候。
文章来源: albertyang.blog.csdn.net,作者:Albert Yang,版权归原作者所有,如需转载,请联系作者。
原文链接:albertyang.blog.csdn.net/article/details/84584167