概述
插槽就是子组件中用slot标签定义的预留位置,可以设置name属性,也可以不设置name属性,设置name的叫具名插槽,不设置name的的叫不具名插槽,在父组件中使用子组件时候可以在使用子组件的标签内通过声明插槽名或不声明插槽名的方式往子组件中的具名插槽或者不具名插槽写入html代码。
插槽使用的关键在于:在父组件中使用子组件标签的时候可以往子组件内写入html代码。
使用步骤
- 子组件中定义插槽
- 父组件使用子组件时往插槽写入代码
何时使用插槽?
简单的举个栗子:有2个组件,父组件father,子组件son。
父组件 father
<template> <div> <h3>这是父组件</h3> <son>实践slot</son> </div>
</template>
- 1
- 2
- 3
- 4
- 5
- 6
子组件 son
<template> <div> <h4>这是子组件</h4> <input type="text" placeholder="请输入"> </div>
</template>
- 1
- 2
- 3
- 4
- 5
- 6
一般我们的组件都会怎么写,但是这么写的话,会发现子组件中的实践slot是显示不出来的。如果需要让他显示出来,这时我们就可以用到插槽slot了。
如何使用插槽?
首先,子组件中我们要添加插槽slot,
<template> <div> <h4>这是子组件</h4> <input type="text" placeholder="请输入"> <slot></slot> </div>
</template>
- 1
- 2
- 3
- 4
- 5
- 6
- 7
这时,终于出现了slot。slot的位置就会出现父组件中实践slot这几个大字。

可以看到,这里面slot是没有名称的,顾名思义,这是插槽中的不具名插槽。
然后再看看具名插槽,直接上代码。
父组件
<template> <div> <h3>这是父组件</h3> <son><span>实践slot</span></son> <son> <template slot="myslot"> <div> 实践具名slot </div> </template> </son> </div>
</template>
- 1
- 2
- 3
- 4
- 5
- 6
- 7
- 8
- 9
- 10
- 11
- 12
- 13
子组件
<template> <div> <h4>这是子组件</h4> <input type="text" placeholder="请输入"> <slot></slot> <slot name="myslot"></slot> </div>
</template>
- 1
- 2
- 3
- 4
- 5
- 6
- 7
- 8
可以看出,和默认插槽不同的是,在子组件中,我们给插槽一个name属性,这个就是插槽的名称,同时在父组件中,我们在需要将内容插入的地方标签上加了一个slot属性,他的值就是我们的slot 名称name。

接下来看下slot-scope。slot-scope是作用域插槽。
官网中有一句特别强调的话:父组件模板的所有内容都会在父级作用域内编译;子组件模板的所有内容都会在子级作用域内编译。简单的说,就是父组件中不能直接用子组件中定义的data数据。而slot-scope的出现就是解决了这样的问题。
父组件
<template lang=""> <div> <h3>这是父组件</h3> <son> <template slot="myslot" slot-scope="scope"> <ul> <li v-for="item in scope.data"> {{item}} </li> </ul> </template> </son> </div>
</template>
- 1
- 2
- 3
- 4
- 5
- 6
- 7
- 8
- 9
- 10
- 11
- 12
- 13
- 14
子组件
<template> <div> <h4>这是子组件</h4> <input type="text" placeholder="请输入"> <slot name="myslot" :data='list'></slot> </div>
</template>
<script>
export default { name:'Son', data(){ return{ list:[ {name:"Tom",age:15}, {name:"Jim",age:25}, {name:"Tony",age:13} ] } }
}
</script>
- 1
- 2
- 3
- 4
- 5
- 6
- 7
- 8
- 9
- 10
- 11
- 12
- 13
- 14
- 15
- 16
- 17
- 18
- 19
- 20
- 21

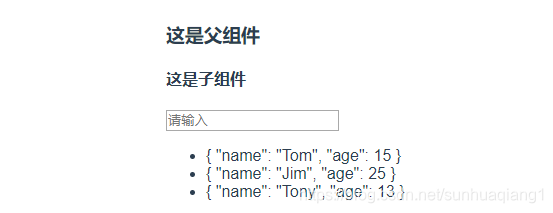
其中,下方三个对象的值,我们本身是在子组件中定义的,按照官方文档中说的,本来父组件中是无法显示出来这些数据的,但是为什么现在显示出来了呢?这就要归功于我们强大的slot-scope了。
首先,在子组件中的插槽上有一句data="list",而在父组件中也有slot-scope="scope",slot-scope就是取data的值,slot-scope的值是自定义的,我们可以取任何名称,但是data的值传过来时是以对象形式传输的,所以在这scope.data才是list的值。
这样我们就可以在父组件中取到子组件的值,并且加以应用了。
注
- 从
vue2.6.0开始,slot、slot-scope已经被废弃,推荐使用v-slot;有关两者的用法区别,请移步博文《Vue进阶(幺贰捌):Vue插槽:slot、slot-scope与指令v-slot使用方法区别讲解》。
文章来源: shq5785.blog.csdn.net,作者:No Silver Bullet,版权归原作者所有,如需转载,请联系作者。
原文链接:shq5785.blog.csdn.net/article/details/106722520