@Author:Runsen
@[toc]
Load dataset
- digits dataset in scikit-learn
- url: http://scikit-learn.org/stable/auto_examples/datasets/plot_digits_last_image.html
from sklearn.datasets import load_digits
from tensorflow.keras.utils import plot_model
from tensorflow.keras.models import Sequential, Model
from tensorflow.keras.layers import Input, Dense, concatenate, Activation
data = load_digits()
X_data = data.images
y_data = data.target
# flatten X_data
X_data = X_data.reshape(X_data.shape[0], X_data.shape[1]*X_data.shape[2])
-
在Keras中创建深度学习模型的最简单方法是使用顺序模型API
-
顺序模型API只允许按顺序连接层,
-
doc: https://keras.io/getting-started/sequential-model-guide/

Sequential Model API
方法1
- 将层列表传递到Sequential()中
- 模型小(即浅)时使用效率高
model = Sequential([Dense(10, input_shape = X_data.shape[1:]), Dense(10, activation = 'softmax')])
model.summary()

plot_model(model)

方法2
- 有时,如果模型越来越深,就很难在图层列表中丢失
- 在这种情况下,可以使用**add()**函数逐行添加层,这样做,还可以一步一步地跟踪模型的输出形状
model = Sequential()
model.add(Dense(10, input_shape = X_data.shape[1:], activation = 'relu'))
print(model.output_shape)
(None, 10)
model.add(Dense(50, activation = 'relu'))
model.add(Dense(50, activation = 'relu'))
print(model.output_shape)
(None, 50)
model.add(Dense(10, activation = 'sigmoid'))
print(model.output_shape)
(None, 10)
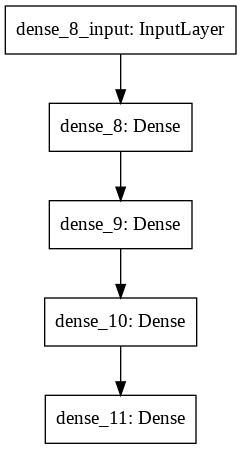
model.summary()

plot_model(model)

- 可以通过设置图层的“名称”来跟踪图层
model = Sequential()
model.add(Dense(10, input_shape = X_data.shape[1:], activation = 'relu', name = 'Input_layer'))
model.add(Dense(50, activation = 'relu', name = 'First_hidden_layer'))
model.add(Dense(10, activation = 'softmax', name = 'Output_layer'))
model.summary()

plot_model(model)

模型函数API
- 通过顺序API创建模型简单易行,但不可能创建复杂的模型结构
- 例如,初始或剩余网络结构不可能使用顺序API实现,因为它们需要层合并和多个输出等操作
- 在这种情况下,可以利用函数API
- 通过定义输入和输出创建模型
单输入输出
- 只有单一输入和输出的模型
- 这种结构也可以使用顺序API创建
# creating layers
input_layer = Input(shape = X_data.shape[1:])
activation_1 = Activation('relu')(input_layer)
hidden_layer = Dense(50)(activation_1)
activation_2 = Activation('relu')(hidden_layer)
output_layer = Dense(10, activation = 'softmax')(activation_2)
# creating model
model = Model(inputs = input_layer, outputs = output_layer)
model.summary()

plot_model(model)

合并图层
- 有时,需要合并层(例如,GoogleNet或ResNet)
1.连接
concatenate()简单地合并两个或更多层的结果- 例如,假设有两个层要连接,其结果是
[x1,x2,…,xn]和[y1,y2,…,yn]。然后,连接层将是[x1,…,xn,…,y1,…,yn]
# creating layers
input_layer = Input(shape = X_data.shape[1:])
activation_1 = Activation('relu')(input_layer)
hidden_layer_1 = Dense(50, activation = 'relu')(activation_1)
hidden_layer_2 = Dense(50, activation = 'relu')(activation_1)
concat_layer = concatenate([hidden_layer_1, hidden_layer_2])
print(hidden_layer_1.shape)
print(hidden_layer_2.shape)
print(concat_layer.shape)
(None, 50)
(None, 50)
(None, 100)
model = Model(inputs = input_layer, outputs = concat_layer)
plot_model(model)

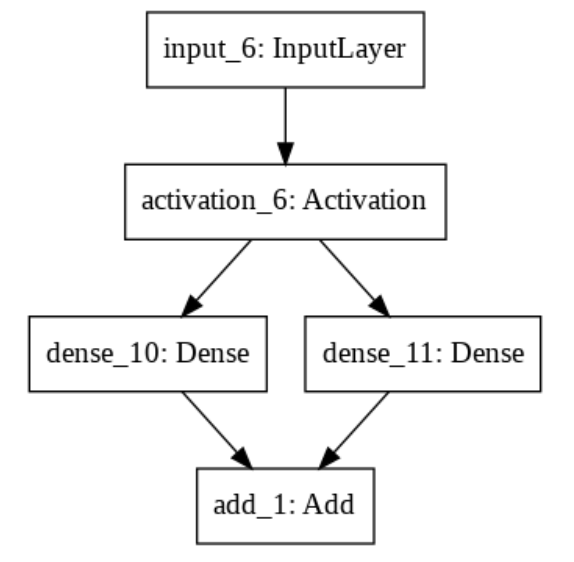
2. add, subtract, multiply, average, maximum
-
这些层对两个或更多层的所有对应元素执行元素操作
-
因此,保持了输入层的维数
# creating layers
input_layer = Input(shape = X_data.shape[1:])
activation_1 = Activation('relu')(input_layer)
hidden_layer_1 = Dense(50, activation = 'relu')(activation_1)
hidden_layer_2 = Dense(50, activation = 'relu')(activation_1)
add_layer = add([hidden_layer_1, hidden_layer_2])
print(hidden_layer_1.shape)
print(hidden_layer_2.shape)
print(add_layer.shape)
(None, 50)
(None, 50)
(None, 50)
model = Model(inputs = input_layer, outputs = add_layer)
plot_model(model)

3. dot
-
dot()在两层结果之间执行内积运算 -
应定义“轴”来执行操作
# creating layers
input_layer = Input(shape = X_data.shape[1:])
activation_1 = Activation('relu')(input_layer)
hidden_layer_1 = Dense(50, activation = 'relu')(activation_1)
hidden_layer_2 = Dense(50, activation = 'relu')(activation_1)
dot_layer = dot([hidden_layer_1, hidden_layer_2], axes = -1)
print(hidden_layer_1.shape)
print(hidden_layer_2.shape)
print(dot_layer.shape)
(None, 50)
(None, 50)
(None, 1)
model = Model(inputs = input_layer, outputs = dot_layer)
plot_model(model)
