作者:Nitro@360GearTeam
简介
2022 年 3 月 7 日,据一位国外开发者披露^1,Linux 内核存在一个文件任意覆写漏洞,低权限用户可以利用此漏洞覆写本没有写权限的文件。由于这个漏洞是基于 Linux 的管道(pipe)形成的,因此被命名为 Dirty Pipe。漏洞的发现过程挺有意思的,可以参考发现者写的文章(见文末「参考资料」部分)。
漏洞形成原因:
使用 splice(2) ^5系统调用从一个只读文件向一个管道^6中传输数据时,会使管道用于保存数据的缓冲区共享文件的 page cache。由于 PIPE_BUF_FLAG_CAN_MERGE 标志位的存在,调用 splice(2) 之后再向管道中写入数据时,写入的数据会直接写到文件的 page cache 中。
漏洞危害:低权限用户可利用此漏洞向本没有写权限的文件中写入数据,进而实现提权。
CVE 编号:CVE-2022-0847。
漏洞评分:7.8。
影响版本:
- 根据作者的描述,5.8 以上的内核均受影响。在 5.16.11、5.15.25、5.10.102 版本中被修复。
- 根据 Red Hat 官方通告^2 ,^3,目前还没有发布已修复的内核软件包。受影响的 Red Hat 版本有:
- 使用
redhat-virtualization-host内核的Red Hat Virtualization 4。 - 使用
kernel-rt或kernel内核软件包的Red Hat Enterprise Linux 8。
- 使用
- 根据 Debian 的官方通告^4,已修复的内核版本号为:
-
stretch:4.9.228-1。 -
stretch (security):4.9.303-1。 -
buster:4.19.208-1。 -
buster (security):4.19.232-1。 -
bullseye:5.10.84-1。注:这是受影响的版本。官方通告中没有说明修复的版本号。 -
bullseye (security):5.10.103-1。 -
bookworm:5.16.11-1。 -
sid:5.16.12-1。
-
修复方法:根据使用的发行版,关注官方的漏洞通告并升级内核到已修复的版本。
漏洞分析过程
漏洞的利用过程与 Linux 管道和 splice(2) 系统调用的实现机制有关,因此当了解了二者的实现机制后,就很容易理解漏洞的形成原因。
因此漏洞分析过程分两部分:第一部分结合内核源码介绍管道和 splice(2) 的实现原理,第二部分通过运行 PoC 并动态调试内核,来实际体验并验证漏洞的触发过程。如果已经了解先导知识中所讲的内容,可直接跳到「漏洞复现」部分。
文中的源码分析基于 5.10 版本。「调试验证」部分基于 5.11 版本。
先导知识^9
pipe 实现机制
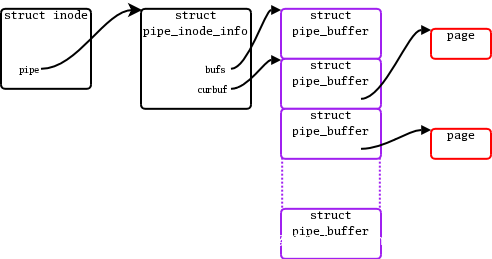
首先给出一张描述 pipe 相关内核数据结构之间关系的图^7、^8:
创建 pipe
创建 pipe 的系统调用有两个:pipe(2) 和 pipe2(2),原型为:
#include <unistd.h>

int pipe(int pipefd[2]);
int pipe2(int pipefd[2], int flags);
系统调用的定义在 /fs/pipe.c (https://elixir.bootlin.com/linux/v5.10/source/fs/pipe.c#L1008)
文件中:
SYSCALL_DEFINE2(pipe2, int __user *, fildes, int, flags)
{
    return do_pipe2(fildes, flags);
}

SYSCALL_DEFINE1(pipe, int __user *, fildes)
{
    return do_pipe2(fildes, 0);
}
两个系统调用的入口都是 do_pipe2() (https://elixir.bootlin.com/linux/v5.10/source/fs/pipe.c#L986)
函数。这个函数的功能是:
- 调用
__do_pipe_flags()函数创建两个struct file结构体实例和两个对应的文件描述符。 - 调用
copy_to_user()函数将两个文件描述符拷贝给系统调用参数pipefd。 - 调用
fd_install()函数将文件描述符和struct file结构体实例关联起来。
__do_pipe_flags()
再看 __do_pipe_flags() (https://elixir.bootlin.com/linux/v5.10/source/fs/pipe.c#L936)
函数。函数原型为:
static int __do_pipe_flags(int *fd, struct file **files, int flags);
第一个参数 fd 用于保存创建的两个文件描述符,第二个参数用于保存创建的两个 struct file 结构体实例,第三个参数是系统调用参数 flags 的值。
__do_pipe_flags() 函数的工作为:
- 检查非法的标志位组合。
- 调用
create_pipe_files()函数创建两个struct file结构体实例。 - 调用两次
get_unused_fd_flags()函数创建两个文件描述符。 - 调用
audit_fd_pair()函数处理审计相关的工作。
create_pipe_files()
再看 create_pipe_files() 函数(https://elixir.bootlin.com/linux/v5.10/source/fs/pipe.c#L893)。
函数的用途是根据传入的标志位创建两个 struct file 结构体实例。流程为:
- 调用
get_pipe_inode()函数创建一个 inode 实例。 - 如果标志位设置了
O_NOTIFICATION_PIPE位,则初始化一个 watch 队列。 - 调用
alloc_file_pseudo()函数创建一个strcut file实例,并将private_data字段的值设置为inode->i_pipe的值。 - 调用
alloc_file_clone()函数拷贝一个struct file实例,同样将其private_data字段的值设置为inode->i_pipe的值。 - 调用
stream_open()函数打开两个文件。
get_pipe_inode()
接下来看看 get_pipe_inode() 函数是如何创建 inode 实例的。
- 调用
new_inode_pseudo()函数创建一个 inode 实例。 - 调用
alloc_pipe_info()函数创建一个pipe_inode_info实例。 - 设置 inode 实例的以下字段:
-
inode->i_pipe设置为pipe实例指针。 -
inode->i_fop设置为pipefifo_fops变量的指针。 -
inode->i_state设置为I_DIRTY。 -
inode->i_mode设置为S_IFIFO | S_IRUSR | S_IWUSR。 -
inode->i_uid设置为fsuid,inode->i_gid设置为fsgid。 -
inode->i_atime、inode->i_mtime、inode->i_ctime均设置为当前时间。
-
关键的内核数据结构
这里涉及到第一个关键的结构体 struct pipe_inode_info(https://elixir.bootlin.com/linux/v5.10/source/include/linux/pipe_fs_i.h#L57),
内核使用这个结构体来描述一个 pipe:
/**
 *    struct pipe_inode_info - a linux kernel pipe
 *    @mutex: mutex protecting the whole thing
 *    @rd_wait: reader wait point in case of empty pipe
 *    @wr_wait: writer wait point in case of full pipe
 *    @head: The point of buffer production
 *    @tail: The point of buffer consumption
 *    @note_loss: The next read() should insert a data-lost message
 *    @max_usage: The maximum number of slots that may be used in the ring
 *    @ring_size: total number of buffers (should be a power of 2)
 *    @nr_accounted: The amount this pipe accounts for in user->pipe_bufs
 *    @tmp_page: cached released page
 *    @readers: number of current readers of this pipe
 *    @writers: number of current writers of this pipe
 *    @files: number of struct file referring this pipe (protected by ->i_lock)
 *    @r_counter: reader counter
 *    @w_counter: writer counter
 *    @fasync_readers: reader side fasync
 *    @fasync_writers: writer side fasync
 *    @bufs: the circular array of pipe buffers
 *    @user: the user who created this pipe
 *    @watch_queue: If this pipe is a watch_queue, this is the stuff for that
 **/
struct pipe_inode_info {
    struct mutex mutex;
    wait_queue_head_t rd_wait, wr_wait;
    unsigned int head;
    unsigned int tail;
    unsigned int max_usage;
    unsigned int ring_size;
#ifdef CONFIG_WATCH_QUEUE
    bool note_loss;
#endif
    unsigned int nr_accounted;
    unsigned int readers;
    unsigned int writers;
    unsigned int files;
    unsigned int r_counter;
    unsigned int w_counter;
    struct page *tmp_page;
    struct fasync_struct *fasync_readers;
    struct fasync_struct *fasync_writers;
    struct pipe_buffer *bufs;
    struct user_struct *user;
#ifdef CONFIG_WATCH_QUEUE
    struct watch_queue *watch_queue;
#endif
};
pipe 中的数据保存在结构体 pipe_buffer (https://elixir.bootlin.com/linux/v5.10/source/include/linux/pipe_fs_i.h#L26)中的 page 字段:
/**
 *    struct pipe_buffer - a linux kernel pipe buffer
 *    @page: the page containing the data for the pipe buffer
 *    @offset: offset of data inside the @page
 *    @len: length of data inside the @page
 *    @ops: operations associated with this buffer. See @pipe_buf_operations.
 *    @flags: pipe buffer flags. See above.
 *    @private: private data owned by the ops.
 **/
struct pipe_buffer {
    struct page *page;
    unsigned int offset, len;
    const struct pipe_buf_operations *ops;
    unsigned int flags;
    unsigned long private;
};
顺便看看 alloc_pipe_info() 函数是怎样初始化 pipe_inode_info 结构体的。
- 使用
kzalloc函数创建一个pipe_inode_info实例。kzalloc函数与kmalloc类似,只不过会初始化分配的内存。 - 根据用户是否有
CAP_SYS_RESOURCE权限决定 pipe 缓冲区的大小,并保存在pipe_bufs变量里。缓冲区的大小以页为单位。非 root 用户可以将缓冲区大小扩展为最大1048576个字节,保存在pipe_max_size变量中。可以通过/proc/sys/fs/pipe-max-size调整这个值。默认大小为PIPE_DEF_BUFFERS(16)个内存页。 - 检查当前用户是否创建了过多的 pipe。
- 调用
kcalloc函数为pipe_inode_info结构体的bufs字段分配内存。kcalloc与kzalloc类似,只不过是分配连续若干个指定大小的内存块。 - 初始化
pipe_buffer中的其它成员:- 初始化读写队列。
- 将读者和写者的数量初始化为 1。
- pipe 的最大可使用量、缓冲区大小、记账个数都初始化为
pipe_bufs变量的值。 - 设置用户为当前用户。
- 初始化互斥锁。
读写 pipe
上文中提到的 pipefifo_fops 是一个 struct file_operations 类型的常量,表示 pipe 文件支持的文件操作有哪些,以及保存了对应操作的函数指针:
const struct file_operations pipefifo_fops = {
    .open        = fifo_open,
    .llseek        = no_llseek,
    .read_iter    = pipe_read,
    .write_iter    = pipe_write,
    .poll        = pipe_poll,
    .unlocked_ioctl    = pipe_ioctl,
    .release    = pipe_release,
    .fasync        = pipe_fasync,
};
在上面 create_pipe_files() 函数中,会将 file 结构体实例的 f_op 字段设置成 pipefifo_fops 结构体的指针。用户态执行上面支持的系统调用时,VFS 会调用结构体中相应的函数。
ssize_t vfs_write(struct file *file, const char __user *buf, size_t count, loff_t *pos)
{
  ...
    if (file->f_op->write)
        ret = file->f_op->write(file, buf, count, pos);
    else if (file->f_op->write_iter)
        ret = new_sync_write(file, buf, count, pos);
  ...
}
以 write(2) 系统调用为例,进入系统调用入口之后,实际会调用 vfs_write() 函数。而 pipe 支持 write_iter 而不是 write,因此会接着执行 new_sync_write():
static ssize_t new_sync_write(struct file *filp, const char __user *buf, size_t len, loff_t *ppos)
{
    struct iovec iov = { .iov_base = (void __user *)buf, .iov_len = len };
    struct kiocb kiocb;
    struct iov_iter iter;
    ssize_t ret;

    init_sync_kiocb(&kiocb, filp);
    kiocb.ki_pos = (ppos ? *ppos : 0);
    iov_iter_init(&iter, WRITE, &iov, 1, len);

    ret = call_write_iter(filp, &kiocb, &iter);
    BUG_ON(ret == -EIOCBQUEUED);
    if (ret > 0 && ppos)
        *ppos = kiocb.ki_pos;
    return ret;
}
call_write_iter() 是一个内联函数:
static inline ssize_t call_write_iter(struct file *file, struct kiocb *kio,
                      struct iov_iter *iter)
{
    return file->f_op->write_iter(kio, iter);
}
其它系统调用类似,不再赘述。总之,从 pipe 中读取数据时,最终调用的是 pipe_read() 函数;向 pipe 中写入数据时,最终调用的是 pipe_write() 函数。
pipe_write()
先来看 pipe_write() 函数的主要流程:
- 如果 pipe 读者的数量为 0,则向进程发送
SIGPIPE信号,并返回EPIPE错误。 - 计算要写入的数据总大小是否是页帧大小的倍数,并将余数保存在
chars变量中。 - 如果
chars不为零,而且 pipe 不为空,则:- 获取 pipe 头部的缓冲区。
- 如果缓冲区设置了标志位
PIPE_BUF_FLAG_CAN_MERGE,且缓冲区中已有的数据长度与chars的和不超过一个页帧的大小,则将chars长度的数据写入到当前的缓冲区中。 - 如果剩余要写入的数据大小为零,则直接返回。
- 在 for 循环中:
- 判断 pipe 的读者数量是否为零。
- 如果 pipe 没有被填满:
- 获取 pipe 头部的缓冲区。
- 如果还没有为缓冲区分配页帧,则调用
alloc_page()函数分配一个。 - 使用自旋锁锁住 pipe 的读者等待队列。再次检测 pipe 是否被填满,是则终止当前循环,执行下一次循环。
- 将
struct pipe_inode_info实例的head字段值增加 1。并释放自旋锁。 - 设置当前缓冲区的字段。
- 如果创建 pipe 时指定了
O_DIRECT选项,则将缓冲区的flags字段设置为PIPE_BUF_FLAG_PACKET,否则设置为PIPE_BUF_FLAG_CAN_MERGE。 - 将要写入的数据拷贝到当前的缓冲区中,并设置相应的偏移量字段。
splice 系统调用
splice() 系统调用避免在内核地址空间与用户地址空间的拷贝,从而快速地在两个文件描述符之间传递数据。函数原型为:
#define _GNU_SOURCE
#include <fcntl.h>

ssize_t splice(int fd_in, off64_t *off_in, int fd_out, off64_t *off_out, size_t len, unsigned int flags);
此次漏洞使用的情况是从文件向管道传递数据,因此 fd_in 指代一个普通文件,off_in 表示从指定的文件偏移处开始读取,fd_out 指代一个 pipe,len 表示要传输的数据长度,flags 表示标志位。详细情况可以参考手册。
看看 splice() 系统调用的主要流程。系统调用的定义在 fs/splice.c 文件中,主要工作由 __do_splice() 函数完成。
__do_splice() 在做完简单的参数检查之后,又调用 do_splice() 函数实现主要工作。
do_splice() 中,会根据两个文件描述符的类型进入不同的分支。当前情况下,fd_out 指代一个 pipe,因此会进入 if (opipe) 这个分支。主要工作通过 do_splice_to() 函数完成。
/*
 * Determine where to splice to/from.
 */
long do_splice(struct file *in, loff_t *off_in, struct file *out,
           loff_t *off_out, size_t len, unsigned int flags)
{
    struct pipe_inode_info *ipipe;
    struct pipe_inode_info *opipe;
    loff_t offset;
    long ret;

  // 判断两个文件描述符的打开模式是否符合条件
    if (unlikely(!(in->f_mode & FMODE_READ) ||
             !(out->f_mode & FMODE_WRITE)))
        return -EBADF;

    ipipe = get_pipe_info(in, true);
    opipe = get_pipe_info(out, true);

  // 当 in 和 out 都是 pipe 的情况
    if (ipipe && opipe) {
        if (off_in || off_out)
            return -ESPIPE;

        /* Splicing to self would be fun, but... */
        if (ipipe == opipe)
            return -EINVAL;

        if ((in->f_flags | out->f_flags) & O_NONBLOCK)
            flags |= SPLICE_F_NONBLOCK;

        return splice_pipe_to_pipe(ipipe, opipe, len, flags);
    }

  // 当 in 是 pipe 的情况
    if (ipipe) {
      ......
    }

  // 当 out 是 pipe 的情况
    if (opipe) {
    // 不能为 pipe 设置偏移量
        if (off_out)
            return -ESPIPE;
        if (off_in) {
            if (!(in->f_mode & FMODE_PREAD))
                return -EINVAL;
            offset = *off_in;
        } else {
            offset = in->f_pos;
        }

        if (out->f_flags & O_NONBLOCK)
            flags |= SPLICE_F_NONBLOCK;

    // 获取 pipe 的锁
        pipe_lock(opipe);
    // 等待 pipe 有可使用的缓冲区
        ret = wait_for_space(opipe, flags);
        if (!ret) {
            unsigned int p_space;

      // 计算能够读取的文件长度,不应该超过 pipe 剩余的缓冲区大小
            /* Don't try to read more the pipe has space for. */
            p_space = opipe->max_usage - pipe_occupancy(opipe->head, opipe->tail);
            len = min_t(size_t, len, p_space << PAGE_SHIFT);

      // 调用 do_splice_to() 实现主要工作
            ret = do_splice_to(in, &offset, opipe, len, flags);
        }
    // 释放 pipe 的锁
        pipe_unlock(opipe);
        if (ret > 0)
      // 唤醒 pipe 的读者等待队列中的进程
            wakeup_pipe_readers(opipe);
        if (!off_in)
            in->f_pos = offset;
        else
            *off_in = offset;

        return ret;
    }

    return -EINVAL;
}
do_splice_to()
在 do_splice_to() 中,主要功能是通过输入文件的 splice_read() 方法实现的。这里以 ext4 文件系统为例,在 fs/ext4/file.c 文件中查看 ext4_file_operations 变量可知,ext4 文件系统中,splice_read 使用的是定义在 fs/splice.c 中的 generic_file_splice_read() 方法。接着通过调试可知接下来的函数调用链:
generic_file_splice_read() -> call_read_iter() -> generic_file_buffered_read() -> copy_page_to_iter() -> copy_page_to_iter_pipe()
call_read_iter() 是一个定义在 include/linux/fs.h 中的内联函数,实际调用的是输入文件的 read_iter() 方法。而 ext4 文件系统的 read_iter() 方法是 ext4_file_read_iter()。在当前情况下,会调用 generic_file_rad_iter(),其接着调用 generic_file_buffered_read()。
copy_page_to_iter_pipe()
generic_file_buffered_read() 是通用的文件读取例程,将文件读取到 page cache 后会通过 copy_page_to_iter() 函数将文件对应的 page cache 与 pipe 的缓冲区关联起来。实际的关联操作通过定义在 /lib/iov_iter.c 中的 copy_page_to_iter_pipe() 实现:
/*
 * page 是文件对应的内存页帧,pipe 实例被包裹在 struct iov_iter 实例中
*/
static size_t copy_page_to_iter_pipe(struct page *page, size_t offset, size_t bytes,
             struct iov_iter *i)
{
    struct pipe_inode_info *pipe = i->pipe;
    struct pipe_buffer *buf;
    unsigned int p_tail = pipe->tail;
    unsigned int p_mask = pipe->ring_size - 1;
    unsigned int i_head = i->head;
    size_t off;

    if (unlikely(bytes > i->count))
        bytes = i->count;

    if (unlikely(!bytes))
        return 0;

    if (!sanity(i))
        return 0;

    off = i->iov_offset;
    buf = &pipe->bufs[i_head & p_mask];
    if (off) {
        if (offset == off && buf->page == page) {
            /* merge with the last one */
            buf->len += bytes;
            i->iov_offset += bytes;
            goto out;
        }
        i_head++;
        buf = &pipe->bufs[i_head & p_mask];
    }
    if (pipe_full(i_head, p_tail, pipe->max_usage))
        return 0;

    buf->ops = &page_cache_pipe_buf_ops;
  // 增加 page 实例的引用计数
    get_page(page);
  // 将 pipe 缓冲区的 page 指针指向文件的 page
    buf->page = page;
    buf->offset = offset;
    buf->len = bytes;

    pipe->head = i_head + 1;
    i->iov_offset = offset + bytes;
    i->head = i_head;
out:
    i->count -= bytes;
    return bytes;
}
漏洞复现
分析
如果了解了向 pipe 写入数据的过程,以及 splice() 系统调用从文件向 pipe 传输数据的过程,就不难理解漏洞的形成原因了。对照漏洞发现者提供的 PoC 来解释漏洞形成原因:
- 首先创建一个 pipe。接着每次向 pipe 中写入一个页帧大小的数据。从
pipe_write()可知,每次写入都不会进入if (chars && !was_empty)这个分支,因为写入数据的大小为页帧大小的整数倍时,chars的值总为零。创建 pipe 的时候没有指定O_DIRECT标志,因此在 for 循环中会将每个pipe_buffer的标志位设置为PIPE_BUF_FLAG_CAN_MERGE。 - 接下来打开要覆写的文件,并通过
splice()系统调用向 pipe 中写入一个字节。根据splice()的实现,将文件从硬盘读取到 page cache 后,会把文件对应的 page 与pipe_buffer的page字段关联起来,并且不会重置pipe_buffer的flags字段。也就是说,此时flags字段的值仍为PIPE_BUF_FLAG_CAN_MERGE。 - 最后向 pipe 中写入小于一个页帧大小的数据。进入
pipe_write()之后,会进入if (chars && !was_empty)分支。由于在copy_page_to_iter_pipe()中,将文件的 page 与pipe_buffer的page字段关联之后,将pipe_inode_info实例的head值增加了 1,因此为了将小于一个页帧的数据写入到前一个pipe_buffer中, if 分支里获取pipe_buffer的时候将head值减 1,从而此时pipe_buffer的 page 指向的是文件的 page。
调试验证
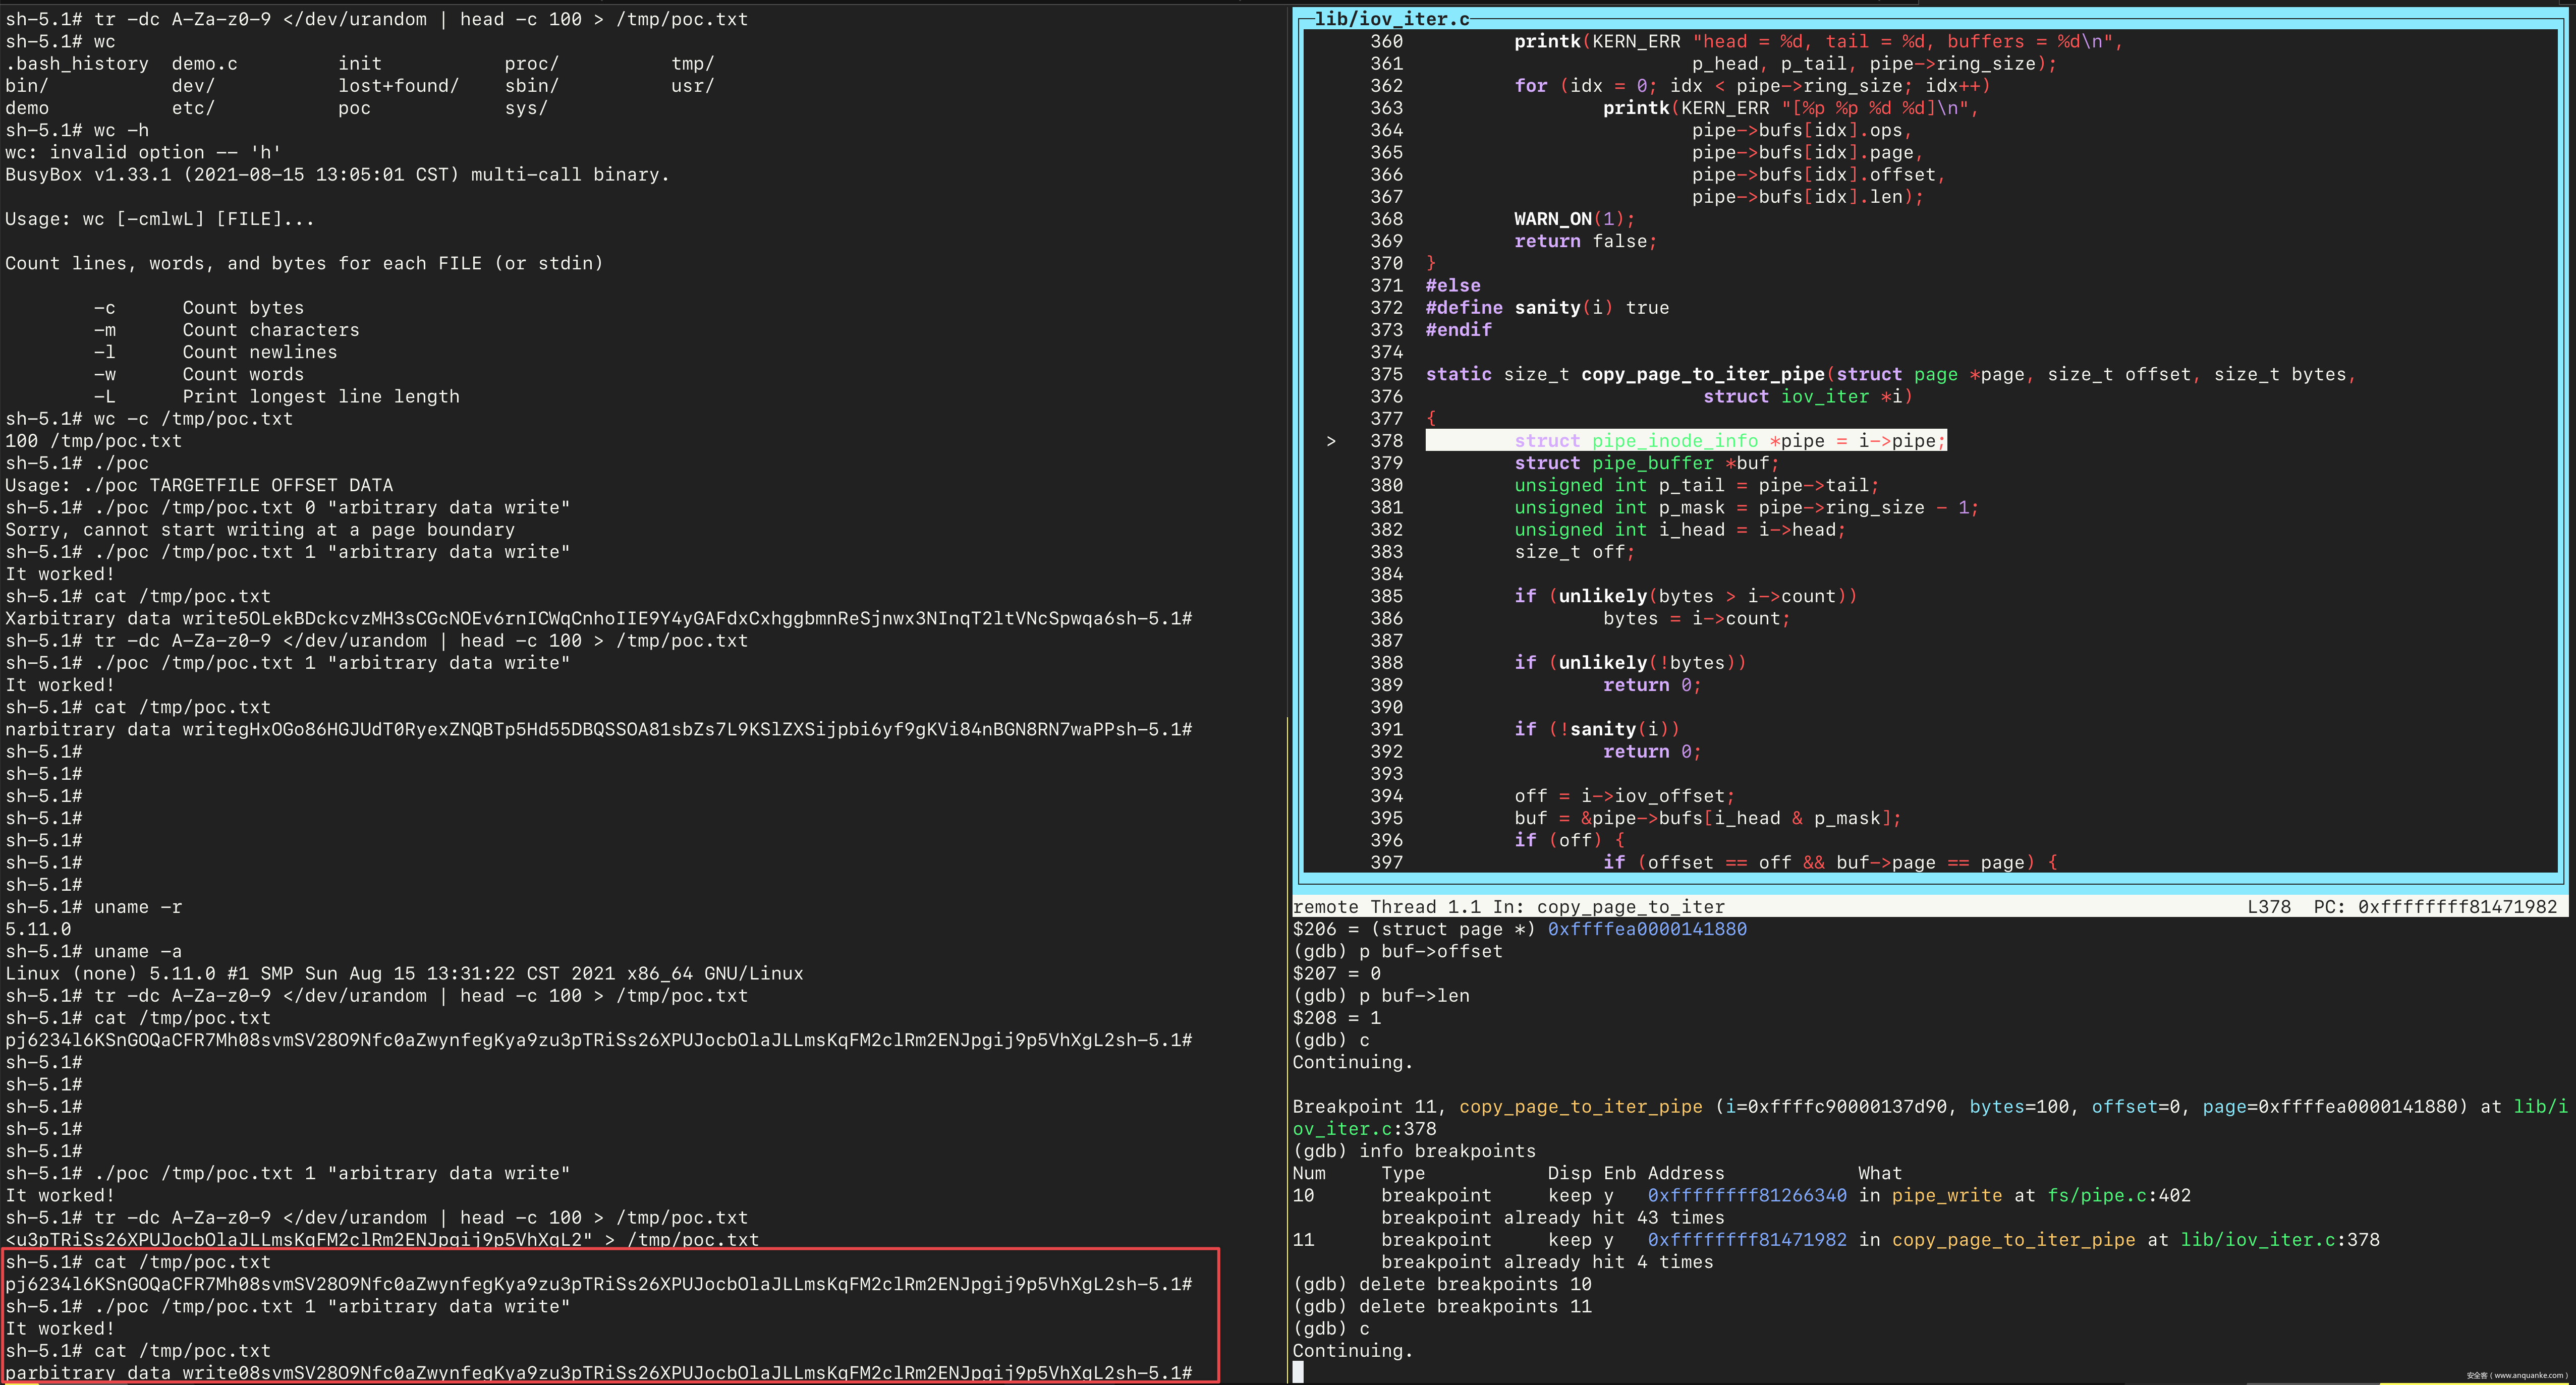
首先创建一个要覆写的文件并用随机字符串填充:
然后在 GDB 中分别在 pipe_write 和 copy_page_to_iter_pipe 两个函数设置断点:
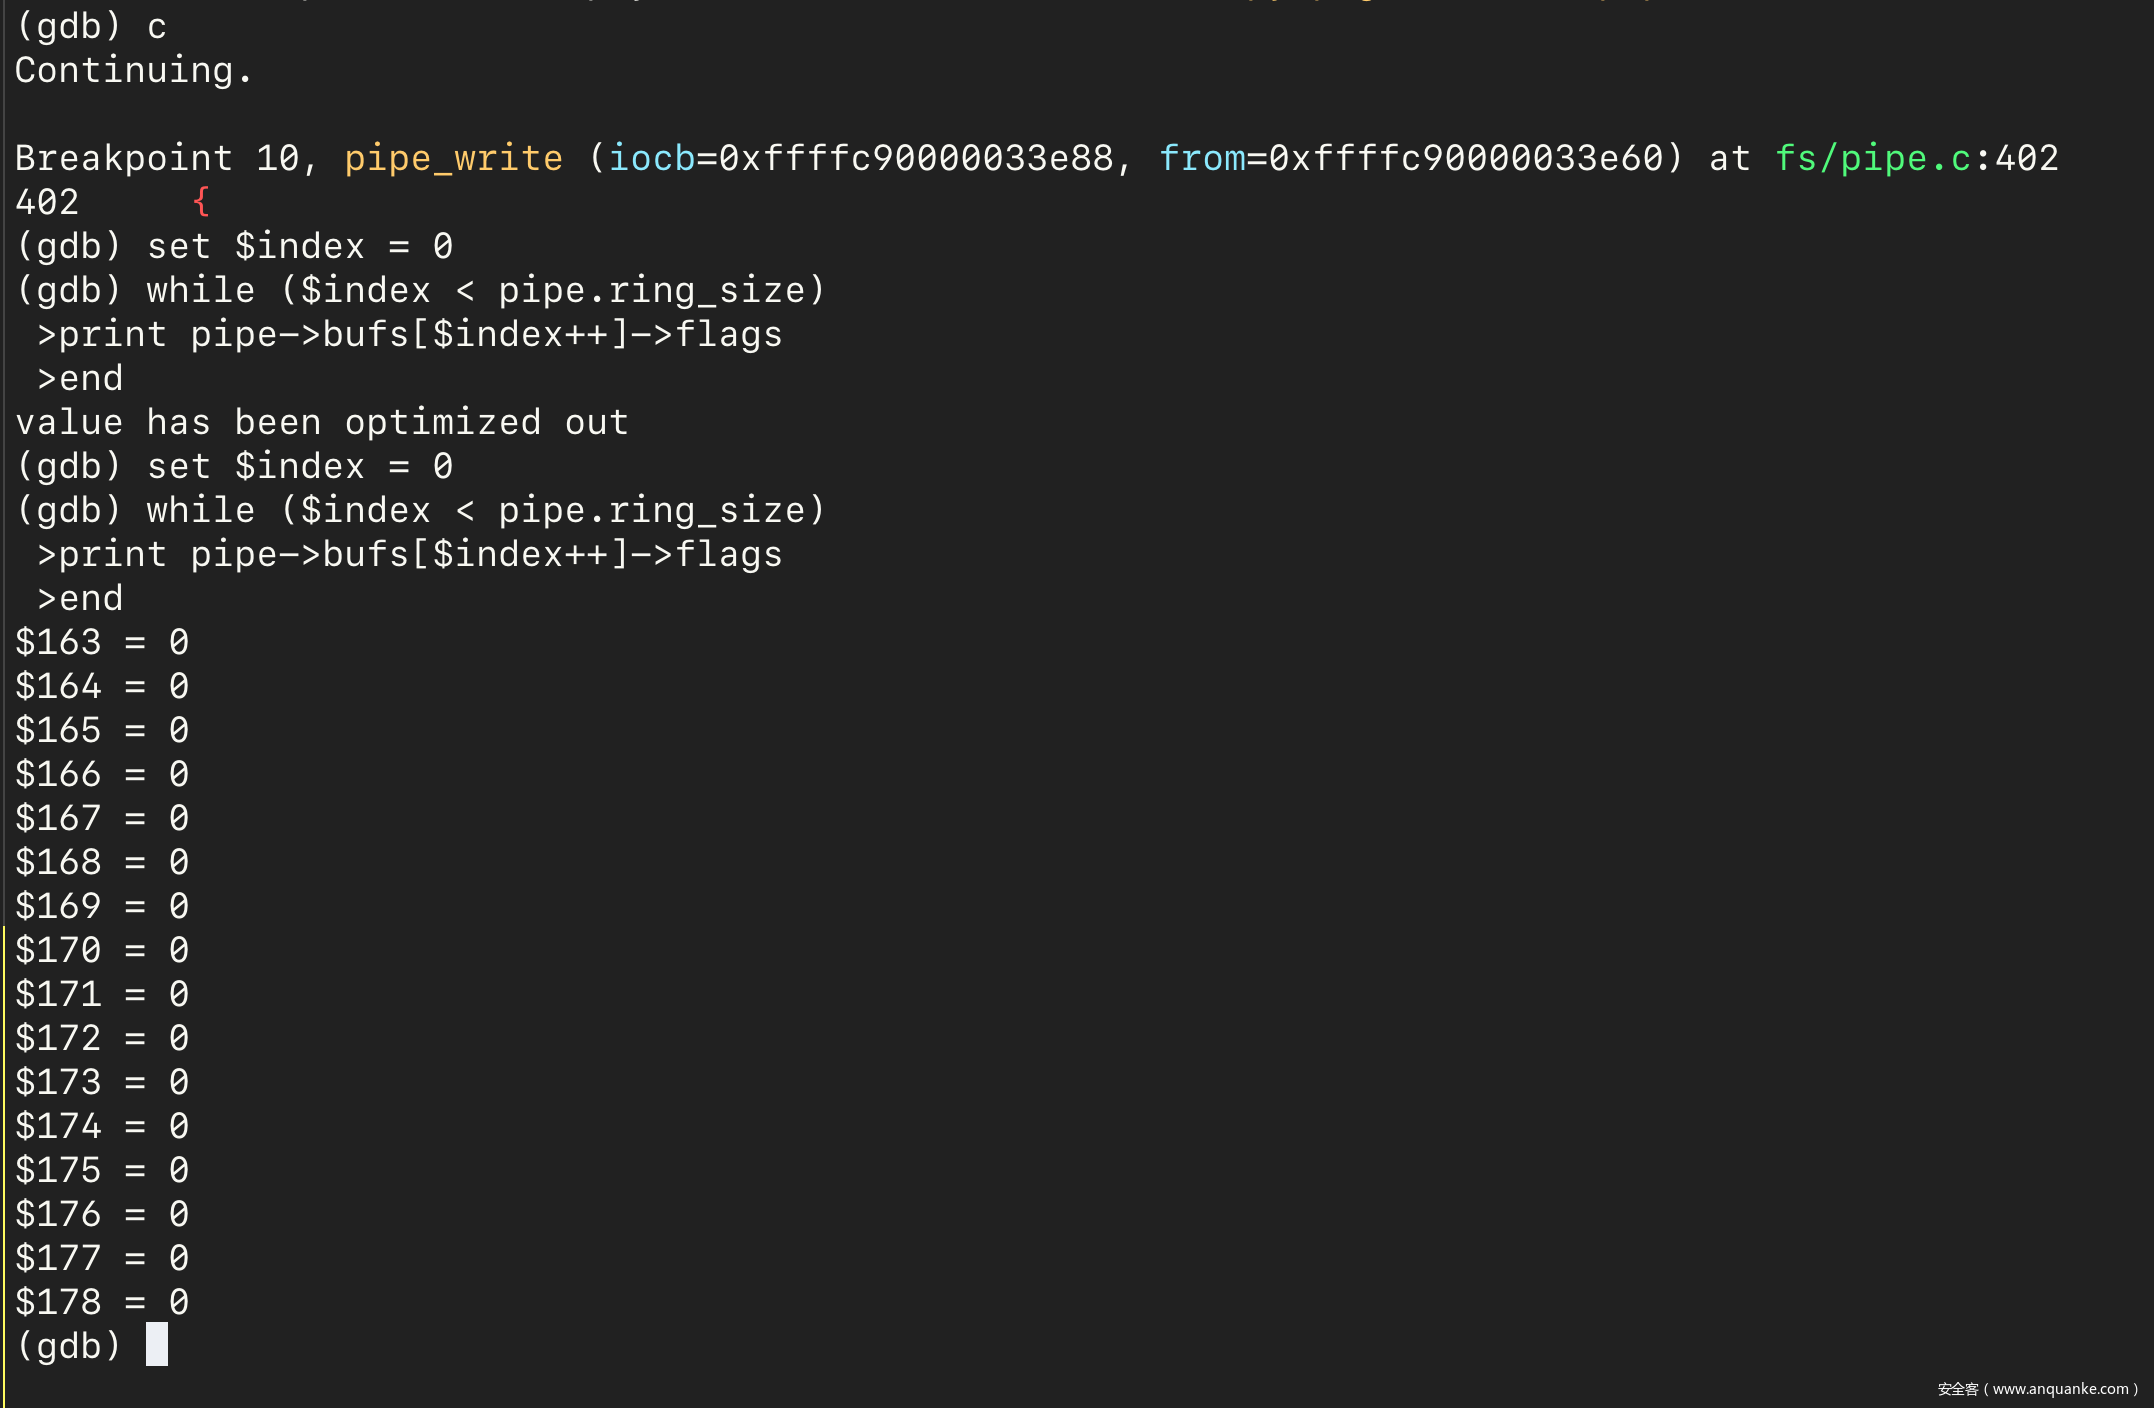
然后在 GDB 中使用 continue 命令让虚拟机继续运行,并执行 PoC 程序。然后会在 pipe_write 处停止。使用下面的 GDB 脚本可以看到,pipe 的所有 pipe_buffer 中的标志位都为零:
set $index = 0
while ($index < pipe->ring_size)
  print pipe->bufs[$index++]->flags
end
然后接着执行 15 次 continue 命令,在第 16 次向 pipe 中写入数据之前停止。再次查看所有 pipe_buffer 的标志位,发现都被置为了 PIPE_BUF_FLAG_CAN_MERGE:
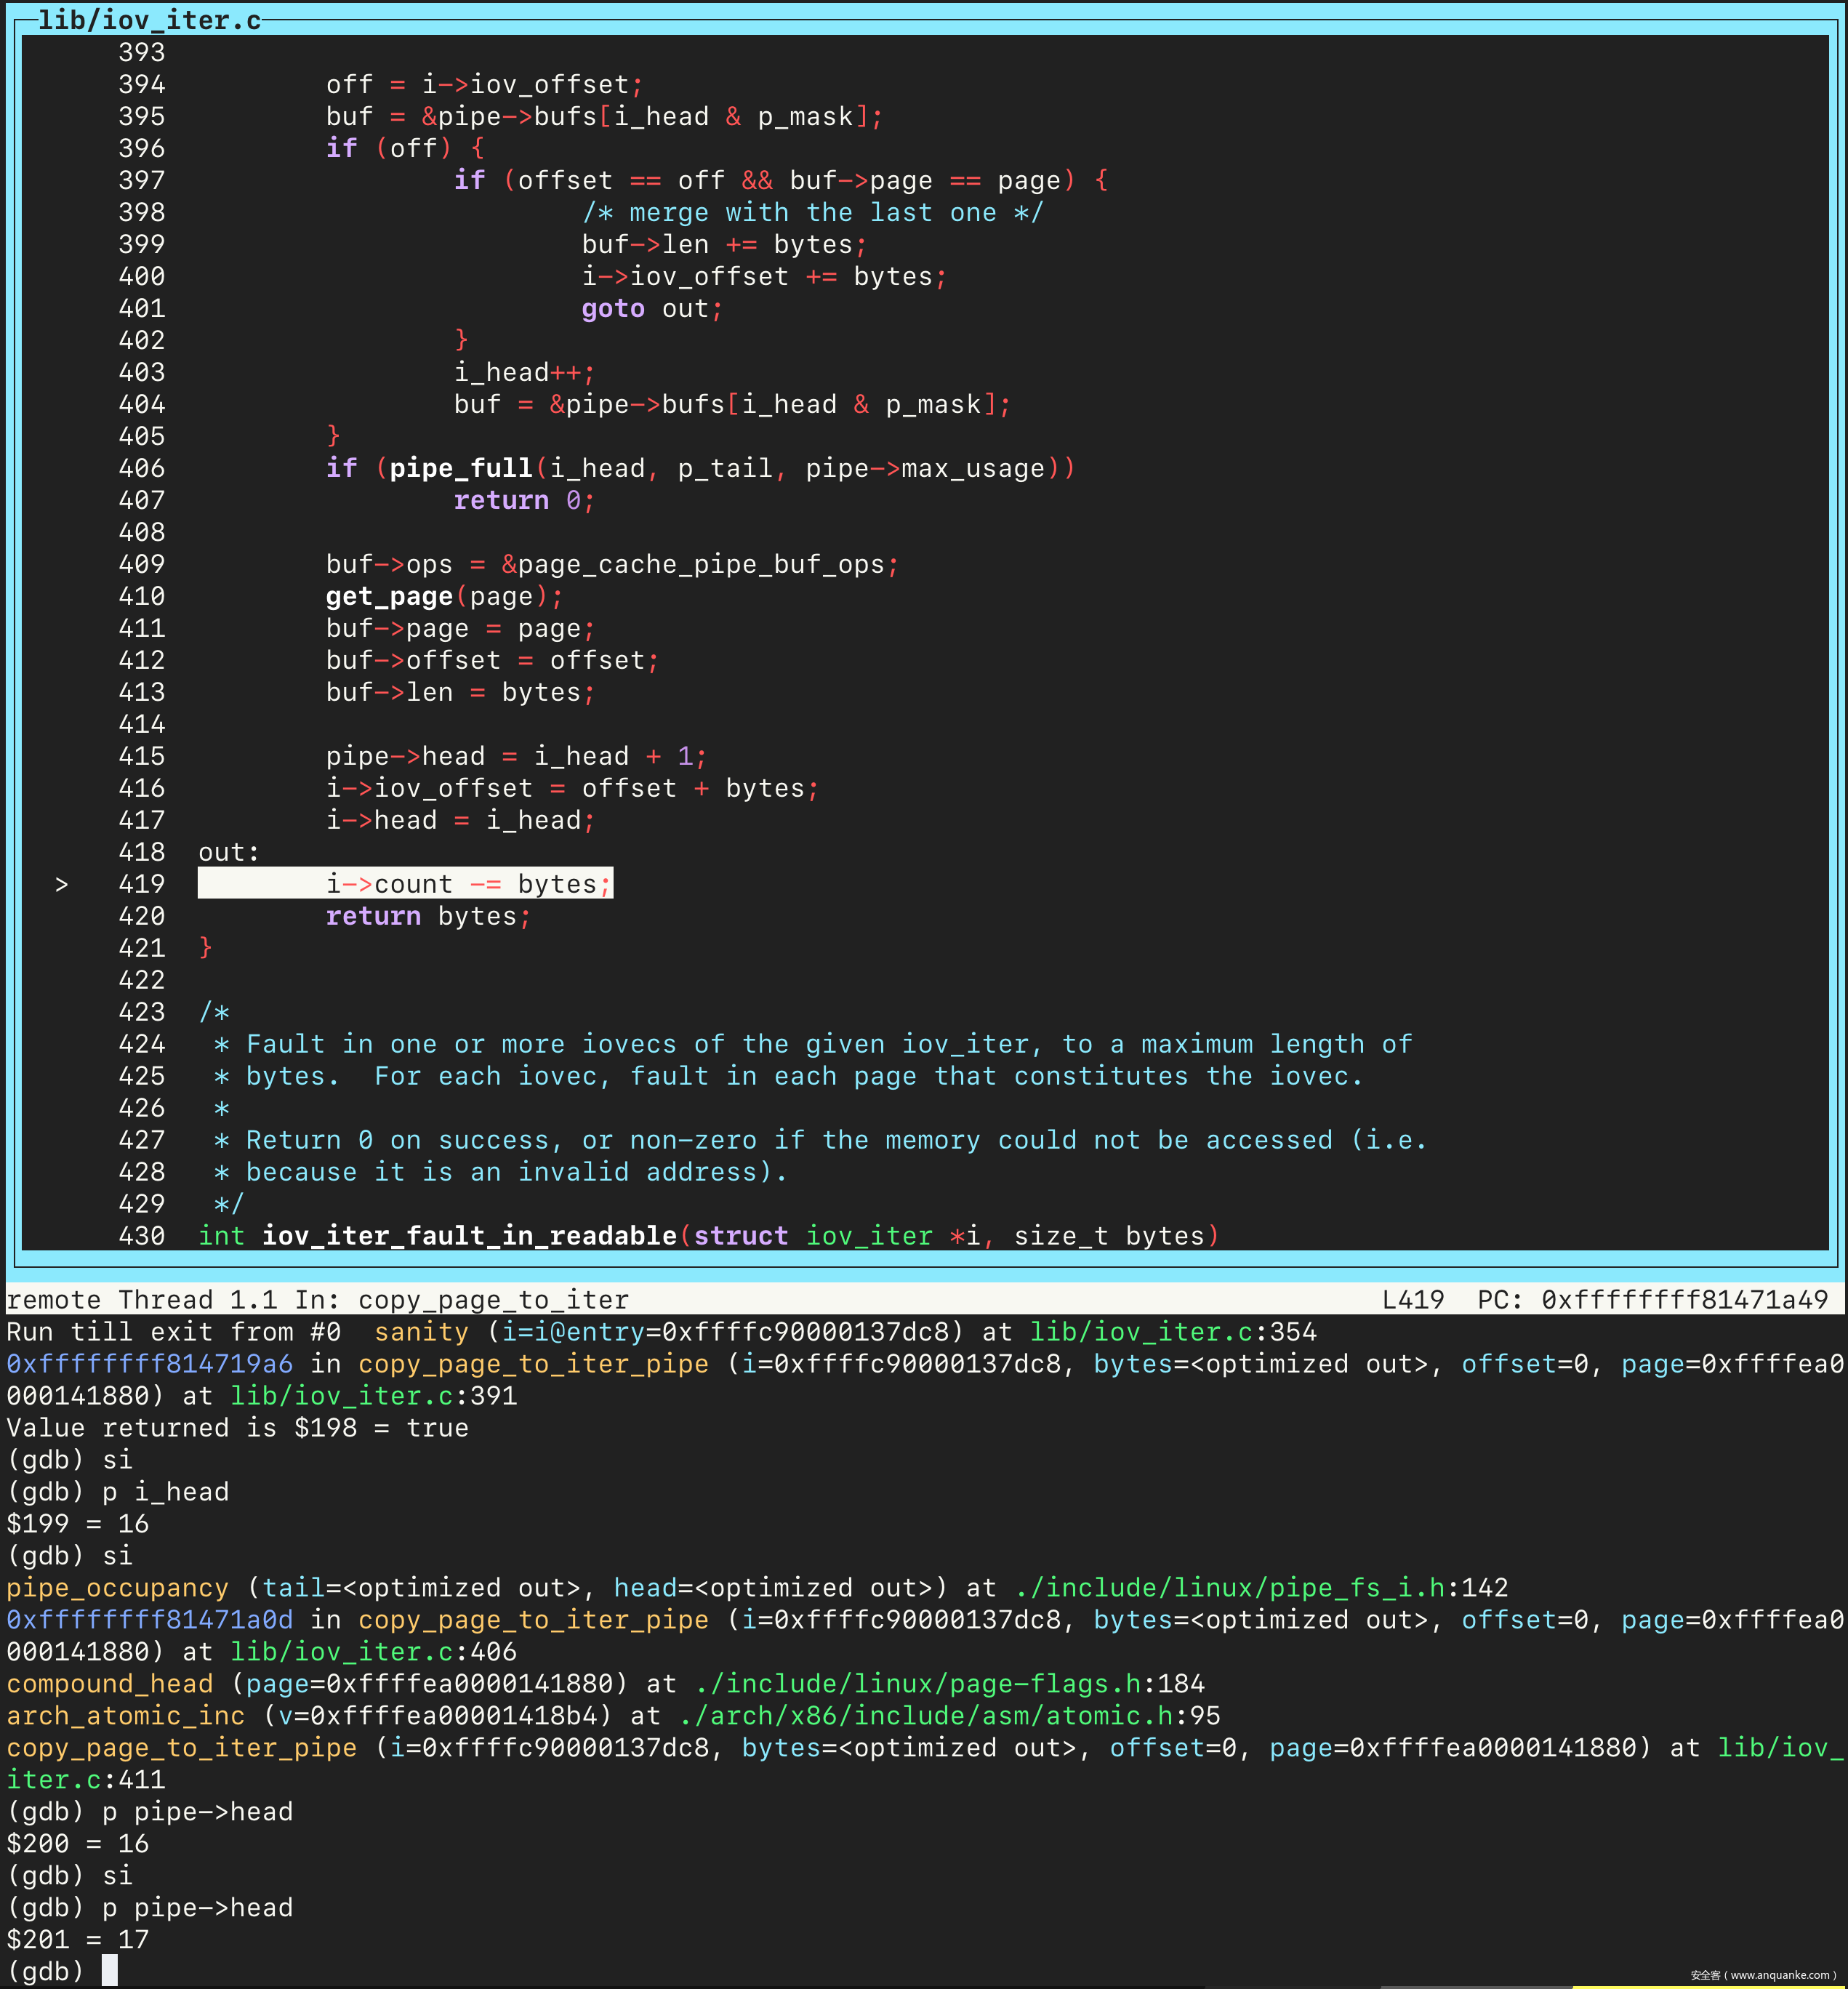
当最后一次 pipe_write 执行完后,pipe->head 的值为 16。
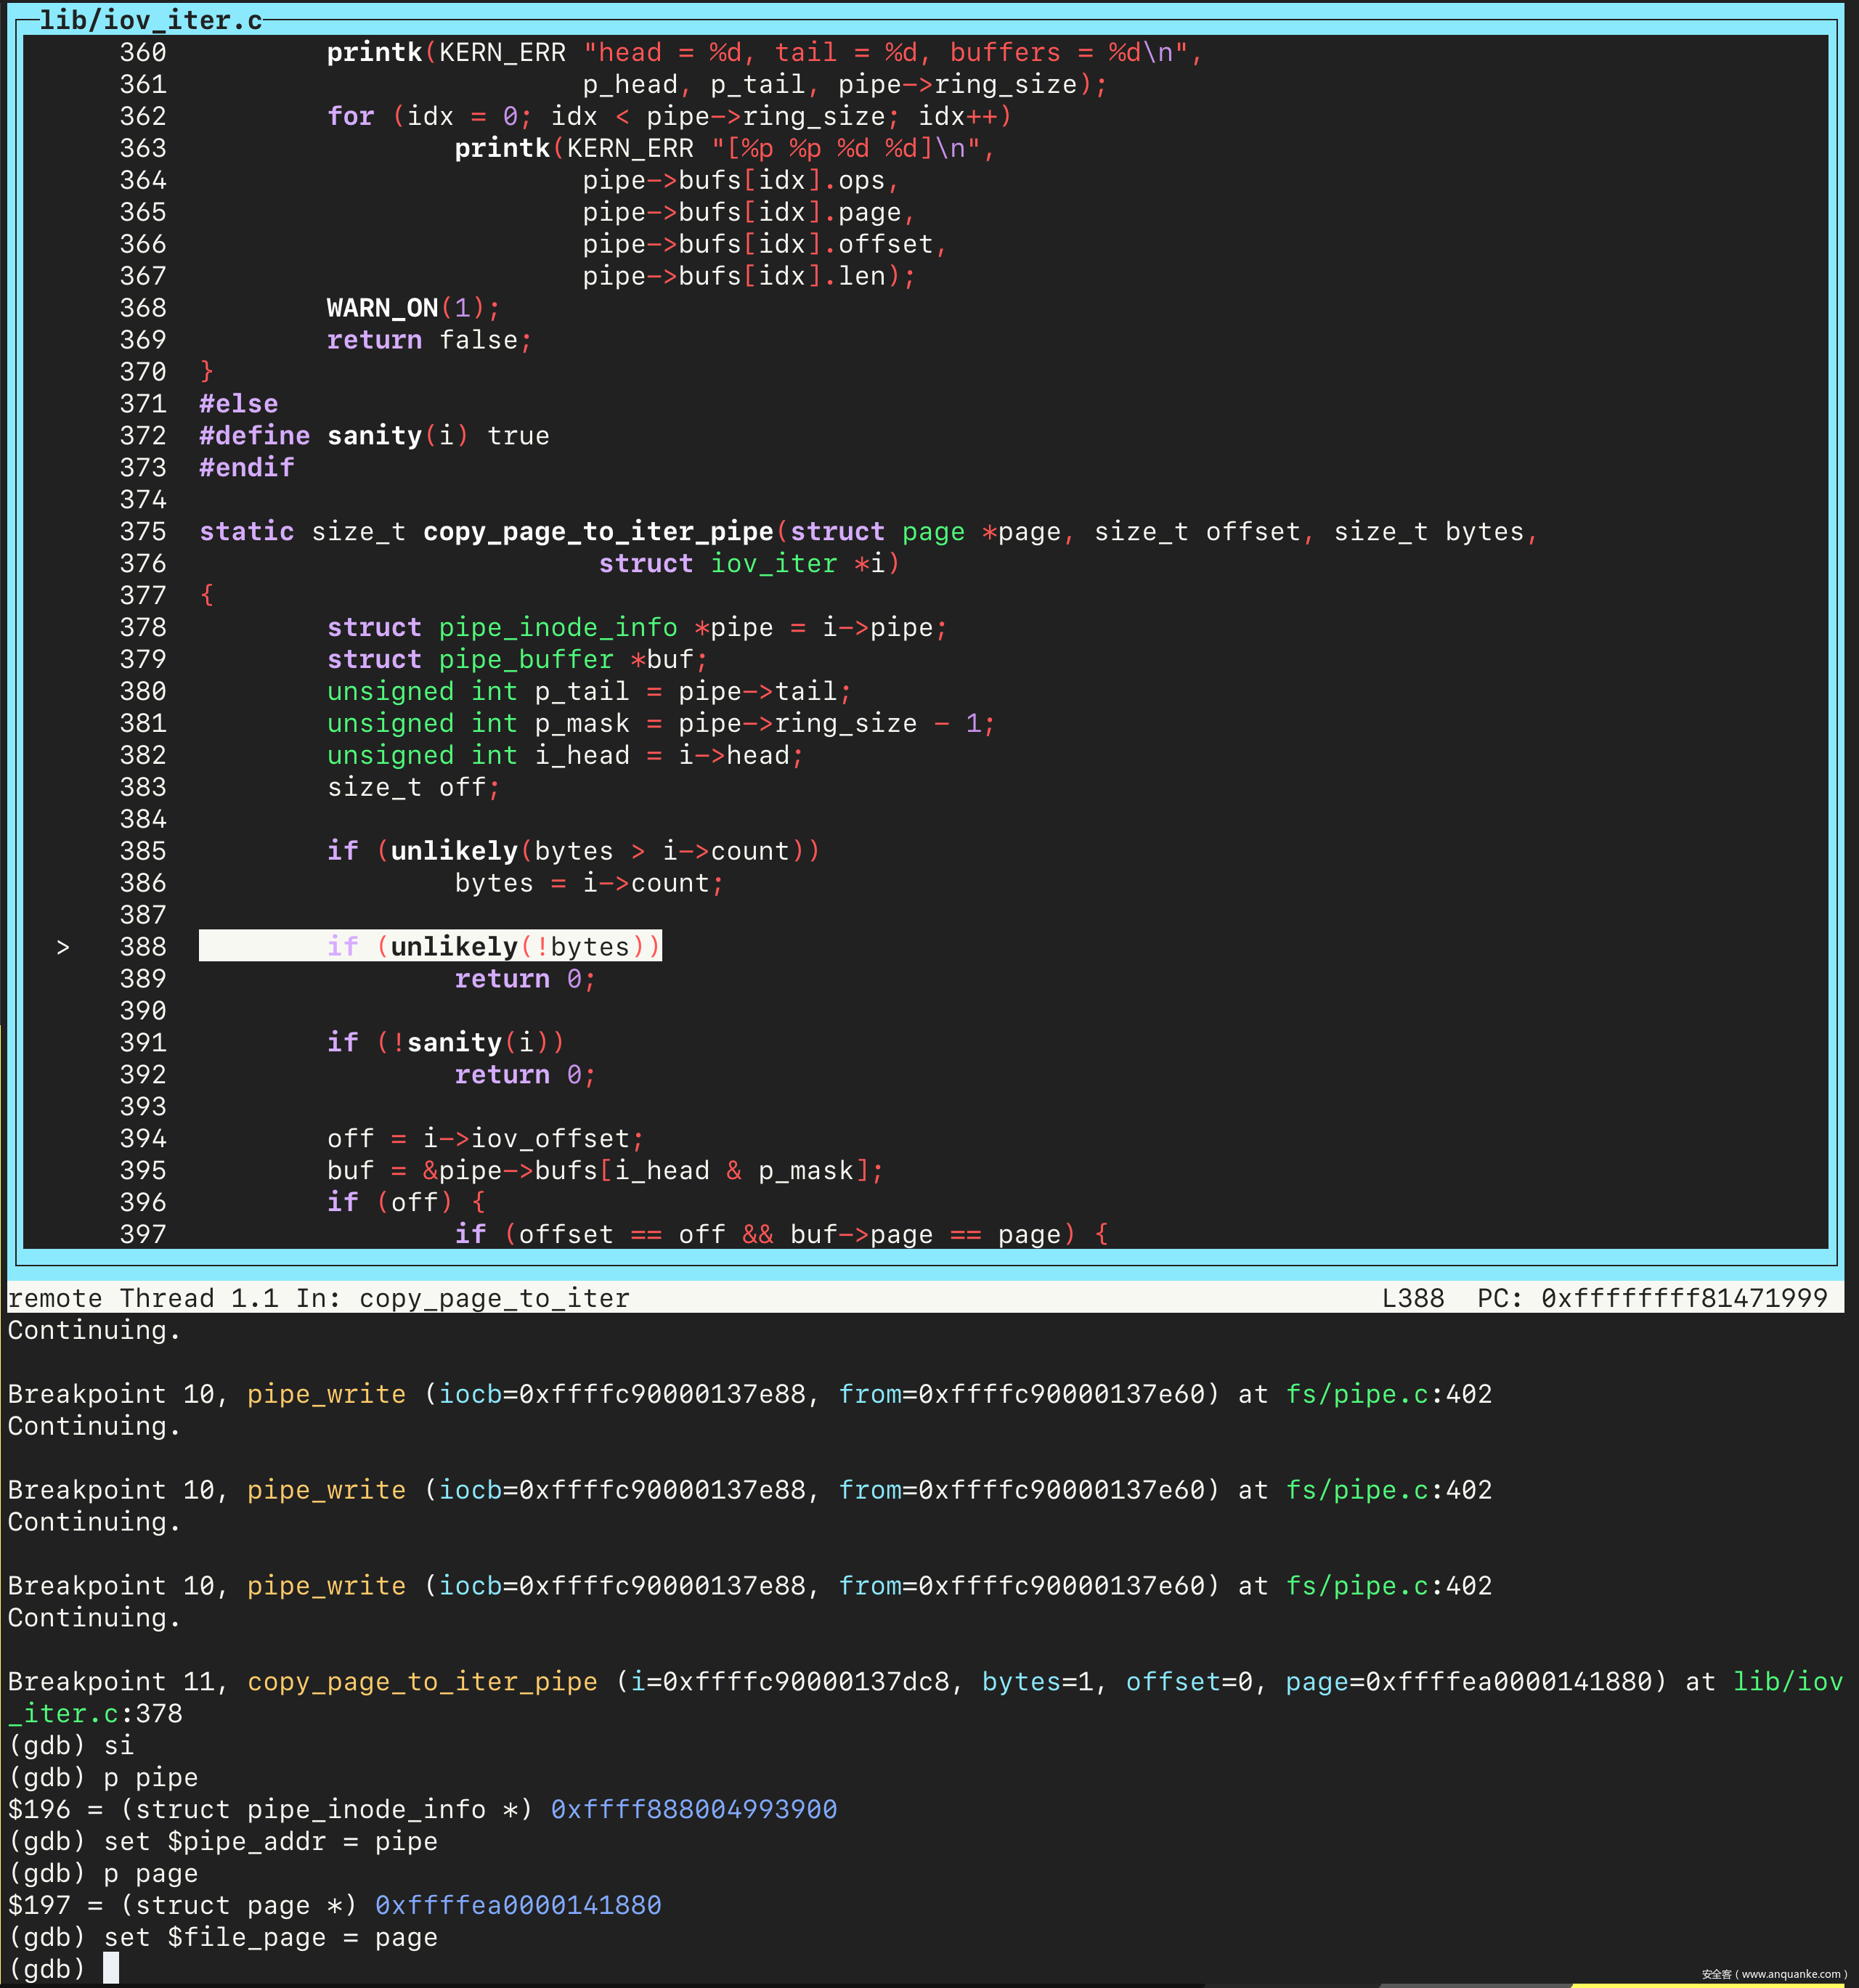
接着执行 continue 命令,会在 copy_page_to_iter_pipe 处停下来。单步进入几步之后,先把 pipe 变量和文件对应的 page 实例的地址保存到变量中。
因为当前 pipe->head 的值是 16,而 pipe->ring_size 的值时默认的 16,因此第 395 行代码中取到的是第一个 pipe_buffer。
接下来将文件的 page 与 pipe_buffer 的 page 字段关联起来,并将 pipe 的 head 字段加一,即此时为 17。
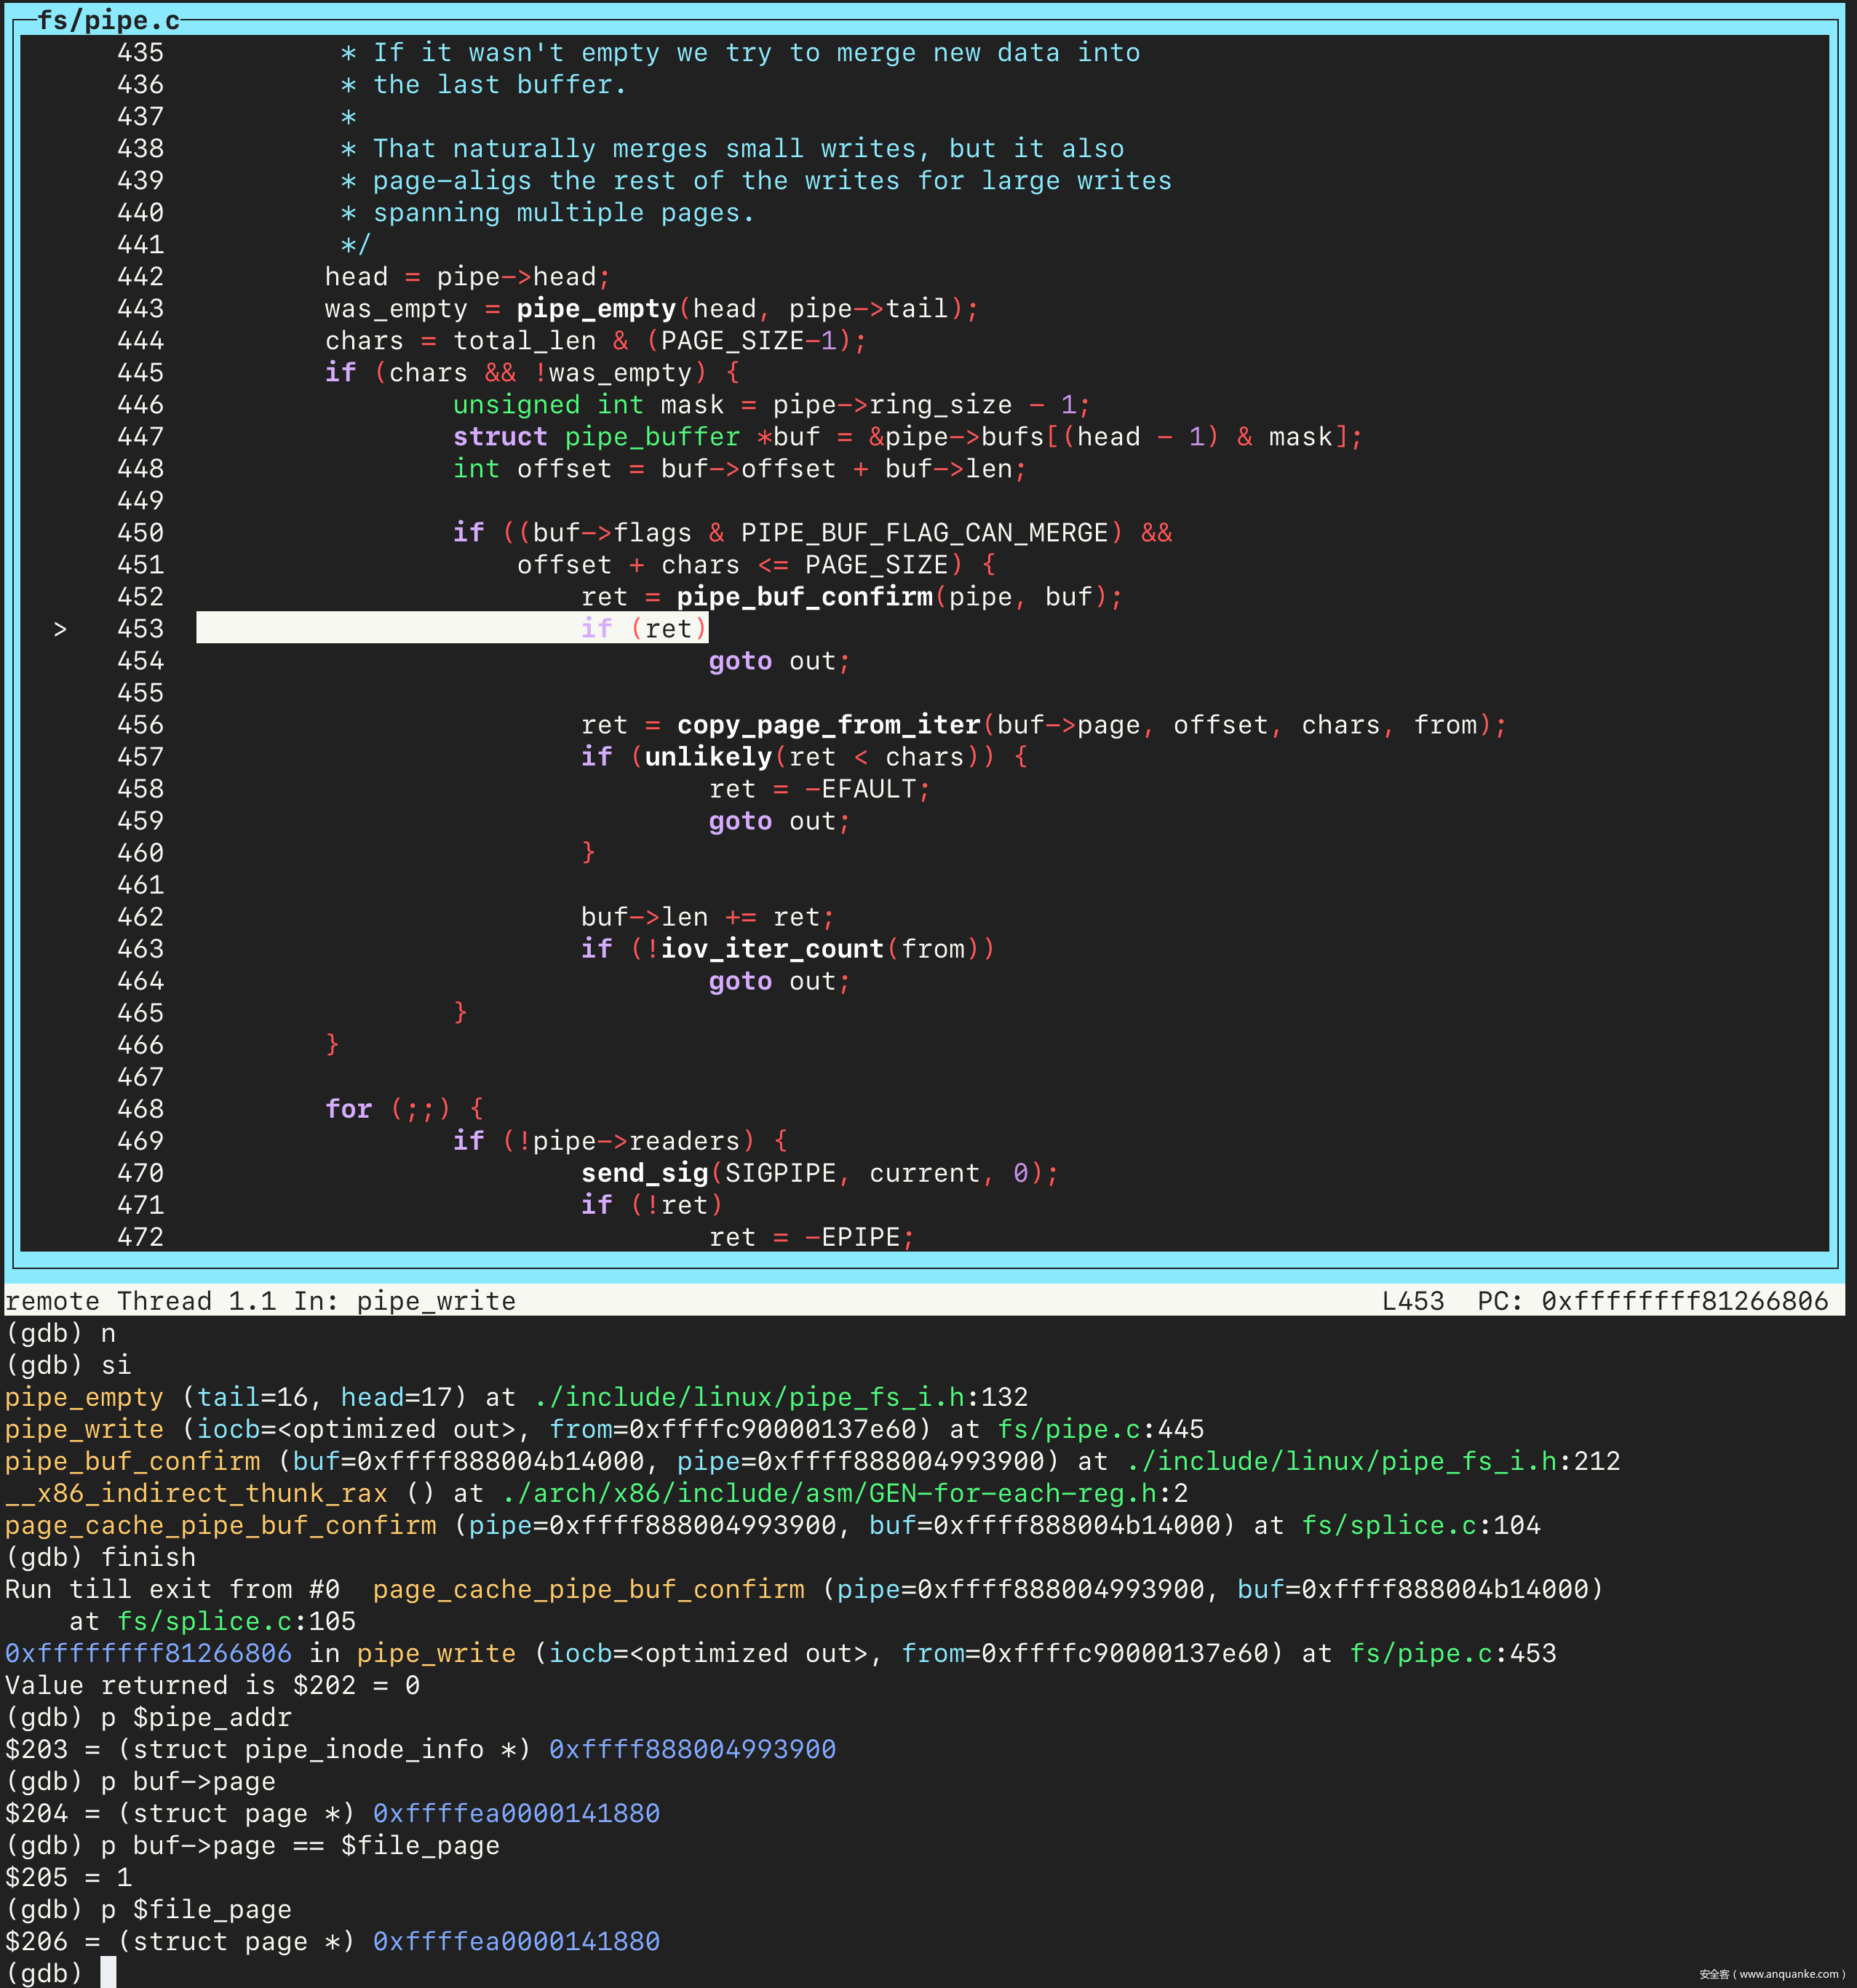
接着 continue,会停在 pipe_write 处。接着单步执行,会进入触发漏洞的 if 分支。然后查看 buf->page 的值,和之前保存的文件的 page 的地址相同。继续之后,文件覆写成功:
低权限用户篡改没有写权限文件的验证
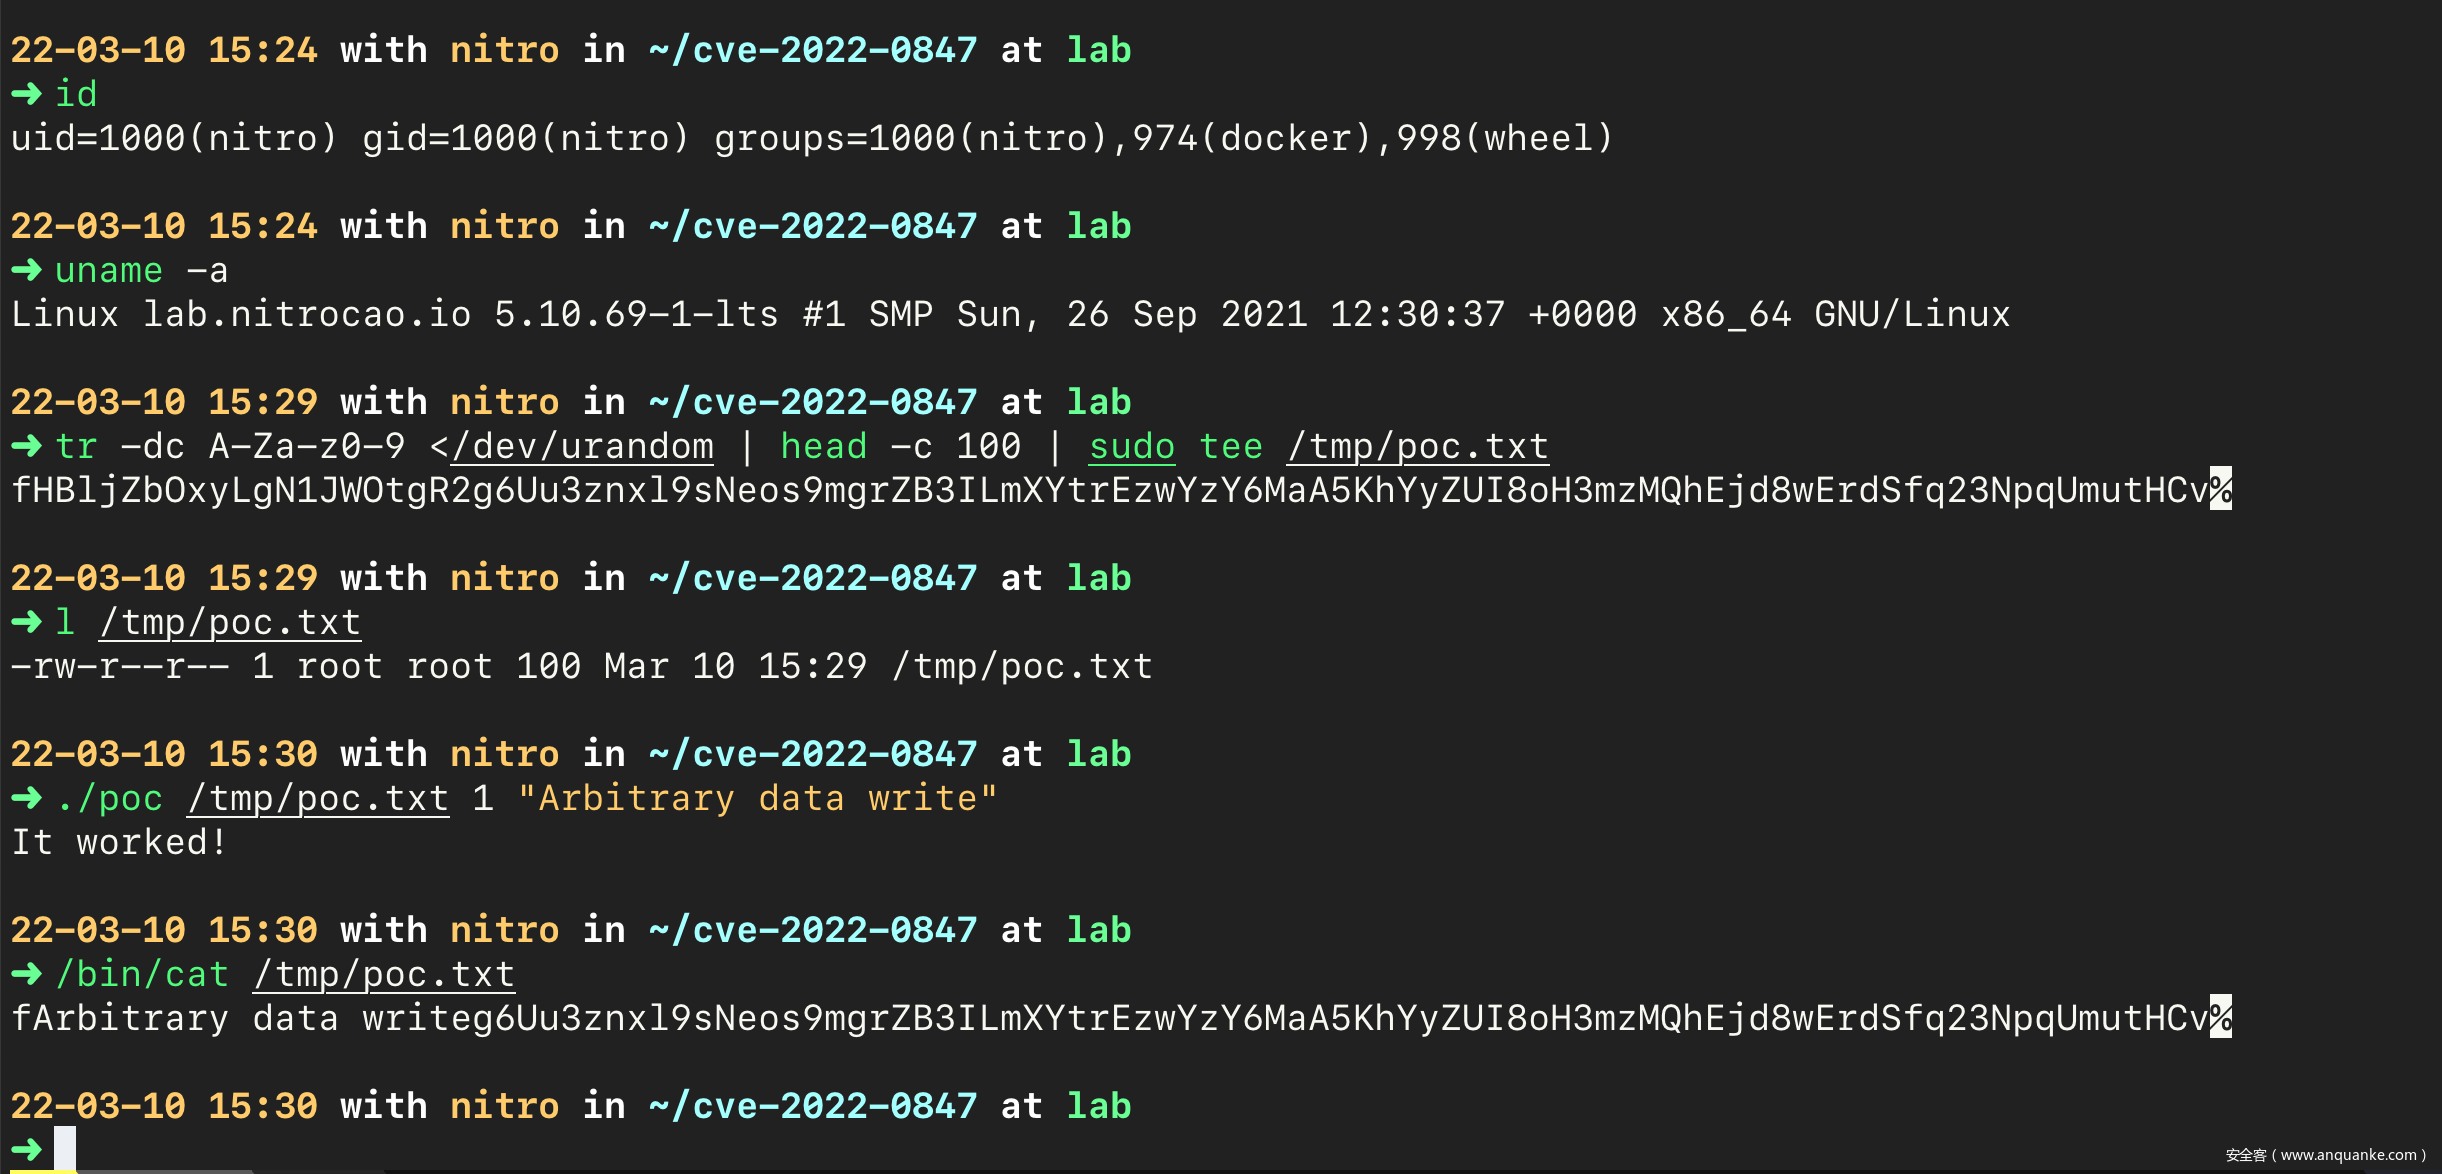
在上面的验证过程中,由于使用的是最简单的内核以及 busybox,因此使用 root 用户。为了验证低权限用户可以成功篡改没有写权限的文件,在此使用 ArchLinux 发行版,以 5.10.69-1-lts 内核版本作验证:
结论
经复现过程可知,漏洞利用方式相对简单,建议受影响的机器立即升级到官方最新版本。
参考资料
^1: https://dirtypipe.cm4all.com/
^2: https://access.redhat.com/security/cve/cve-2022-0847
^3: https://access.redhat.com/security/vulnerabilities/RHSB-2022-002
^4: https://security-tracker.debian.org/tracker/CVE-2022-0847
^5: https://man7.org/linux/man-pages/man2/splice.2.html
^6: https://man7.org/linux/man-pages/man2/pipe.2.html
^7: https://lwn.net/Articles/118750/
^8: https://www.slideshare.net/divyekapoor/linux-kernel-implementation-of-pipes-and-fifos
^9: https://book.douban.com/subject/4843567//

